How to Remove Rust from Cast Iron Cookware with Electrolysis
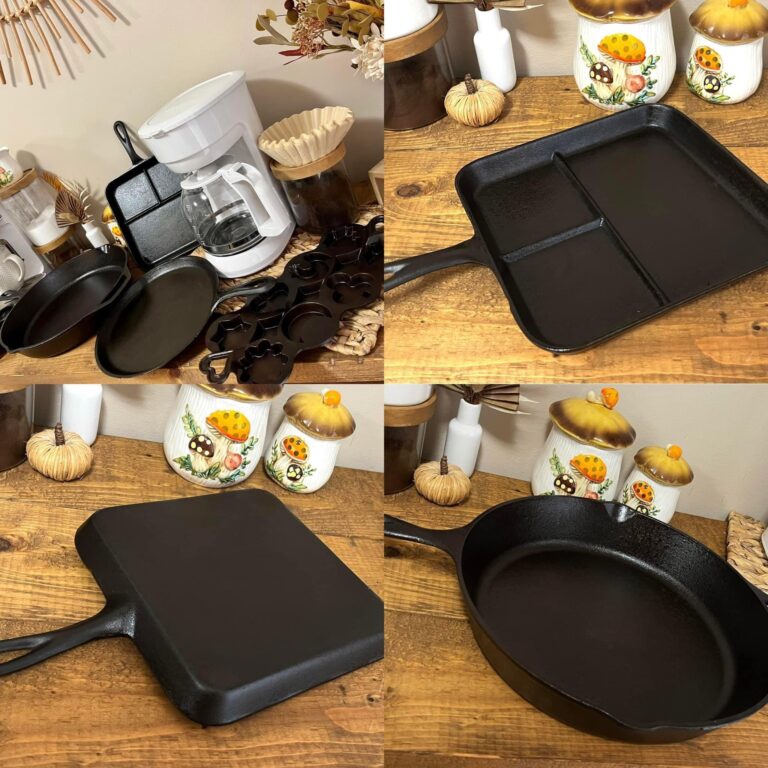
If you love cast iron cookware but hate rust, you’re in the right place. I recently took a rusty 9¾-inch unmarked Wagner cast iron skillet from yucky to shiny using a DIY electrolysis setup in my garage. Let me tell you, this method beats wire brushing by a mile! In this post, I’ll walk you through how to remove rust from cast iron using electrolysis – a little science experiment that saves a lot of elbow grease. It’s a friendly, down-home guide from one cast iron collector to another, with step-by-step instructions and photos of the process.
Why Use Electrolysis for Cast Iron Restoration?
Restoring cast iron cookware with electrolysis is one of the best ways to clean a rusty cast iron skillet without damaging the metal. Other methods like vinegar soaks or harsh chemicals can eat away at good iron if you’re not careful, and vigorous wire brushing can scratch up a pan’s surface. Electrolysis rust removal is different – it only targets the rust (iron oxide), leaving the healthy metal intact. It’s a gentle but thorough cast iron restoration method that preserves even the smallest manufacturer markings or smooth finish on your vintage pieces. Plus, it’s almost like magic watching the rust bubble away while you kick back with a cup of coffee. For a cast iron enthusiast, it’s downright satisfying and DIY-friendly.
When you set up an electrolysis rust removal setup, you’re essentially using a low-voltage electric current and a conductive solution to convert that flaky red rust into a harmless black sediment that wipes right off. No strenuous scrubbing, no grinding – the electricity and solution do the work. In other words, this method lets you clean cast iron cookware with minimal labor, and that is why many collectors (myself included) swear by electrolysis for rusty finds.
Materials and Equipment You’ll Need
Before we get into the nitty-gritty, let’s gather the tools and materials for this DIY rust remover for cast iron. You might already have some of these lying around:
-
Plastic tub or bucket (5-gallon) – This will be your electrolysis tank. Make sure it’s a sturdy non-conductive container (plastic is perfect). Using a metal container is a no-no since it could short out your setup or become an unintended anode. I used a standard 5-gallon bucket.
-
Sacrificial metal (anodes) – You’ll need some pieces of iron or steel that will sacrifice themselves and collect the rust. Common choices are rebar, steel plates, or bars. Avoid stainless steel for the anodes, as it can produce toxic byproducts in the solutioninstructables.com. I opted for four pieces of construction rebar. They’re cheap, sturdy, and perfect for anodes.
-
DC power supply or manual battery charger – This is the heart of the setup. You can use an old-school manual battery charger (around 6-12 volts, 2-10 amps output) or an adjustable DC bench power supply like the one I used (the kind with dials and a digital display). The power supply as pictured in my setup lets you dial in voltage/amperage and monitor the process. Whichever you use, it must output DC current. (Tip: If you only have a modern “smart” charger, it might not work for this, since those often shut off without a proper load. A manual charger or DC bench supply is best.)
-
Alligator clips and wiring – A few insulated wires with alligator clip clamps on the ends are ideal for connecting your cast iron piece and the anodes to the power supply. You want a good, solid connection – rust and electricity don’t mix well, so sometimes you might need to scrape a bare metal spot to clip onto.
-
Arm & Hammer Super Washing Soda (sodium carbonate) – This common laundry additive will be our electrolyte. It’s often sold in a yellow box. Note: This is washing soda, not baking soda and not Borax. Washing soda (sodium carbonate) makes the water conductive and is preferred for electrolysiscastironcollector.com. A one-pound box will last through many rust removal sessions.
-
Water – Plain water (I used warm water to help dissolve the washing soda). You’ll fill your bucket enough to submerge the rusty item completely.
-
Rusty cast iron cookware – The star of the show! In my case, it’s a 9-3/4 inch unmarked Wagner cast iron skillet that was totally encrusted with rust. You can use this method on anything from pans to grates, as long as it’s bare cast iron (no enamel or seasoning).
-
Suspension rod or hook – You need a way to suspend/hang the cast iron piece in the solution so it doesn’t touch the anodes or the bottom of the bucket. A wooden dowel or metal rod across the top of the bucket works great. I used a metal rod through the skillet’s handle eye to hang it. (If you use a metal hanger, ensure it’s connected to the negative lead along with the piece, and not touching the anodes.)
-
Scrubbing tools – After electrolysis, you’ll want a stiff brush, steel wool, or Scotch-Brite pad to quickly scrub off the loosened rust/black residue. Also have an old rag or sponge for wiping gunk off.
-
Gloves and eye protection – It’s wise to wear rubber gloves and safety glasses. The washing soda solution is mildly caustic, and the rust sludge is messy (and who knows what was on that old pan). Protect your skin and eyes, especially when you’re checking progress or cleaning up.
-
Ventilation – Not a physical item, but an important condition: do this in a well-ventilated area (like an open garage or outdoors). Electrolysis will produce some hydrogen gas, and while it’s usually a small amount, you don’t want it accumulating (more on safety at the end).
Alright, got everything? Let’s head to the garage and set this up!
Step 1: Set Up the Electrolysis Tank (Bucket & Anodes)
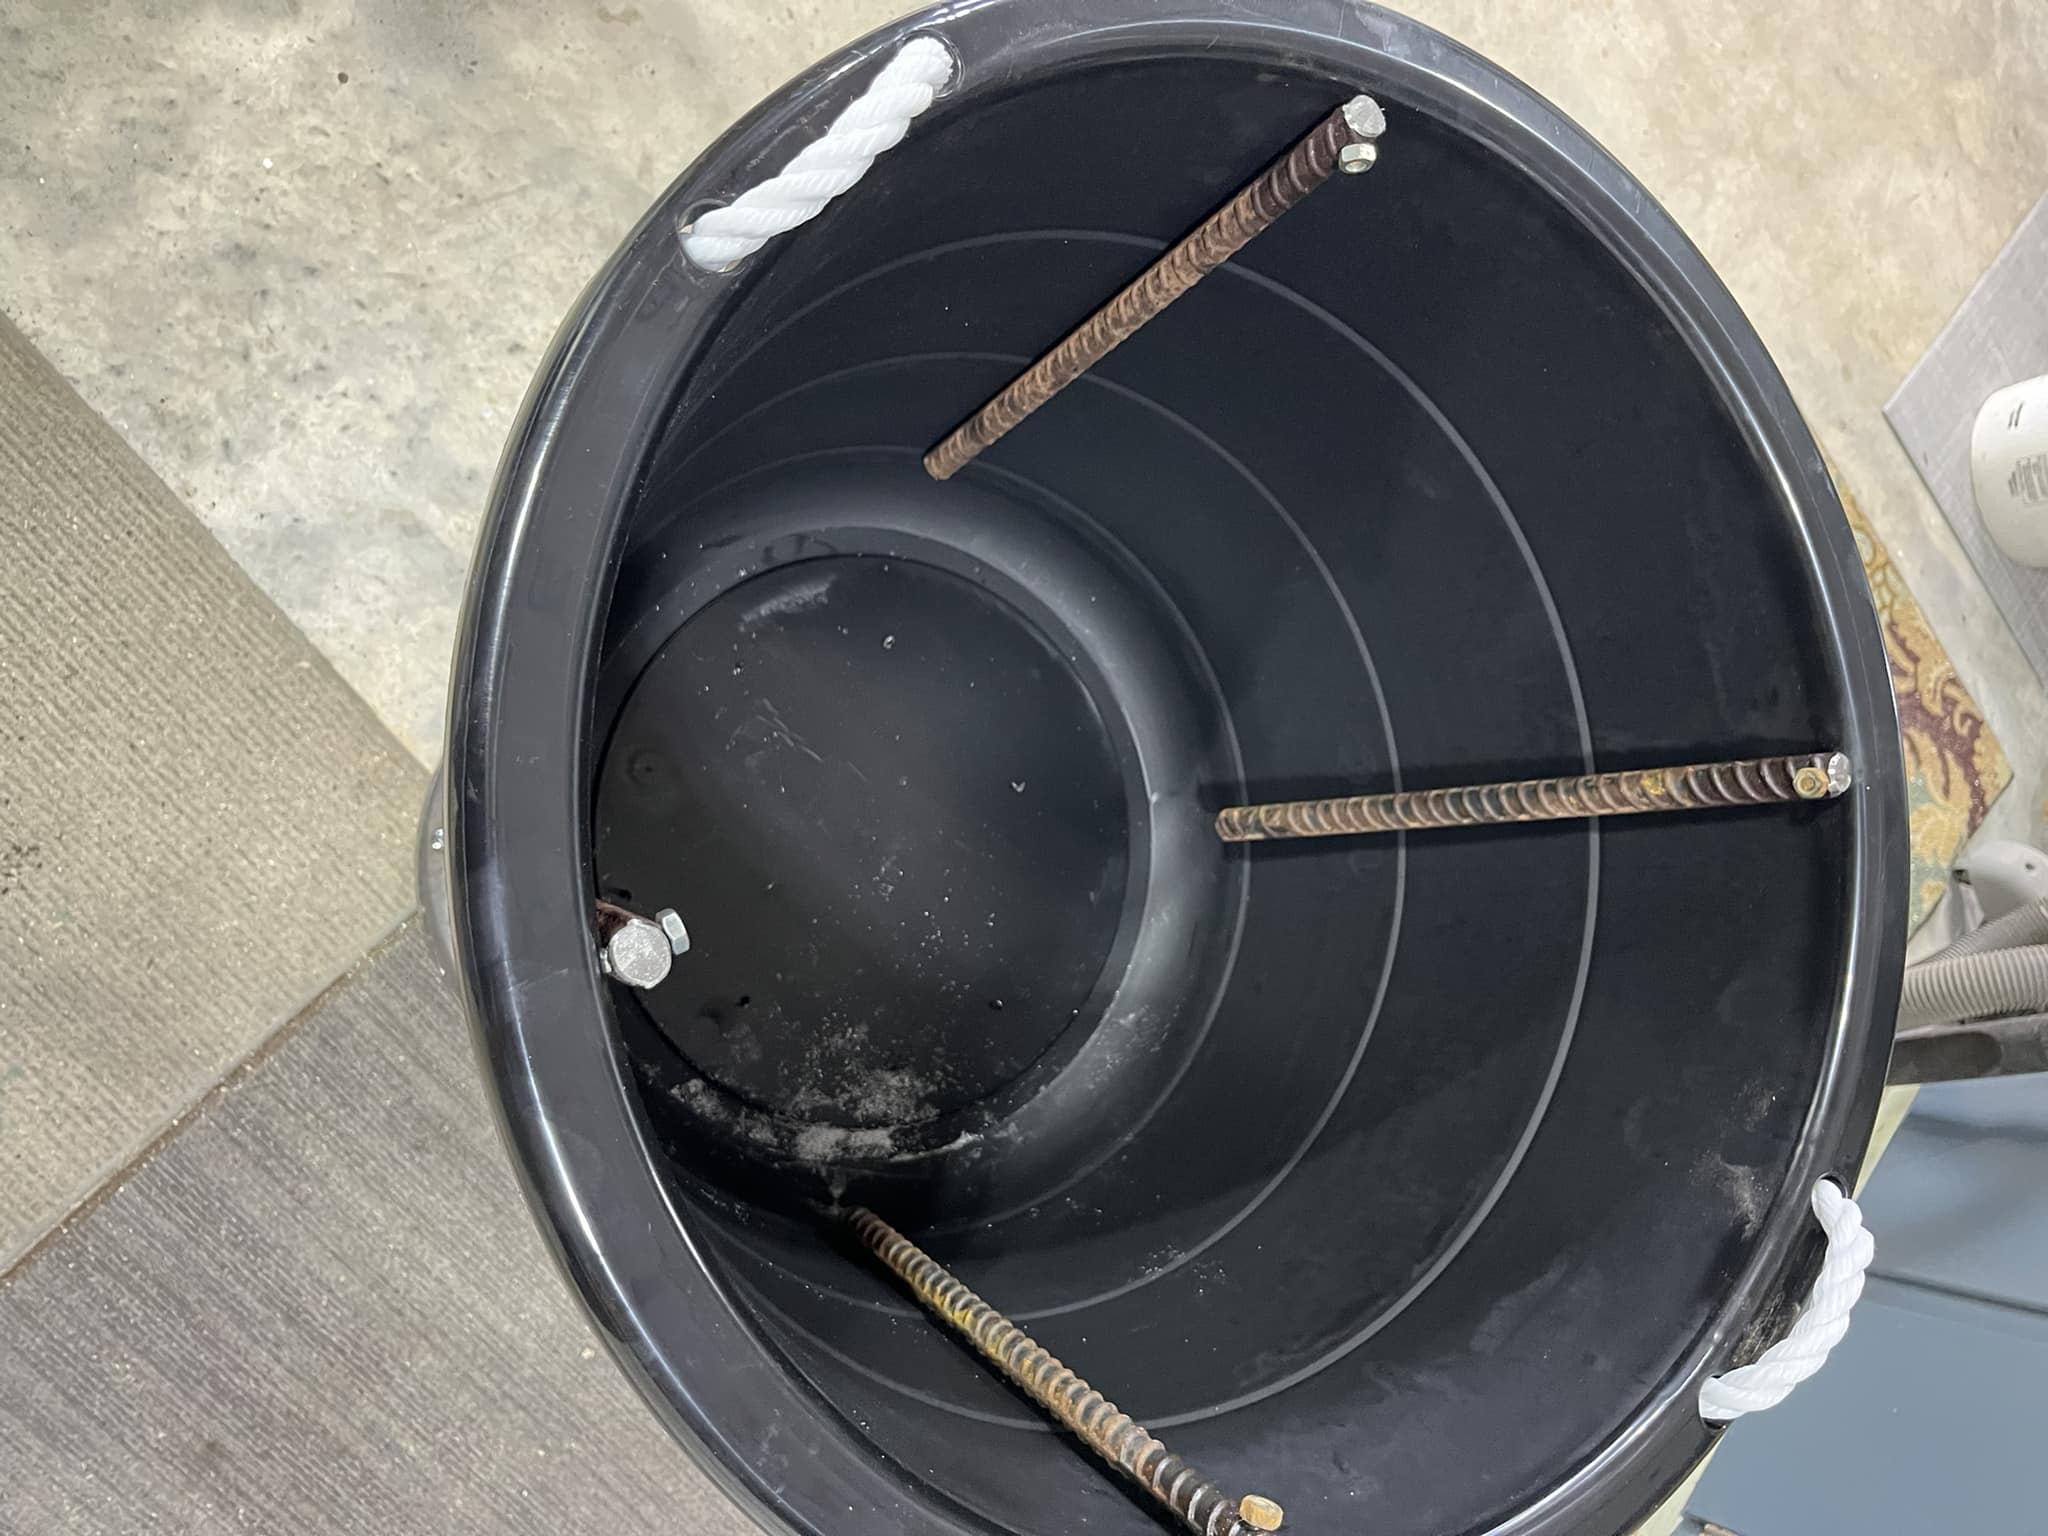
A few tips while setting up the tank: Make sure the rebar (or whatever metal you use) do not touch each other or the cast iron piece when it’s in place – they all should be isolated except through the solution. Also, as mentioned, do not use stainless steel for the anodesinstructables.com. Stick with plain iron or mild steel (rebar, old steel plates, etc.). Stainless can leach toxic chromium compounds into the solution, and we don’t want that. With my four rusty rebar rods mounted in the bucket, the electrolysis tank structure was ready to go.
Step 2: Mix the Electrolyte Solution (Water + Washing Soda)
Why washing soda and not something else? Well, washing soda is cheap, safe, and effective. Borax (sodium borate) is sometimes suggested for electrolysis, and baking soda (sodium bicarbonate) can work in a pinch, but washing soda is generally considered the best for this jobcastironcollector.com. It yields a nice steady current flow without foaming excessively, and it’s readily available in the laundry aisle. In chemical terms, washing soda is a stronger base than baking soda, which helps the process along. I also avoid using things like salt or acid, because they can produce dangerous gases or cause other issues – stick with the tried-and-true washing soda for safe results.
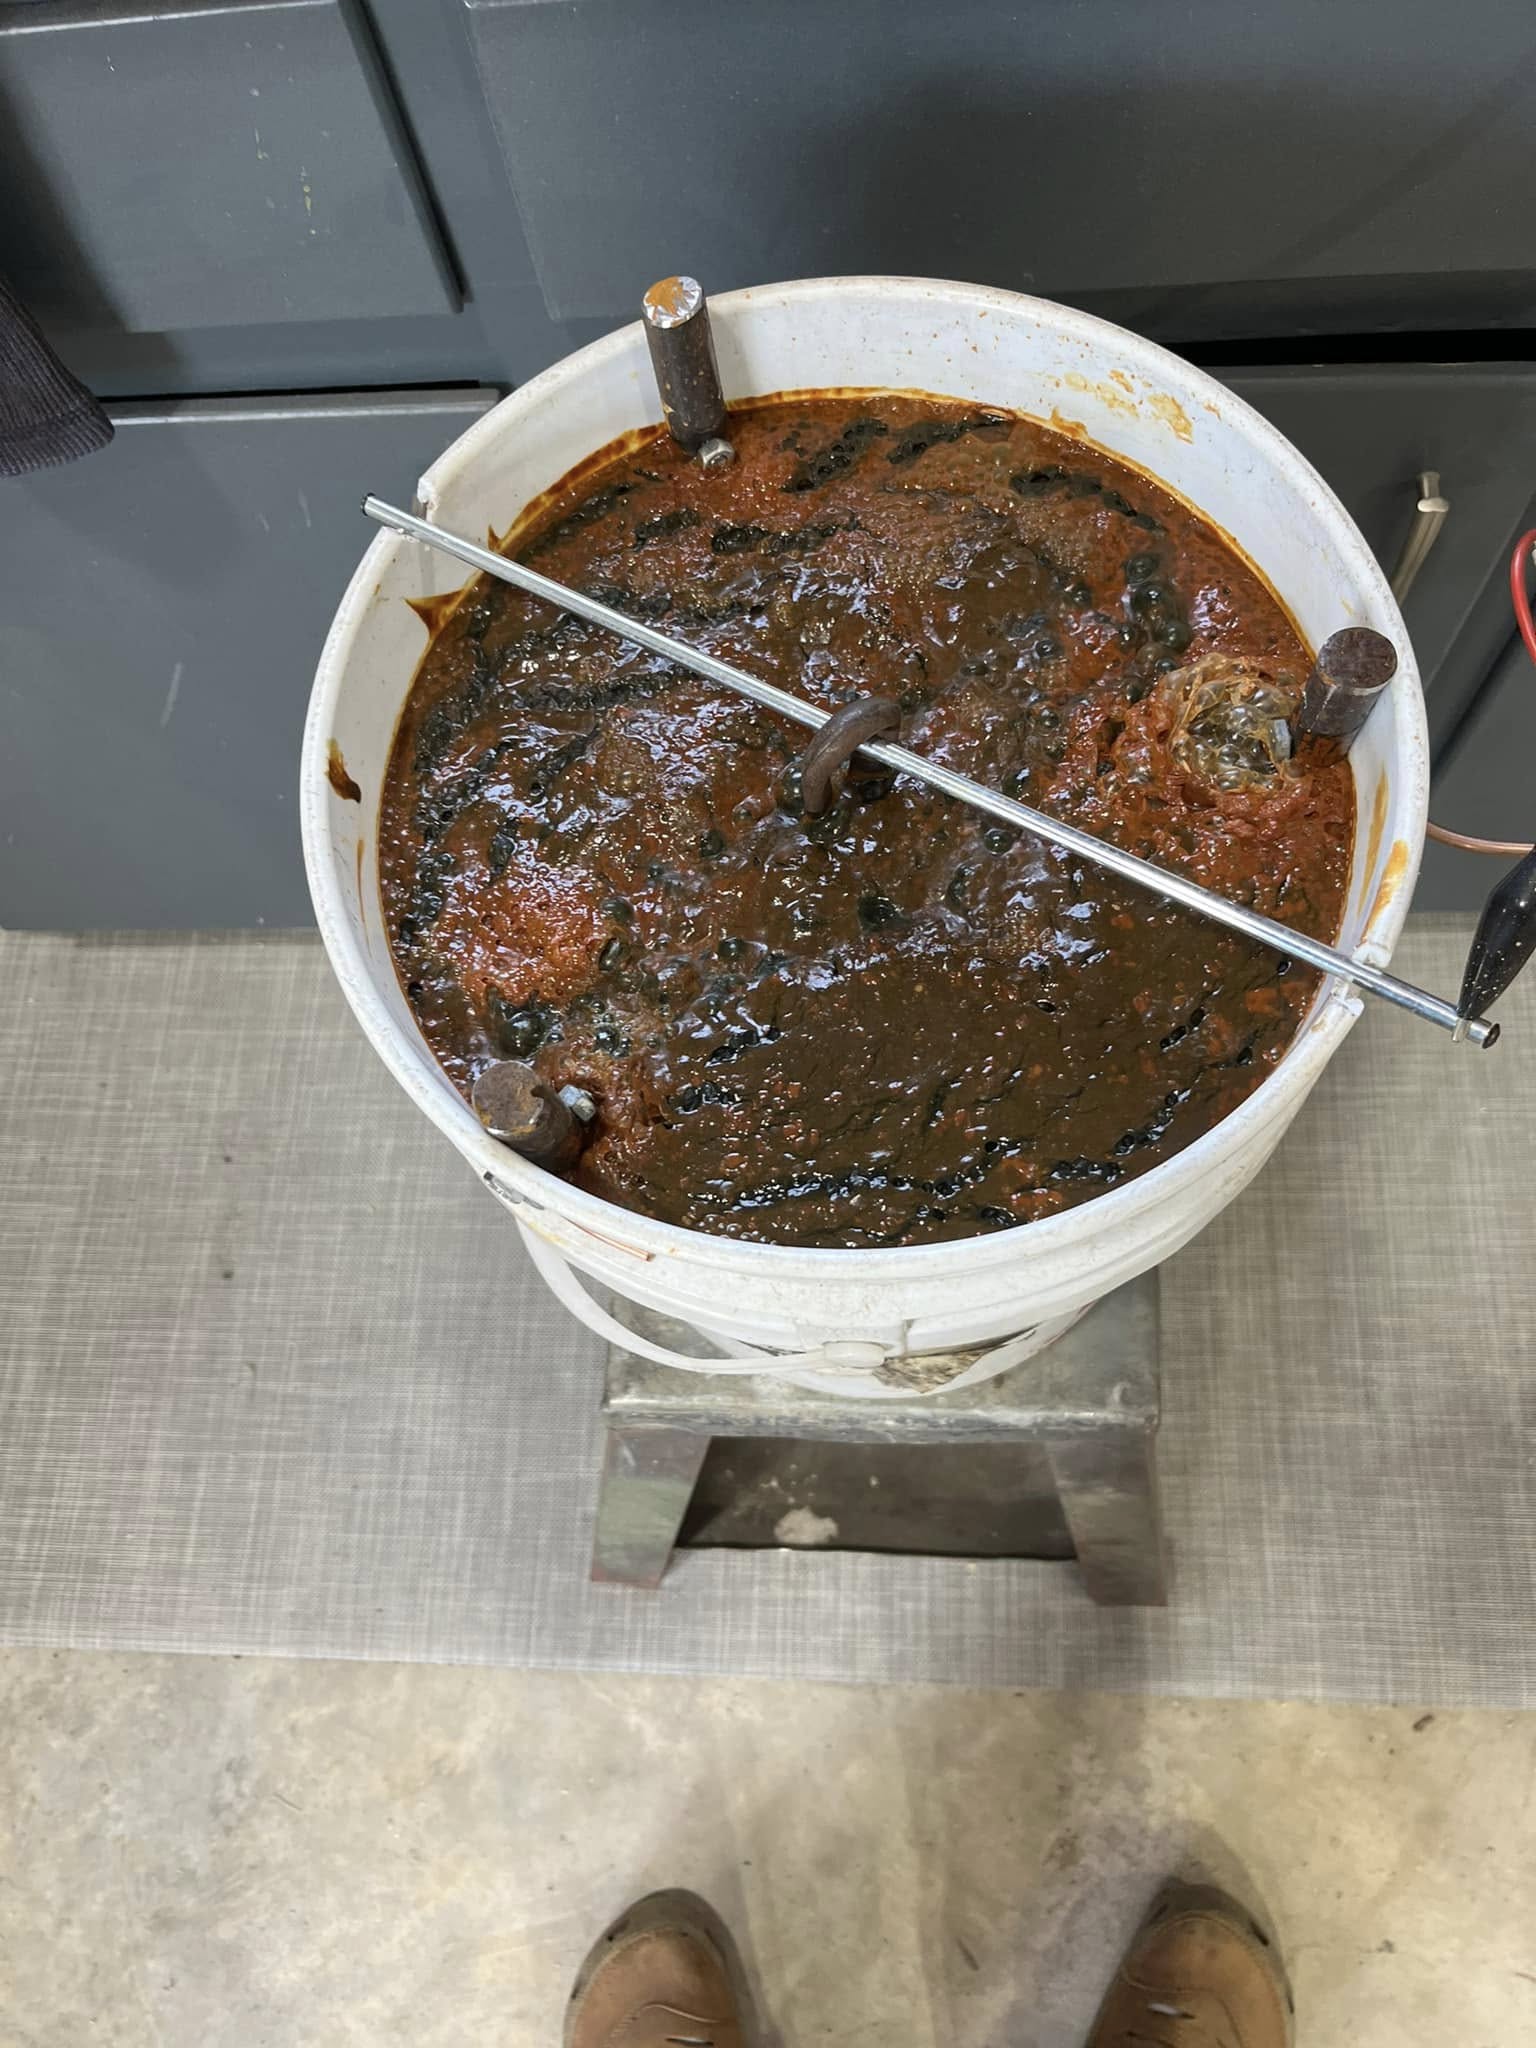
An earlier attempt using Borax resulted in a thick, orange-brown “rust soup” foaming at the top of the bucket – yucky to say the least! Before I knew better, I initially tried using Borax in my solution, and as you can see, it created a swampy mess of rust sludge in the tank. The photo above shows the aftermath: a foamy, frothy orange-brown layer coating everything. Yucky to say the least! The electrolysis did work with Borax, but it was not as effective or fast as with washing soda. The current stayed lower and the rust removal was slower, plus the solution got really gunky (that orange foam is all the loosened rust particles). After switching to pure washing soda in a fresh tank, I immediately noticed an improvement – the solution stayed cleaner (just a grayish fizz instead of thick orange foam) and the process sped up. Lesson learned: stick with washing soda for the best results and less cleanup. It makes your electrolysis rust removal setup run like a champ.
(Side note: Don’t add way more washing soda than recommended either. More soda doesn’t equal more cleaning power beyond a point – it will just draw excessive current and could trip your charger or overheat the power supplycastironcollector.com. A heaping tablespoon or two per gallon is plenty to get the job done.)
Step 3: Connect the Electrodes and Power Supply
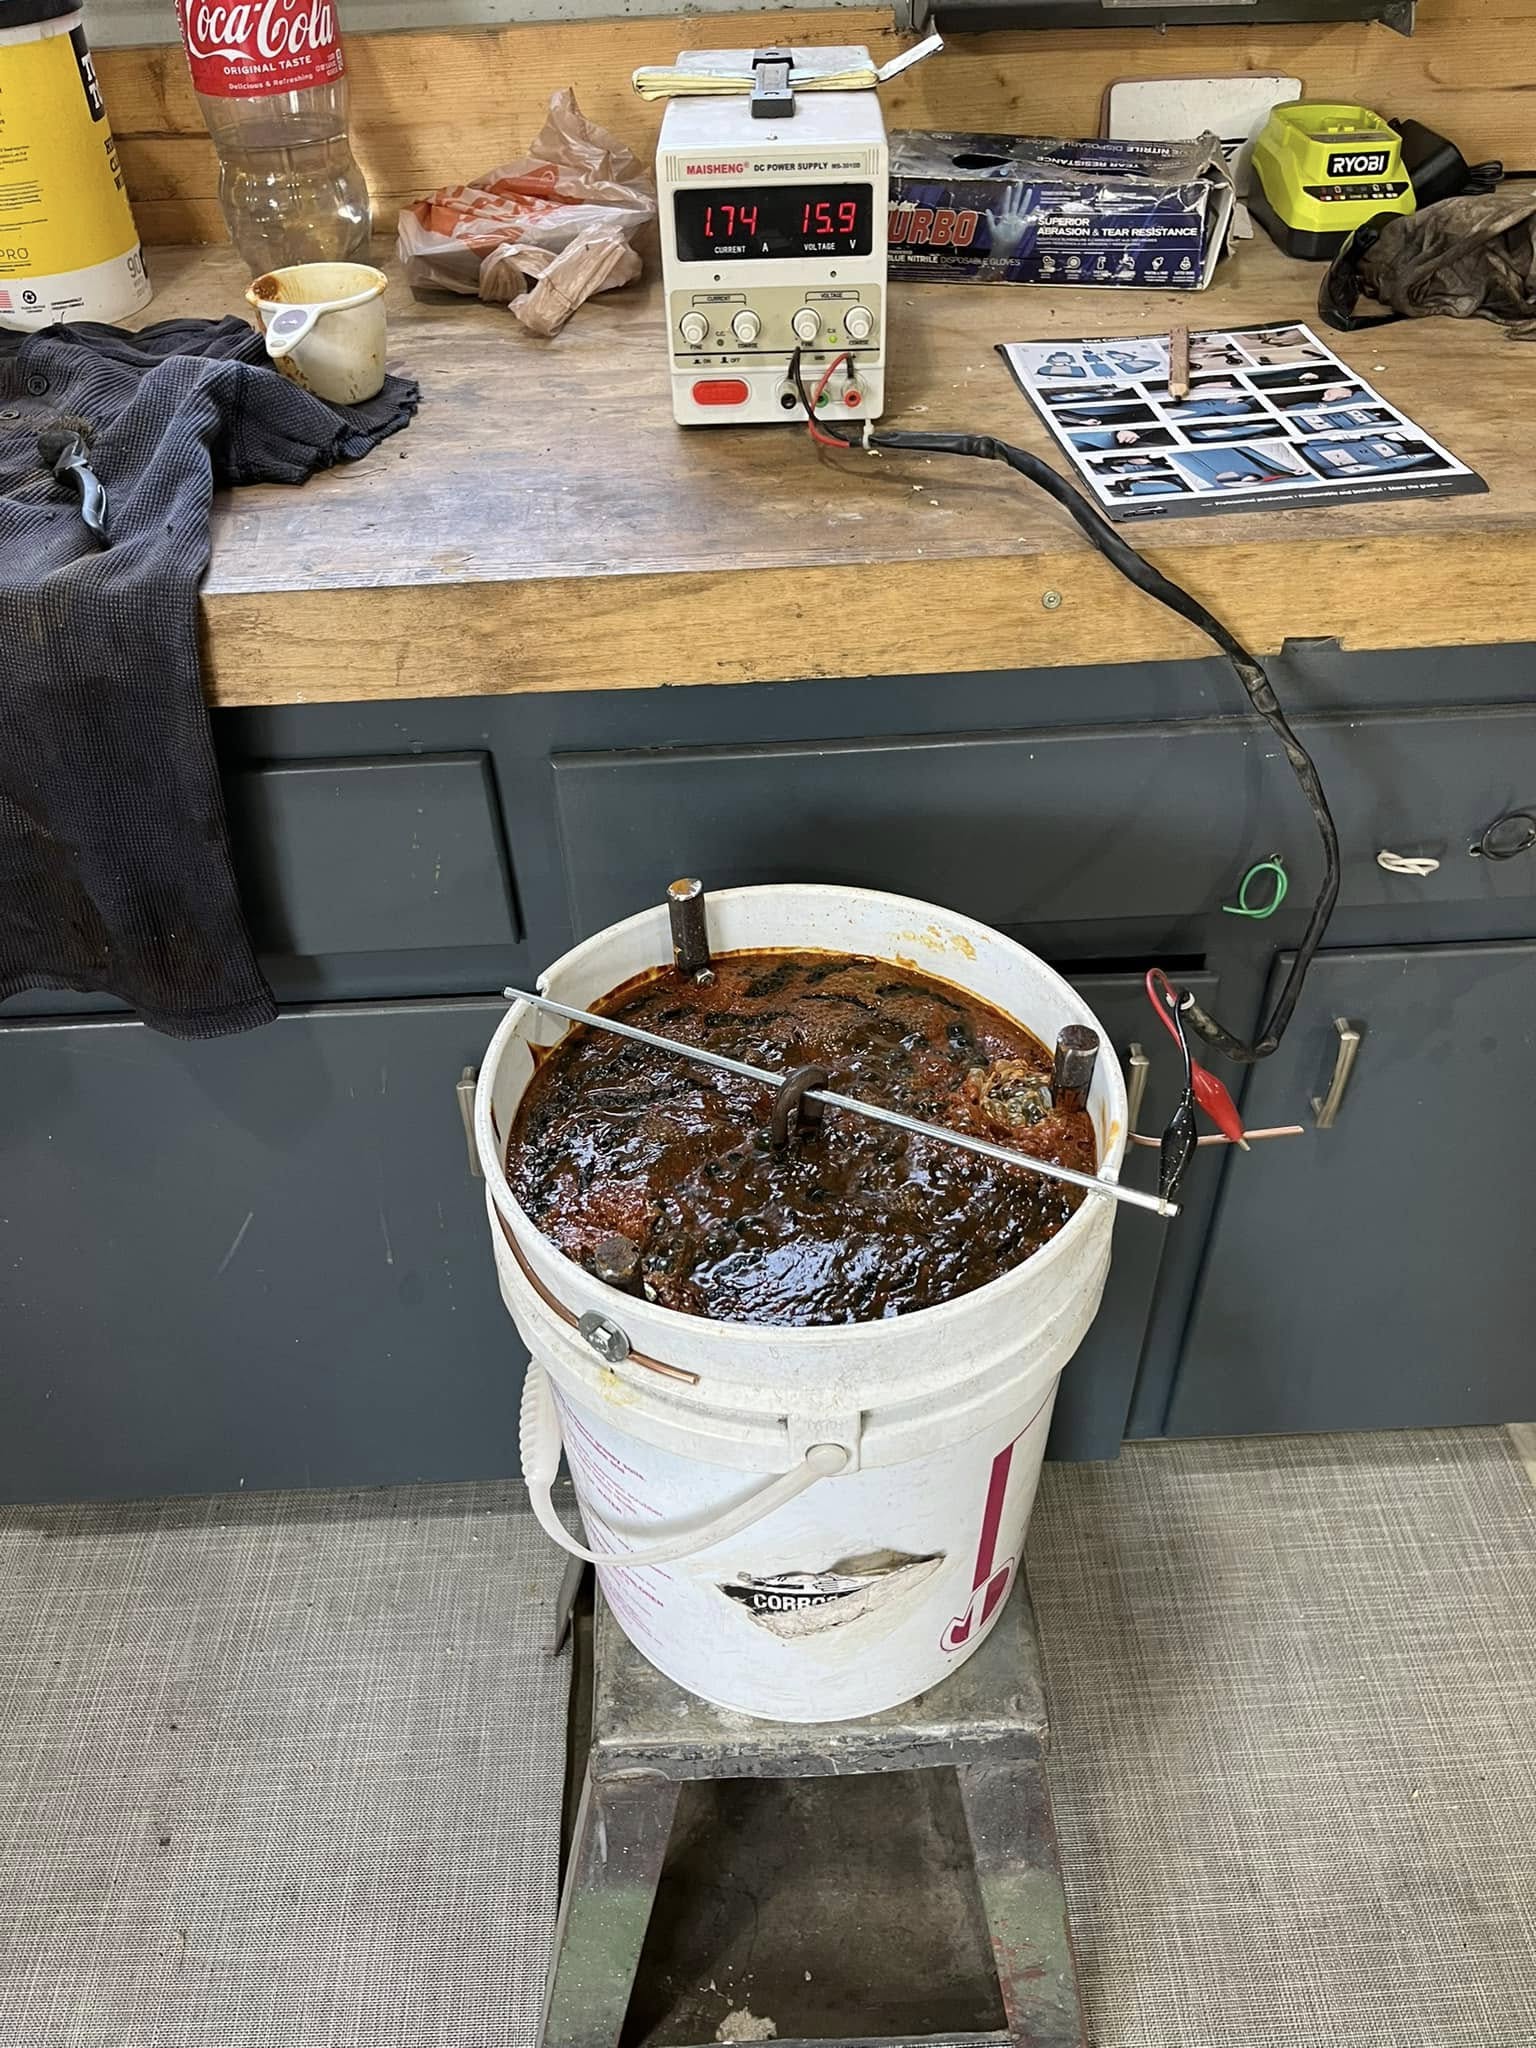
Hooking up the DC power supply: black negative clamp to the cast iron skillet’s handle, red positive clamp to the rebar anode. The power supply is set around 15.9 volts, drawing 17.4 amps once the reaction is going. Now comes the fun part – hooking up the electricity. It’s crucial to get the polarity right: I connected the negative (-) lead (black alligator clamp) to the cast iron skillet, and the positive (+) lead (red clamp) to one of the rebar rods (which are all tied together electrically around the bucket). Important: Remember, the black (negative) goes on the skillet (the item being cleaned)castironcollector.com. The rusty cast iron piece must be the cathode (negative) in the circuit. The sacrificial anodes (rebar) are connected to the positive. If you hook it up backwards, you’ll actually cause further rusting on your cast iron instead of removing it – ask me how I know! I double-checked my connections: the skillet was hanging from a rod and I clipped the black lead directly to the skillet’s handle (ensuring a good metal-to-metal bite, I even sanded a small shiny spot on the handle for good contact). The red lead was clipped to the rebar (I had a copper wire connecting all four rebars, so I could clip to one and it effectively energizes them all).
With everything wired up, I positioned the power supply on my workbench and kept the bucket on the floor. In the image above, you can see my DC bench power supply reading about 15.9 volts and 17.4 amps. I dialed it to around 15-16V for this setup. The current (amperage) will depend on factors like the size of your piece, distance between electrodes, and how much washing soda you added. In my case, once the solution started conducting, it drew roughly 15-17 amps which is fairly robust. (If you’re using a car battery charger, you might be running at 12V/10A or similar – that works too.) One nice thing about the adjustable supply is I could set a current limit for safety; I kept an eye on the amperage to make sure it stayed in a reasonable range.
Double-check everything before turning on power: the pan and anodes should not be touching, connections are secure, and the power supply or charger is set to the correct mode. When all looked good, I powered it on and watched the magic begin!
(If you only have an automatic battery charger that refuses to stay on for this, a trick is to connect it through a battery or use a manual override. But the simplest route is a manual charger or a DC power source designed for constant outputcastironcollector.comcastironcollector.com. You can even use a 12V car battery in a pinch, but that’s usually not necessary.)
Step 4: Fire It Up – Electrolysis in Action (Rust Removal)
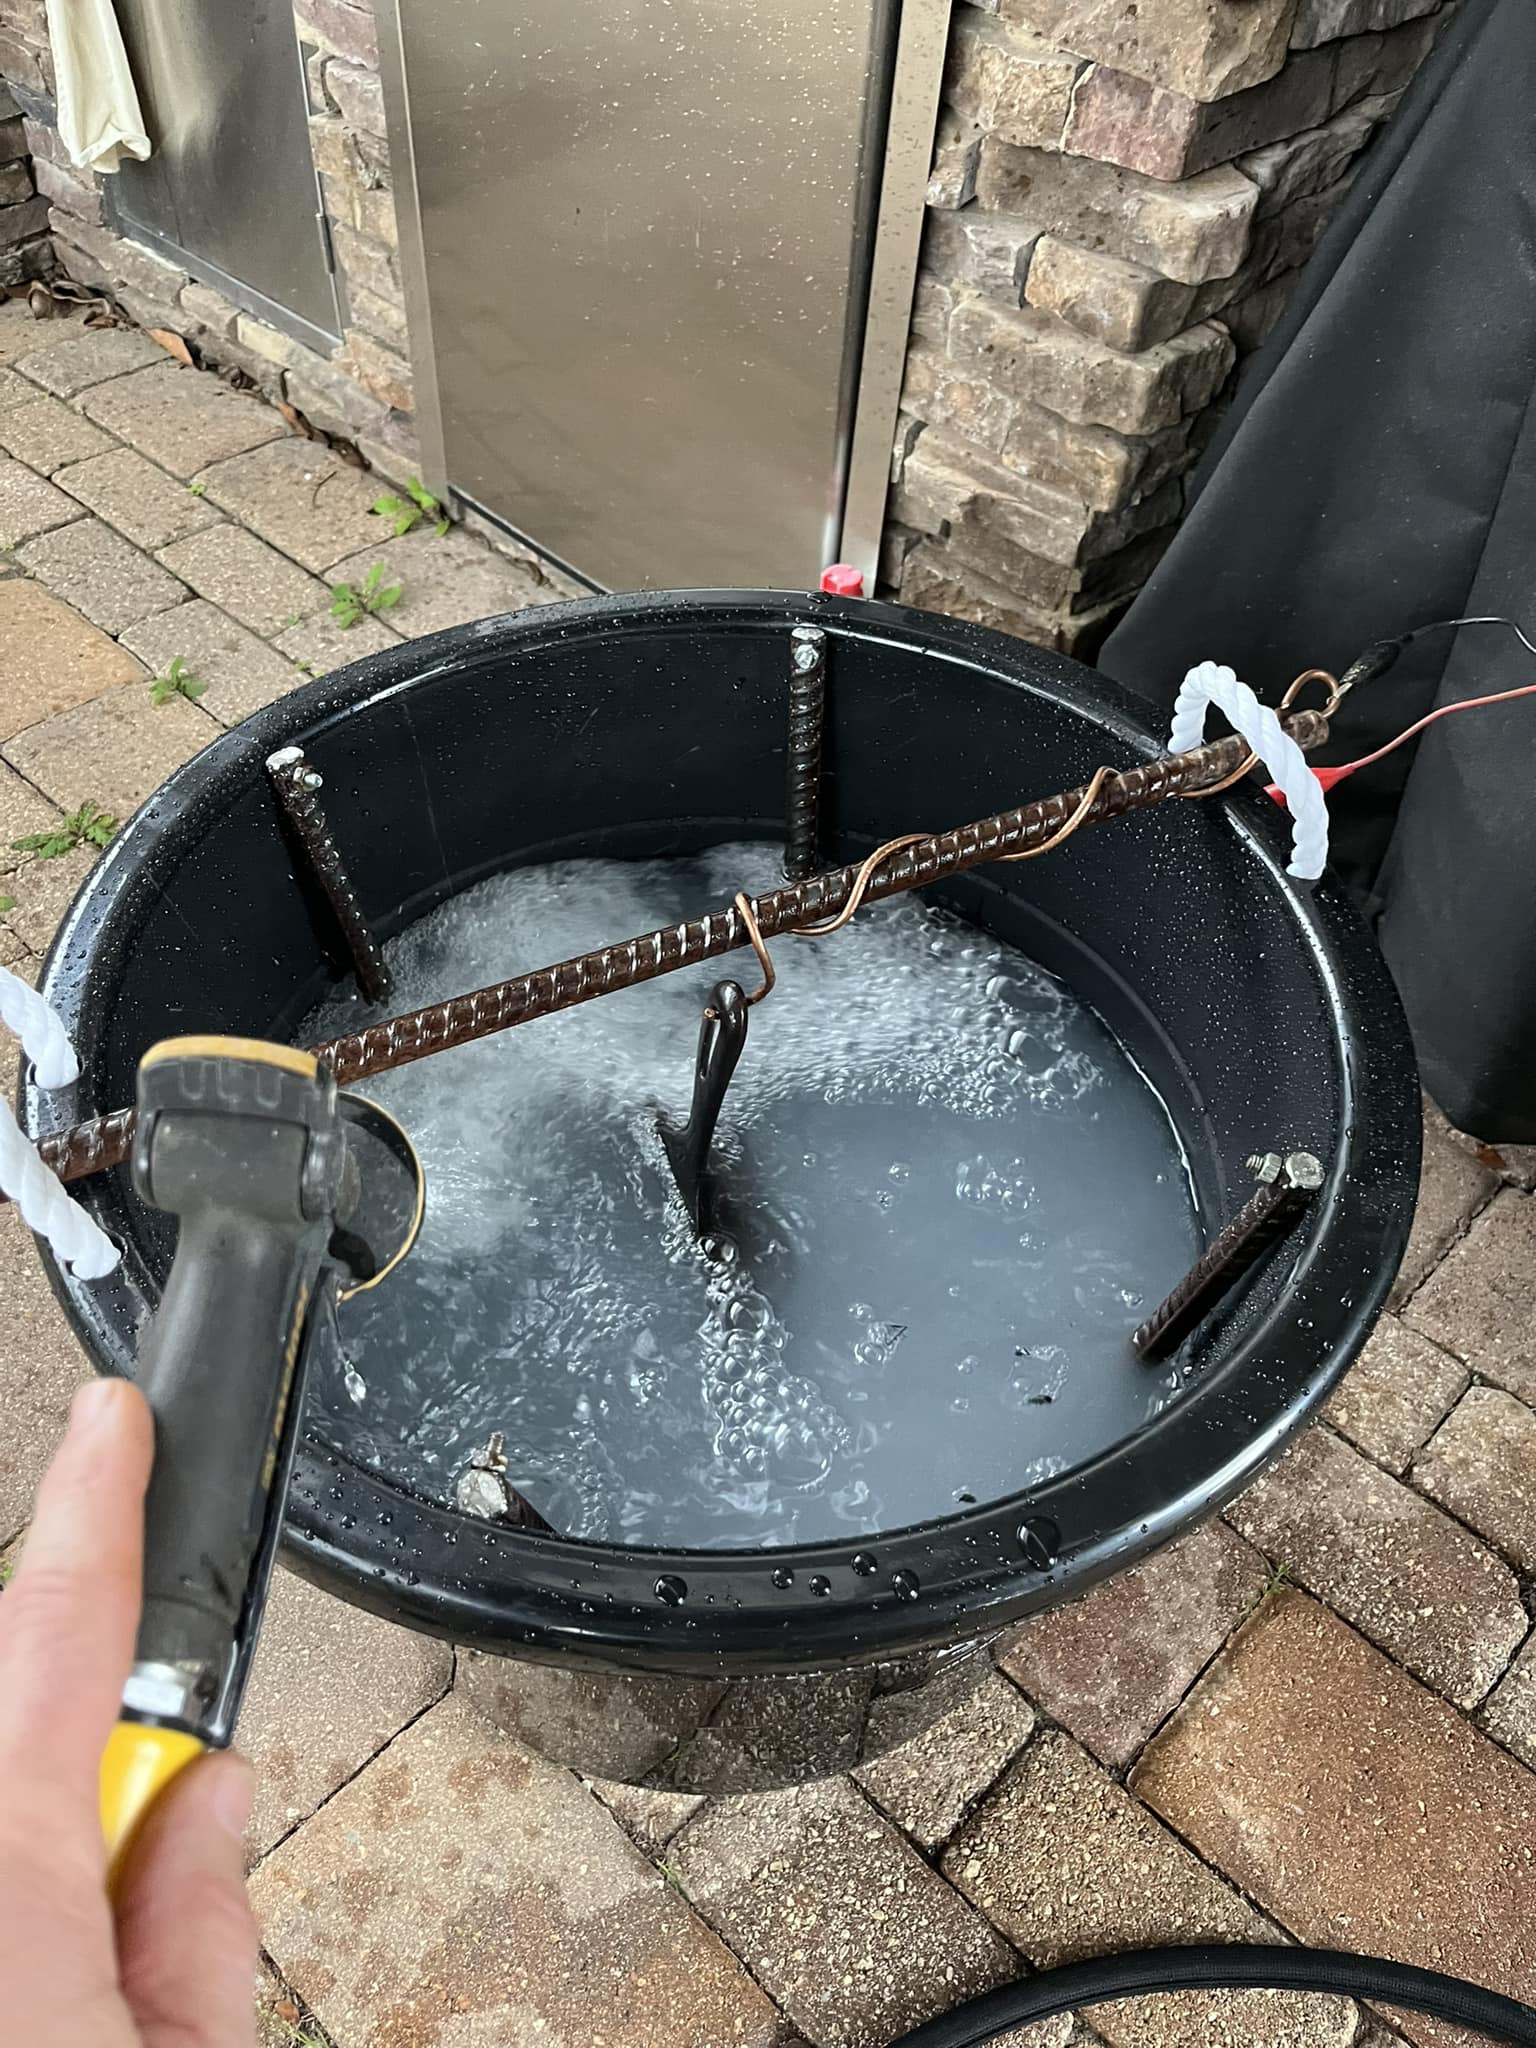
With the power on, the electrolysis process kicked off. Almost immediately I could see tiny bubbles fizzing around the electrodes and the skillet. Those bubbles are hydrogen gas (at the negative cathode) and oxygen gas (at the positive anodes) being formed from the water – this is normal. Make sure you’ve got ventilation, since hydrogen gas, while it typically dissipates quickly, is flammable in high concentration. I cracked the garage door and kept the area open. (In practice, a small electrolysis setup produces a modest amount of hydrogen that quickly rises and disperses – any sort of ventilation will let it dissipate to safe levelsgaragejournal.com. Just don’t do this in a tiny sealed closet with a flame going, and you’ll be fine.)
As the minutes passed, I watched clouds of rust begin streaming off the cast iron skillet. The formerly clear solution turned murky grey. That means the rust (iron oxide) is steadily loosening and dispersing into the water. You might even see brownish flakes floating to the top or accumulating on the anodes. In my case, the current was strong enough that after a couple of hours, a lot of rust had been converted. The rebar anodes started to get coated with a layer of dark crud (that’s some of the rust they’ve attracted). The process will convert red rust (Fe<sub>2</sub>O<sub>3</sub>) to black oxide (Fe<sub>3</sub>O<sub>4</sub>), which usually clings to the pan as a soft black layer, and any loose rust just detaches into the water.
After about 4 hours, I decided to check on the progress. (It’s a good idea to peek every few hours depending on how rusty the piece is. Light rust might be done in an hour or two; heavy rust could take 6-8 hours or more.) I turned off the power before handling anything – always cut the electricity before reaching into the tank or removing the item, for safety. Then I gently lifted the skillet out of the electrolyte to have a look.

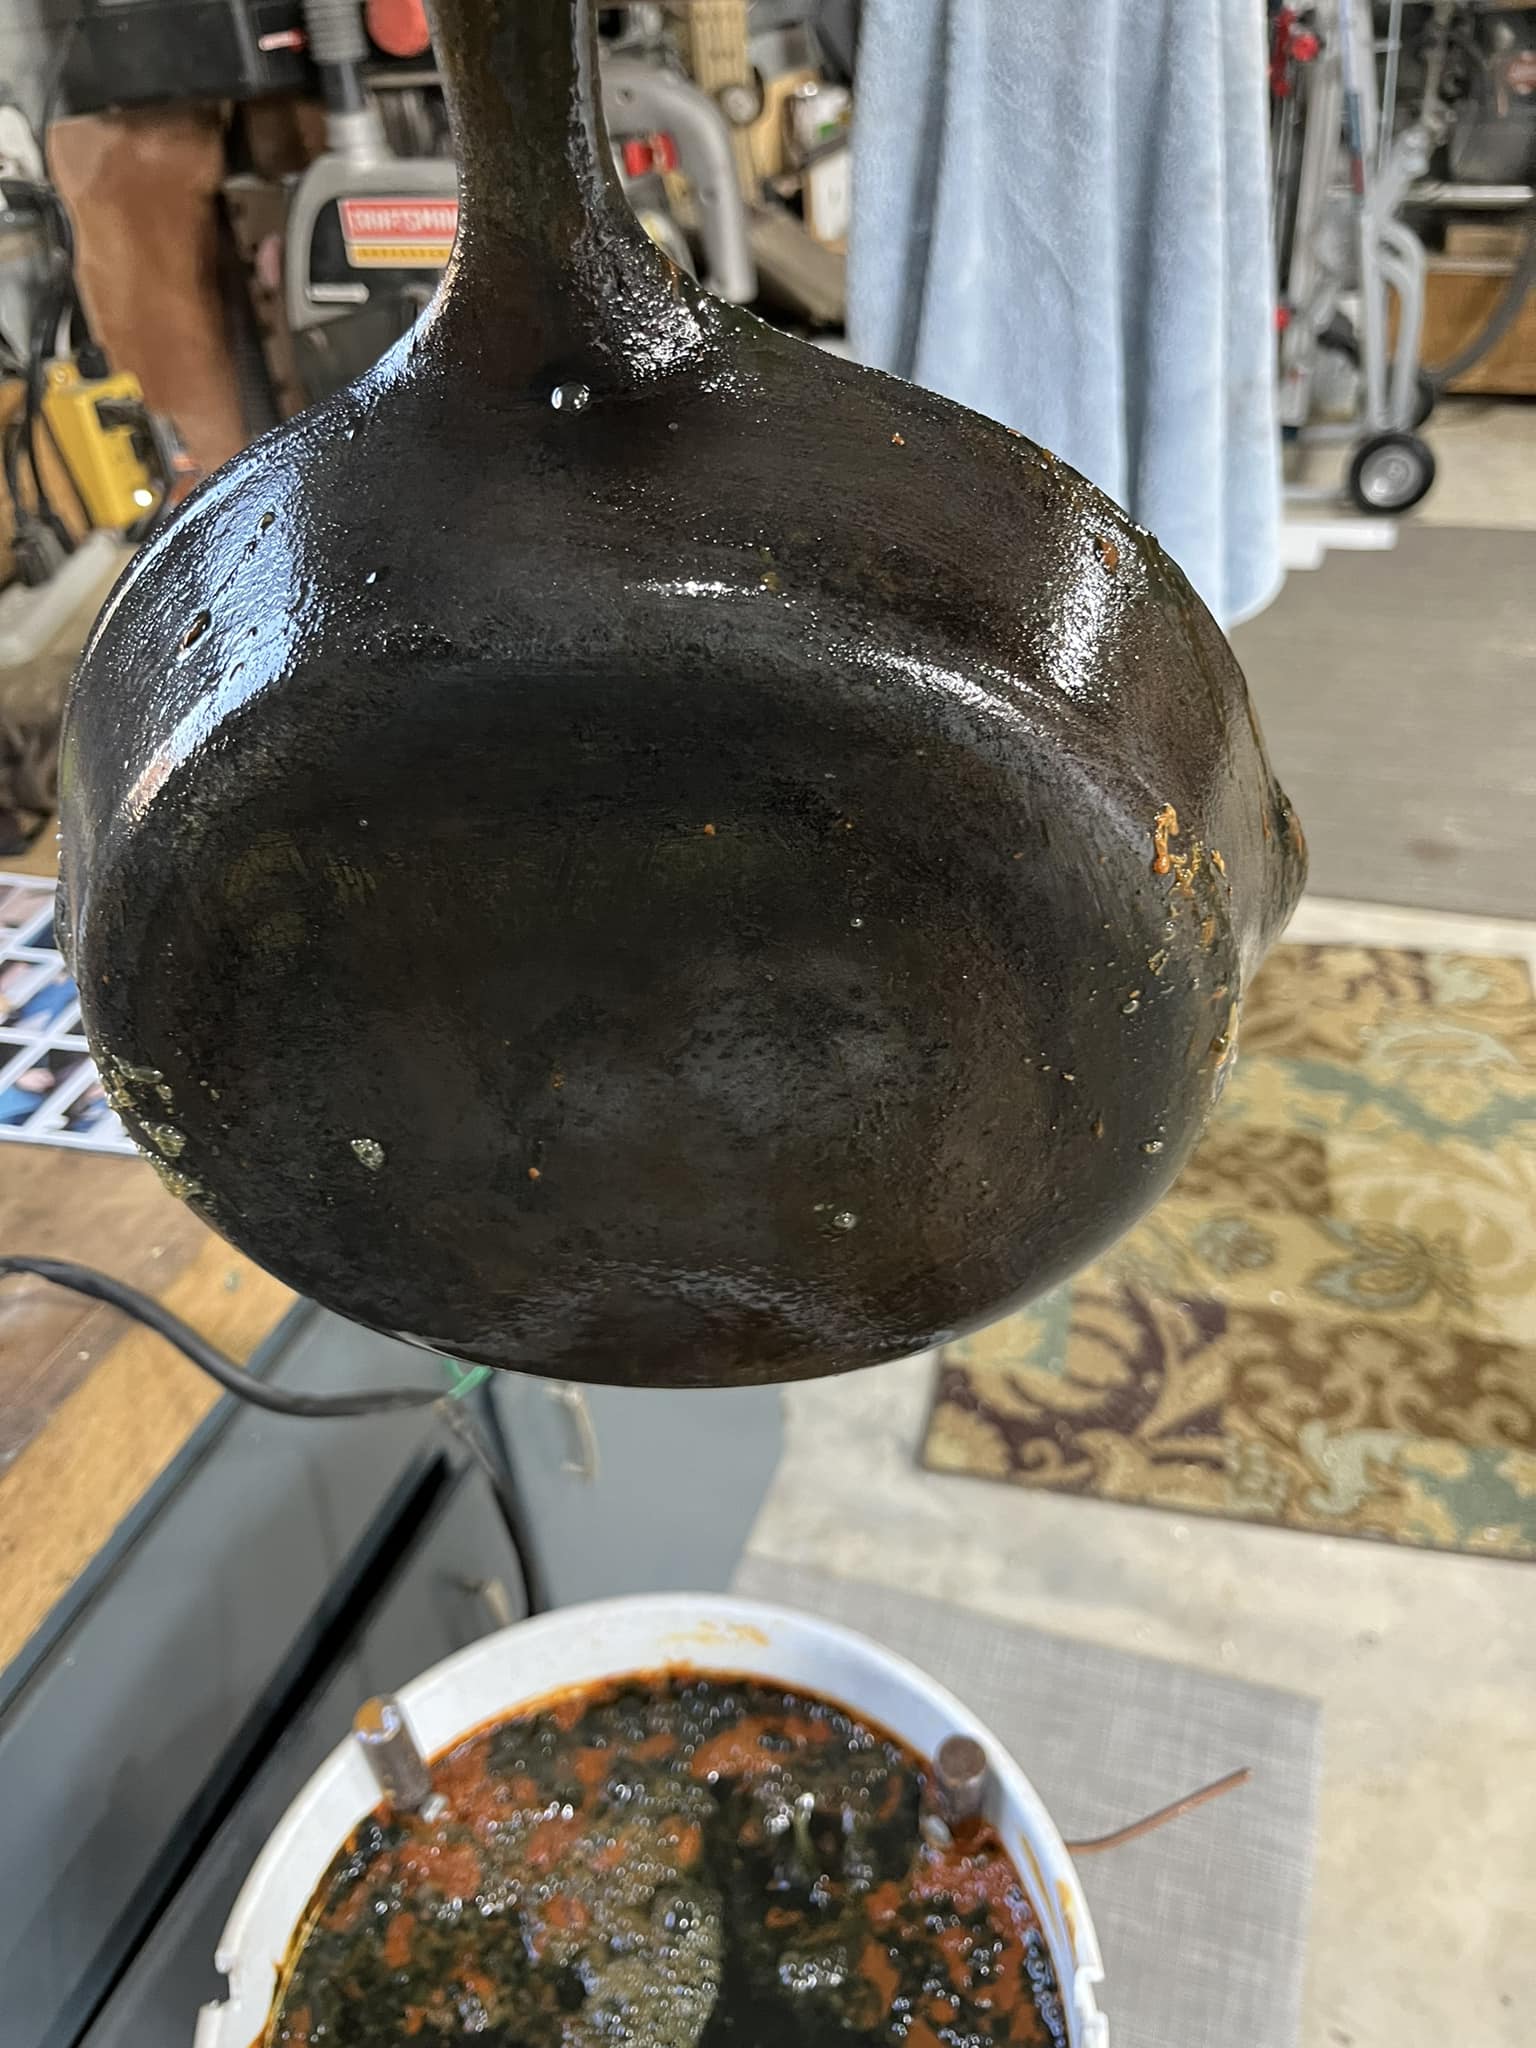
Checking the skillet after a few hours in the electrolysis bath – it’s now covered in black residue instead of orange rust. As you can see in the photo, the rusty orange color was completely gone, and the skillet was coated in a layer of black soot-like residue. This black stuff is the transformed rust and other impurities that the electrolysis process pulled out of the iron. It may not look pretty, but that’s a great sign! It means the red rust has been neutralized. At this stage the pan looks kind of sludgy and blackened, which might prompt an “oh boy, what did I do?” moment – but fear not. This black coating is mostly iron oxide (magnetite) and carbon from the rust and old seasoning that got blasted off. It will easily come off with a bit of scrubbing. The key thing is that no solid rust remains – it’s all either in the water or in that black film.
I’ll be honest, when I first pulled out the gooey, blackened skillet, it looked bad, but I was grinning from ear to ear. Compared to the orange, crusty nightmare we started with, this was a huge improvement. And the best part: I didn’t have to grind or sand the iron itself at all. The electrolysis did all the heavy lifting, reaching into pits and crannies that a wire wheel would have struggled with. It sure beats wire brushing by a mile in my book, especially for intricate or valuable cast iron pieces where you want to avoid scratching up the metal.
I ended up running the skillet for about 5-6 hours in total until I was satisfied that all rust was converted. You can often tell it’s done when the vigorous bubbling slows down and the water is thoroughly filthy with rust. If you leave it too long, it’s not usually harmful, but there’s a point of diminishing returns once all rust is gone. In my case, after 6 hours the current had dropped a bit and the rust was history, so I shut it down and prepared to clean up the piece.
Step 5: Cleanup – Scrub, Rinse, and Season the Cast Iron
With the rust now eliminated, we need to clean off that black residue and get the pan ready for seasoning. I unplugged/disconnected the power and then removed the skillet from the tank. Immediately, I sprayed it down with clean water (a garden hose outside or a utility sink works well) to wash off the loose gunk.
After electrolysis, the skillet has no rust – only a black film that rinses off, revealing bare iron. Here’s the pan after a thorough rinse and light scrubbing, ready to be dried and seasoned. While rinsing, I gave the skillet a good scrubbing with steel wool and a brush. It didn’t take much effort at all – the black film came off, revealing the smooth gray metal underneath. If there were any stubborn black patches, a bit of extra elbow grease with a scouring pad knocked them out. In the photo above, you can see the bottom of the pan after I’ve cleaned it up: it’s back to bare cast iron with zero rust in sight! The dark color you see is the natural iron (and some areas of remaining black oxide which is totally fine). The key is that all the flaky red rust is gone. At this point the cast iron will be highly prone to flash rust (since it’s fresh bare metal), so we need to move quickly to dry and protect it.
Once the skillet was rinsed clean, I dried it immediately and thoroughly. The fastest way is to put it in a warm oven or on a burner for a few minutes to drive off all moisture. I popped mine into a 200°F oven for about 10 minutes. You could also towel-dry then blow it with a hair dryer or heat gun – just get it bone dry. Sure enough, as it warmed up, any tiny hints of remaining moisture evaporated and I could see the bare metal take on a uniform dry, gray appearance.
Finally, it’s time to season the cast iron to protect it from future rust. While the pan was warm, I rubbed a very thin layer of cooking oil all over it (inside and out). I used canola oil, but you can use flaxseed, grapeseed, Crisco – whatever your preferred seasoning oil is. Then I put the skillet back in a hot oven (around 400°F) for an hour to bake the oil on. This polymerizes the oil and forms that beautiful protective black patina that cast iron is known for. After it cooled down, the once-rusty pan looked almost as good as new. You would hardly believe it’s the same 100-year-old skillet that looked like it was destined for the scrap heap. That 9¾-inch Wagner now has a new lease on life and is ready to fry up some dinner!
(Quick tip: If you see a tiny flash of rust appearing during drying – it can happen if the air hits damp metal – don’t panic. Just scrub it off with a bit of baking soda or Bar Keepers Friend and water, then dry and proceed with seasoning. The seasoning oil will seal the iron from air and moisture.)
Conclusion: Why Electrolysis is Worth It (Benefits & Safety Tips)
Using electrolysis to remove rust from cast iron cookware turned out to be a real game-changer for me. To sum up the experience, here are the key benefits of this method and some final safety tips to keep in mind for your own DIY electrolysis setup:
Benefits of Electrolysis for Rusty Cast Iron
-
Gentle Yet Effective: Electrolysis only breaks down the rust, not the base metal. Your cast iron retains its original surface detail and shape. No grinding away metal or sandblasting – it’s easy on the iron but tough on rust. This is especially important for antique or collectible cast iron pieces (you don’t want to ruin those crisp markings or the smooth cooking surface).
-
Minimal Labor: Once set up, the process is largely hands-off. You let science do the work while you relax. Sure, you have to do a quick scrub at the end, but that beats hours of scrubbing with steel wool or a wire brush. Like I said, it beats wire brushing by a country mile.
-
No Harsh Chemicals: The electrolyte is just washing soda (basically a form of salt) and water – pretty benign compared to strong acids or commercial rust removers. It’s food-safe in theory (since washing soda is even used in some recipes and cleaning), though you’ll be washing it off anyway. No toxic fumes during the process, just a bit of hydrogen gas which disperses easily. And the waste rust sludge is relatively innocuous (more on disposal in a moment).
-
Reusability & Scalability: You can reuse the same solution and setup for multiple restorations. If you have a bunch of rusty cast iron cookware, just keep the tank, top up water and washing soda as needed, and swap in the next piece. The only thing you’ll replace eventually are the sacrificial anodes (the rebar), as they will gradually erode away. The setup can be scaled up to bigger containers for larger items, too – hobbyists have used plastic tubs or barrels for stove parts, etc.
Safety Tips for Electrolysis Rust Removal
-
Work in a Ventilated Area: Electrolysis releases hydrogen gas at the negative electrode (your cast iron)garagejournal.com. In high concentrations, hydrogen is explosive (remember the Hindenburg?). For a small bucket setup, the amount is small and hard to contain – any airflow will disperse it quickly. Just to be safe, do it in an open garage, outdoors, or under a shed roof with good air circulation. And of course, no open flames or smoking near the setup, because hydrogen plus a spark is a big “boom”. Keep it breezy and you’ll be fine.
-
Wear Gloves and Eye Protection: The washing soda solution is alkaline and will irritate your skin or eyes if splashed. Also, when you pull the item out, it will be covered in nasty black rust muck. Wear rubber gloves when handling the wet, freshly cleaned cast iron, and maybe old clothes too – it’s a messy job. Safety glasses are a good idea when you’re near the bubbling tank, in case any droplet decides to pop. Better to look like a mad scientist than to get caustic crud in your eye.
-
Double-Check Polarity: I know I harped on this, but it’s worth repeating as a safety/quality point: hook the negative to the cast iron piece and positive to the sacrificial anodecastironcollector.com. If you mix this up, you will ruin your cookware by plating rust onto it instead of removing it. Label your clips if needed (black = negative = on the skillet). Every time you set up a new item, double-check before turning on the juice.
-
Power Off Before Adjustments: Always turn off or unplug the power supply before you stick your hands in the solution or tweak any connections. We’re dealing with low voltage, but high current. You don’t want to bridge the electrodes with your hand or a tool while it’s live – at best you’ll get a scare (or a burn if a short causes a spark). Also, disconnect the power before attaching or removing clamps to avoid any sparking, especially around hydrogen. In short: treat it like a car battery – it’s only ~12-15 volts, but it can deliver a lot of amps. Be smart and power down when making changes.
-
Use Only on Cast Iron (No Aluminum or Coated Pans): This method is intended for bare cast iron only. Do NOT use electrolysis on aluminum cookware or other metals. Aluminum will literally dissolve away in an electrolysis bath, because the process eats it up aggressivelycastironcollector.com. Enamel-coated cast iron can be damaged too (it may strip off the enamel). If a cast iron piece is nickel-plated or chrome-plated and the plating is flaking, electrolysis might strip those areas furthercastironcollector.com. So, stick to plain cast iron that you intend to strip down to bare metal.
-
Proper Disposal of Spent Solution: After you’re done, you’ll have a bucket of dirty electrolyte water full of rust and iron particles. This stuff is basically water, washing soda, and iron oxide (plus a little dissolved metal from the anodes). It’s not highly toxic. You can let it sit so the solids settle, then skim off the top water. I usually dump the used solution in a safe spot in my yard away from vegetable gardenscastironcollector.com (the iron in the soil won’t hurt much, but the washing soda could affect soil pH). Avoid pouring it down your sink, as the sediment could settle in your pipes. Another option is to neutralize the liquid with a little vinegar (to bring the pH closer to neutral) and then dispose. The rust sediment that settles can be wiped out and trashed. Always wear gloves when handling the residue, and rinse everything down afterward.
-
Maintain Your Equipment: Rinse off your clamps and rods after use. The anodes (rebar) will get quite crusty with rust deposits – you can wire-brush them clean if you plan to reuse them, or replace them after several sessions when they’re heavily wasted. Store your power supply and electrical connections safely away from moisture when not in use. Basically, take care of your gear and it will last for many rust-busting sessions to come!
By now, you’ve seen how a rusty cast iron skillet can go from orange and flaky to bare metal and ready-to-cook with relatively little sweat, all thanks to electrolysis. In my garage, this project was a big success – that old Wagner Ware pan is back in action flipping eggs instead of languishing as rust decoration. Electrolysis is a technique every cast iron collector or restorer should have in their toolkit. It’s cheap, fun, and effective, and it feels a bit like science class in the comfort of your own shop.
Give it a try on your next flea market find or heirloom piece that has seen better days. I hope this step-by-step guide (and the photos of my setup and results) inspire you to rescue some rusty cast iron cookware yourself. Trust me, the first time you pull a piece out of the tank and see black gunk where there was rust – you’ll be amazed. And when you finish cleaning and seasoning that piece, you’ll have the satisfaction of bringing a quality cast iron pan back to life.
Happy cast iron restoring, and y’all come back now if you want more restoration tips! If you have any questions or want to share your own rust removal stories, feel free to leave a comment. Now get out there and turn that rust bucket cast iron into a kitchen treasure. Good luck and stay safe in the workshop!