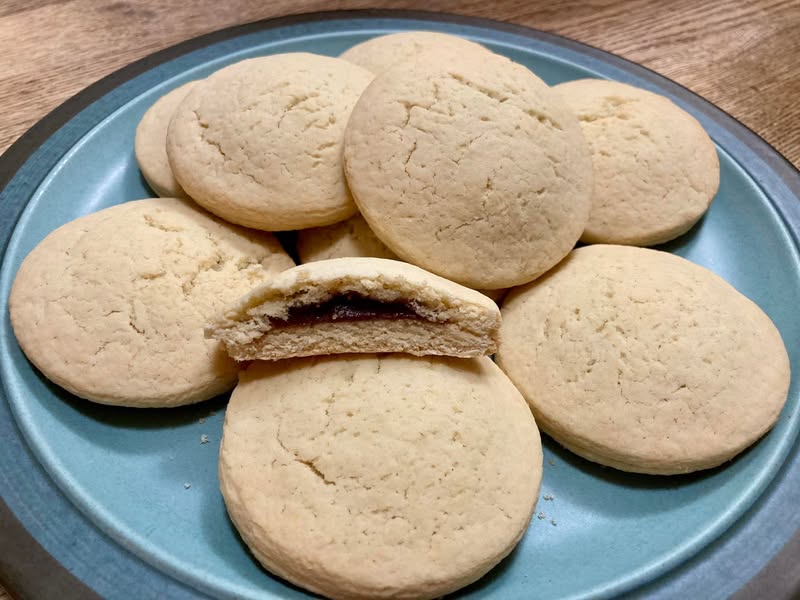
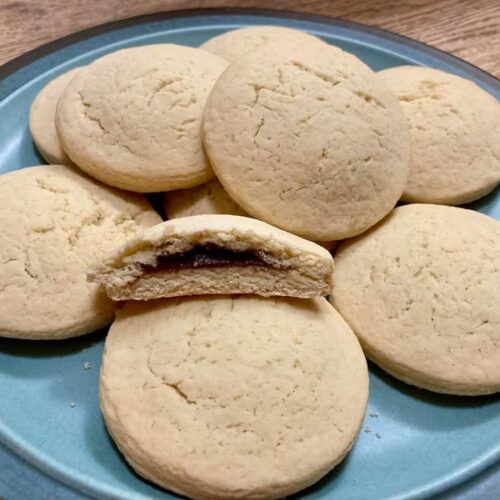
Old Fashioned Date Filled Cookies (Vintage Recipe)
When I think of cookies that carry tradition and comfort, my mind instantly goes to old fashioned date filled cookies. These are not the kind of cookies you whip up on a whim. They take time, patience, and a little bit of love. But when you bite into that tender, cakey cookie with a sweet, jammy date filling, you’ll understand why they’ve been treasured for generations.
These cookies remind me of stories from neighbors and friends who grew up with tins of them at Christmas, or tucked into lunchboxes by grandmothers who believed nothing said love quite like a homemade cookie. Making them today feels like keeping a piece of history alive in the kitchen.
Why You’ll Love This Recipe
- Vintage charm: This is a true heritage recipe passed down through families.
- Soft & cakey: Unlike crisp cookies, these bake up tender and light.
- Jammy date filling: A rich, sweet contrast to the mild dough.
- Perfect for gifting: Wrap them in parchment and ribbon for a nostalgic gift.
- Holiday tradition: Especially popular around Christmas and church gatherings.
Ingredients You’ll Need
For the Cookies
- 2 cups granulated sugar
- 1 cup shortening (like Crisco)
- 2 large eggs
- 2 teaspoons vanilla extract
- 1 cup milk
- 6 teaspoons baking powder
- 1 teaspoon kosher salt
- 6 cups all-purpose flour
For the Date Filling
- 8 ounces pitted dates, chopped
- 1/3 cup granulated sugar
- 1 tablespoon flour
- 1 cup water
Ingredient Tips:
- Shortening: Keeps the cookies tender, but you can swap in butter for a richer flavor (texture will change slightly).
- Dates: Medjool dates are soft and flavorful, but Deglet Noor works well too.
- Vanilla: A touch of almond extract can be added for a different vintage flair.
Step-by-Step Instructions
Step 1: Prepare the Date Filling
- Chop the dates using a sharp knife or kitchen shears.
- Combine chopped dates, flour, sugar, and water in a saucepan.
- Cook over medium heat, stirring often, until thickened (about 15 minutes).
- Cool to room temperature before filling cookies.
Step 2: Make the Cookie Dough
- Mix flour, baking powder, and salt in a bowl.
- Cream sugar and shortening together until fluffy.
- Beat in eggs and vanilla.
- Alternate adding dry mixture and milk, ending with flour.
- Divide dough in half, wrap, and chill for 30–60 minutes.
Step 3: Roll & Cut
- Roll dough to 1/8–1/4 inch thickness.
- Cut into 2–3 inch rounds with a cookie cutter.
Step 4: Assemble the Cookies
- Place one cookie round on baking sheet.
- Spoon 1 teaspoon date filling in center, leaving border.
- Top with another round and press edges to seal.
- Crimp with fork dipped in flour.
Step 5: Bake
- Bake at 350°F until edges turn golden (12–20 minutes, depending on size).
- Cool on wire racks.
Expert Tips & Troubleshooting
- Don’t skip chilling: Warm dough will stick and tear.
- Seal well: Press edges firmly to avoid filling leaking out.
- Work in batches: Keep half the dough chilled while rolling the other half.
- Filling consistency: If too runny, cook longer; if too thick, add a splash of water.
Variations & Serving Ideas
- Nutty date filling: Add chopped walnuts or pecans to the filling.
- Citrus twist: Stir in a little orange zest to brighten the flavor.
- Iced cookies: Drizzle with simple powdered sugar glaze once cooled.
- Mini cookies: Use a smaller cutter for bite-sized holiday treats.
Storage & Make-Ahead Notes
- Store cookies in an airtight container at room temp for up to 5 days.
- Freeze baked cookies for up to 2 months.
- Filling can be made 2–3 days ahead and refrigerated.
FAQs
Can I make these with butter instead of shortening?
Yes, but the texture will be denser. Shortening keeps them soft.
Do I have to use dates?
Traditionally yes, but you could try figs, prunes, or even a thick jam.
Why is my filling leaking out?
Make sure to seal edges well and don’t overfill.
Can I make the dough the night before?
Yes—wrap in plastic and refrigerate overnight.
Internal Linking Suggestions
- Link to your Lemon Bars post (another nostalgic recipe).
- Link to your Blackberry Cobbler post (for fruit dessert lovers).
- Link to your Southern Pound Cake post (similar vintage feel).
Conclusion
These old fashioned date filled cookies are a true labor of love—a recipe that takes an afternoon, but rewards you with nostalgia in every bite. Whether you’re baking them for the holidays, for a neighbor, or just to keep a tradition alive, they’re sure to win hearts.
✨ Did someone in your family make these? Share your memories in the comments, and don’t forget to 📌 save this recipe to Pinterest so you can bake it again and again!
Old Fashioned Date Filled Cookies
Ingredients
- Cookies:
- - 2 cups granulated sugar
- - 1 cup shortening
- - 2 large eggs
- - 2 tsp vanilla extract
- - 1 cup milk
- - 6 tsp baking powder
- - 1 tsp kosher salt
- - 6 cups all-purpose flour
- Filling:
- - 8 oz pitted dates chopped
- - 1/3 cup sugar
- - 1 tbsp flour
- - 1 cup water
Instructions
- Make filling: cook chopped dates, sugar, flour, and water until thick. Cool.
- Cream sugar and shortening. Add eggs and vanilla.
- Alternate flour mixture and milk into creamed mixture.
- Chill dough. Roll and cut rounds.
- Fill with cooled date filling and top with another round.
- Seal edges. Bake at 350°F for 12–20 minutes.
Notes
- Store airtight up to 5 days.
- Freeze up to 2 months.