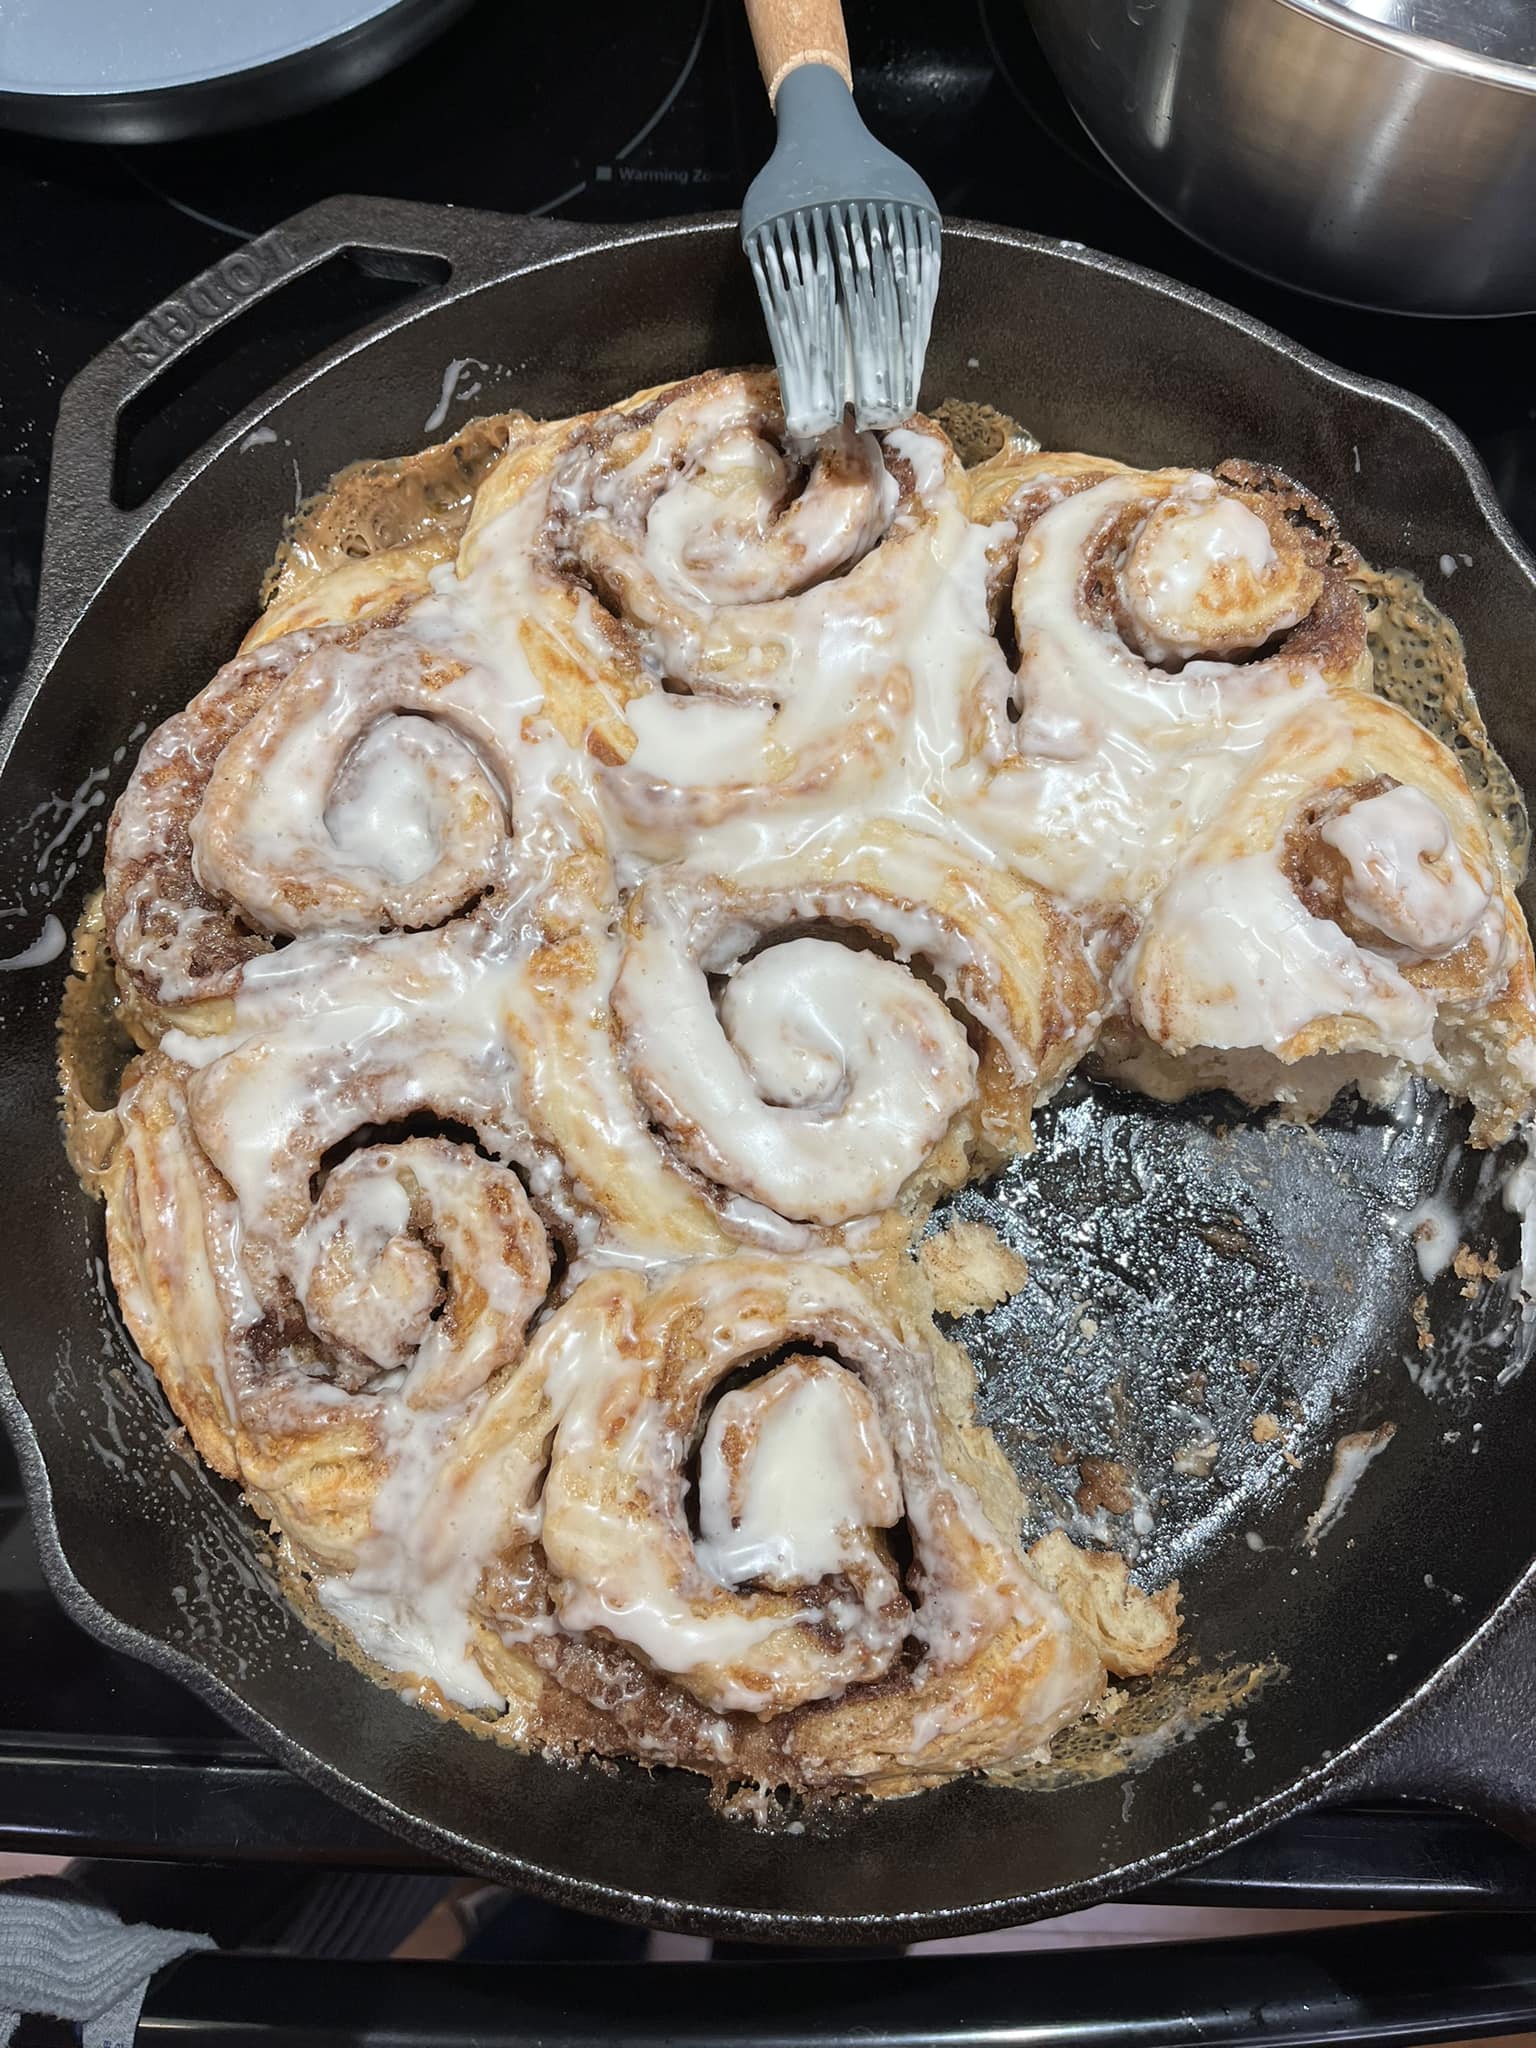
Cast Iron Sourdough Cinnamon Rolls (Healthy & Soft)
There are certain smells that just make a house feel like a home. Fresh coffee, frying bacon, and—without a doubt—the scent of cinnamon and yeast rising in the oven.
Recently, my wife set out on a mission. She wanted to create the ultimate cinnamon roll. But not just any roll—she wanted one that was softer, more flavorful, and yes, even a little bit healthier than the standard bakery bombs loaded with refined sugars and processed oils.
After much testing (and me happily volunteering as the chief taste tester), I can officially say: The wife has mastered the cast iron cinnamon roll.
These Cast Iron Sourdough Cinnamon Rolls are, hands down, better than any I have ever had. The secret lies in the long fermentation of the sourdough, the natural sweetness of honey and maple syrup, and the magic of baking in a seasoned cast iron skillet.
If you have a sourdough starter bubbling on your counter and a skillet begging to be used, this is the recipe you need to try this weekend.
Why You’ll Love This Recipe
Sourdough baking can be intimidating, but this recipe is approachable and incredibly rewarding. Here is why this version beats the store-bought tube every time:
-
Healthier Ingredients: Unlike traditional recipes that rely heavily on white sugar and vegetable oils, we use melted coconut oil and honey in the dough. The topping is sweetened with pure maple syrup. It’s a treat you can feel better about serving to your family.
-
Gut-Friendly: The overnight fermentation process breaks down the gluten and phytic acid in the flour, making these rolls easier to digest than standard yeast breads.
-
The Cast Iron Edge: Baking these in a 14-inch cast iron skillet does something magical. The iron retains heat perfectly, giving the bottoms of the rolls a slight golden caramelization while keeping the insides soft and gooey.
-
No “Sour” Overload: Because we add baking soda and baking powder right before shaping, it neutralizes some of the intense acidity. You get the depth of flavor without an overpowering sour tang.
Ingredients Breakdown
This recipe leans on pantry staples and natural sweeteners. Here is what you need to get started.
The Dough
-
Sourdough Starter: You need ½ cup of bubbly, active starter. This isn’t a discard recipe; you want the wild yeast to be strong and ready to work. Feed your starter 4–6 hours before mixing.
-
Flour: 4 cups of all-purpose flour works great here for a soft, fluffy crumb. You can use bread flour for a chewier texture.
-
Coconut Oil: We use ½ cup of melted coconut oil instead of butter or canola oil. It provides moisture and a very subtle sweetness.
-
Honey: ½ cup of honey acts as the sweetener for the dough. It keeps the bread incredibly soft.
-
Eggs: Two eggs provide structure and richness.
-
Leavening Agents: We use a unique hybrid method here: baking soda and baking powder are added after the bulk fermentation. This ensures a massive rise and fluffy texture.
The Filling
-
Butter: Softened salted butter is best.
-
Brown Sugar: We stick to brown sugar here for that classic molasses flavor that pairs so well with cinnamon.
-
Cinnamon: A full 2 tablespoons. Don’t skimp!
The Cream Cheese Glaze
-
Cream Cheese: 6 ounces, softened.
-
Heavy Cream: This thins the icing into a pourable glaze rather than a thick frosting.
-
Maple Syrup or Honey: No powdered sugar here! We use ½ cup of liquid gold (maple or honey) to sweeten the topping naturally.
Step-by-Step Instructions
This is a two-day process, but active time is minimal. It’s mostly waiting for the sourdough magic to happen.
Day 1: The Mix and Ferment
Step 1: Make the Dough In the bowl of a stand mixer, combine your active sourdough starter, flour, honey, water, eggs, and melted coconut oil. Using the dough hook, mix on low to medium speed until the dough is smooth and glossy.
-
The Windowpane Test: You know it’s ready when you can stretch a small piece of dough between your fingers into a thin, translucent membrane without it tearing.
Step 2: The Overnight Rest Place the dough in a greased bowl. I like to grease mine with a little extra coconut oil. Cover it tightly with a beeswax wrap, foil, or plastic wrap. Let it rest in a warm place overnight, or for up to 12 hours. During this time, the dough will ferment, develop flavor, and become easier to digest.
Day 2: Shape and Bake
Step 3: Preheat and Prep The next morning, preheat your oven to 375°F (190°C). Get your 14-inch cast iron skillet ready. If it’s well-seasoned, you might not need much grease, but rubbing a little butter around the edges never hurts.
Step 4: The Second Mix Here is the trick for fluffiness: Add the baking soda, baking powder, and salt to the fermented dough. Pop the bowl back onto the stand mixer and mix on medium speed for about 5 minutes. If you don’t have a mixer, you can knead this by hand, but it will take some muscle to get it fully incorporated!
Step 5: Roll and Fill Lightly dust your counter with flour. Roll the dough out into a large rectangle, about ¼ inch thick. In a small bowl, mix the softened butter, brown sugar, and cinnamon to make a paste (or spread the butter first and sprinkle the sugar/cinnamon on top—either way works). Spread the filling evenly all the way to the edges.
Step 6: The Roll Up Starting from the long edge, roll the dough up as tightly as you can. When you get to the end, pinch the seam into the main roll to seal it shut. Using a sharp knife (or unflavored dental floss for a clean cut!), slice the log into 12 even rolls.
Step 7: Cast Iron Baking Place the rolls into your 14-inch cast iron skillet. Leave a little space between them, as they will expand. Bake at 375°F for 20–25 minutes. You are looking for a golden brown top and the dough to be cooked through.
-
Note: If they are browning too fast, you can tent a piece of foil over the skillet for the last 5 minutes.
Step 8: The Warm Pour-Over Glaze While the rolls cool slightly, make the topping. In a medium saucepan over medium heat, combine the cream cheese, heavy cream, maple syrup (or honey), and vanilla extract. Stir constantly until the mixture is melted and combined.
-
Pro Tip: Use an immersion blender if you want it perfectly smooth and glossy. Pour the warm glaze over the warm rolls. The heat helps the sauce seep down into the spirals, making every bite gooey.
Expert Tips for Sourdough Success
-
Temperature Matters: Sourdough loves warmth. If your kitchen is freezing cold in the winter, the overnight rise might take longer. Try placing the bowl in the oven (turned off) with just the light on.
-
Don’t Overheat the Honey: When making the glaze, keep the heat on medium or low. You just want to melt the cream cheese, not boil the cream.
-
The Skillet Factor: If you don’t have a 14-inch skillet, you can divide these between two 10-inch skillets or use a 9×13 baking dish. However, the cast iron gives the best crust. If you need to restore an old pan for this, check out my guide on restoring cast iron with vinegar.
Variations
My wife mastered this version, but you can always tweak it to your taste:
-
Nutty Crunch: Add chopped pecans or walnuts to the filling for a texture contrast.
-
Orange Zest: Grate fresh orange zest into the glaze for a citrusy brightness that cuts through the rich dough.
-
Apple Cinnamon: Finely chop an apple and scatter it over the cinnamon sugar before rolling for an autumn twist.
Serving Suggestions
These rolls are a meal in themselves, but they pair beautifully with a savory protein to balance the sugar.
-
Eggs: Since you already have the cast iron out, why not whip up some Scrambled Eggs in Cast Iron? The fluffy eggs are the perfect partner to a sweet roll.
-
Coffee: A strong cup of black coffee or a latte is non-negotiable for me when eating these.
-
Bacon: The salty-sweet combo of bacon and cinnamon rolls is unmatched.
Storage and Reheating
Counter: These rolls are best eaten fresh, but they will stay soft in an airtight container on the counter for 2–3 days.
Refrigerator: Because of the cream cheese glaze, if you plan to keep them longer than a few days, store them in the fridge.
Freezer: You can freeze baked, unglazed rolls. Wrap them individually in plastic wrap and freeze for up to 2 months. Thaw and warm them up, then make a fresh batch of glaze.
Reheating: To bring that “fresh out of the oven” texture back, pop a roll in the microwave for 15–20 seconds.
FAQs
Can I use sourdough discard? This recipe relies on the rising power of active yeast plus the baking soda, so active starter is preferred for the best rise. If you only have discard, you might want to try a recipe specifically formulated for it, like my Sourdough Discard Crackers which don’t need to rise.
Why coconut oil instead of butter? We love the subtle flavor and moisture coconut oil provides. It’s also a great option if you are trying to reduce dairy in the dough itself (though the filling and glaze still have dairy). If you prefer butter, you can swap it 1:1.
My dough is too sticky! Sourdough can be tricky depending on the humidity in your house. If the dough is unmanageable, add more flour 1 tablespoon at a time. However, remember that a slightly tacky dough makes for a softer roll.
Do I have to use a cast iron skillet? No, but I highly recommend it! Cast iron provides an even, radiant heat that prevents the bottoms from burning before the centers are done. If you love baking in cast iron, try my Cast Iron Skillet Biscuits next.
Cast Iron Sourdough Cinnamon Rolls
Ingredients
- Dough:
- 1/2 cup sourdough starter bubbly and active
- 1/2 cup water
- 4 cups all-purpose flour
- 1/2 cup melted coconut oil
- 1/2 cup honey
- 2 large eggs
- 1 tsp baking soda
- 1 tsp baking powder
- 1/2 tsp salt
- Cinnamon Sugar Filling:
- 1/2 cup softened butter
- 1 cup brown sugar
- 2 tbsp ground cinnamon
- Cream Cheese Topping:
- 6 oz cream cheese
- 1/2 cup heavy cream
- 1/2 cup maple syrup or honey
- 2 tsp vanilla extract
Instructions
- Mix Dough: In the bowl of a stand mixer, combine active sourdough starter, flour, honey, water, eggs, and melted coconut oil. Mix on low/medium until smooth, glossy, and the dough passes the windowpane test (stretches without tearing).
- Overnight Ferment: Place the dough in a greased bowl. Cover with beeswax wrap, foil, or plastic wrap. Allow to rest in a warm place overnight, or up to 12 hours.
- Add Leavening: The next day, preheat oven to 375°F (190°C). Add the baking soda, baking powder, and salt to the fermented dough. Mix in the stand mixer on medium speed for about 5 minutes until fully incorporated.
- Roll: Lightly dust the counter with flour. Roll the dough out into a rectangle about 1/4 inch thick.
- Fill: In a small bowl, mix the softened butter, brown sugar, and cinnamon. Spread this mixture evenly over the top of the dough.
- Shape: Roll the dough up tightly from the long edge. Pinch the seam to seal. Slice into 12 even rolls.
- Bake: Place rolls into a well-seasoned 14" cast iron skillet (or 9x13 baking dish). Bake at 375°F for 20-25 minutes until lightly browned and cooked through.
- Make Glaze: While rolls cool slightly, add cream cheese, heavy cream, maple syrup (or honey), and vanilla to a medium saucepan. Heat over medium, stirring constantly until combined and smooth. (Use an immersion blender for extra smoothness).
- Serve: Pour the warm glaze over the rolls and serve immediately.
Notes