Homemade Donut Recipe: A Sweet and Nostalgic Treat
Slug: homemade-donut-recipe
SEO Title: “Homemade Donut Recipe: Soft, Sweet, and Perfectly Glazed”
Meta Description: “Try this homemade donut recipe for soft, sweet, and perfectly glazed treats. A nostalgic favorite that’s easier to make than you think!”
Introduction
There’s something magical about making homemade donuts from scratch. The smell of dough frying in hot oil, the warm, pillowy texture, and that first bite into a perfectly glazed treat—it all brings back childhood memories of weekend baking sessions in the kitchen. This homemade donut recipe is simple, delicious, and absolutely worth the effort.
I recently gave this recipe a try for the first time, and while I might tweak the nutmeg next time (it was a bit strong), the end result was still a batch of golden, soft, and sweet donuts that disappeared almost instantly. If you’ve never made donuts before, don’t worry—I’ll walk you through each step.

Why You’ll Love This Homemade Donut Recipe
- Soft and Fluffy – These donuts are light, airy, and have the perfect texture.
- Simple Ingredients – No fancy equipment or hard-to-find ingredients needed.
- Customizable – Adjust the nutmeg, add cinnamon, or try a chocolate glaze.
- Nostalgic and Fun – Perfect for making with kids or for a special homemade treat.
Ingredients
For the Dough:
- 1 ¼ cups warm water (¼ cup reserved for blooming the yeast)
- 1 ¼ tablespoons yeast
- ½ cup sugar (+ 1 teaspoon for blooming the yeast)
- 3 ¾ cups all-purpose flour
- ¼ cup shortening (not butter shortening)
- 1 egg
- ½ teaspoon salt
- 2 teaspoons vanilla extract
- ½ teaspoon nutmeg (optional – or adjust to taste)
For the Glaze:
- 2 cups powdered sugar
- 1 teaspoon butter
- Small amounts of milk (until desired consistency)
Step-by-Step Instructions
1. Bloom the Yeast
In a small bowl, mix ¼ cup warm water, 1 teaspoon sugar, and yeast. Stir and let it sit for about 5–10 minutes until it becomes foamy. This step ensures your yeast is active and ready to work its magic.
2. Prepare the Dough
In a large mixing bowl, add the flour and cut in the shortening until it’s well combined. Once blended, add the remaining sugar, egg, salt, vanilla, and nutmeg. Pour in the bloomed yeast mixture and mix everything using a dough hook for about 3 minutes.
3. Let the Dough Rise
Transfer the dough to a lightly oiled bowl, cover it with a towel, and let it rise in a warm place for about 1 hour, or until it doubles in size.
4. Shape the Donuts
Turn the risen dough out onto a lightly floured surface. Punch it down and let it rest for 10 minutes. Then, roll it out to your desired thickness and cut out donut shapes. (If you don’t have a donut cutter, a round glass and a small bottle cap for the center work great!)
Place the cut donuts onto a lightly floured baking sheet, cover, and let them rise again for 30 minutes.
5. Fry the Donuts
In a large skillet, heat about 1½ inches of oil to 350°F. (To test, drop a small piece of dough in—if it sizzles and floats, it’s ready.) Fry the donuts in batches, flipping when the bottoms are golden brown. This usually takes about 1–2 minutes per side.
Remove and place the fried donuts on a paper towel-lined baking sheet to drain excess oil.
6. Make the Glaze
In a bowl, mix powdered sugar and butter, then slowly add small amounts of milk until you reach your desired glaze consistency.
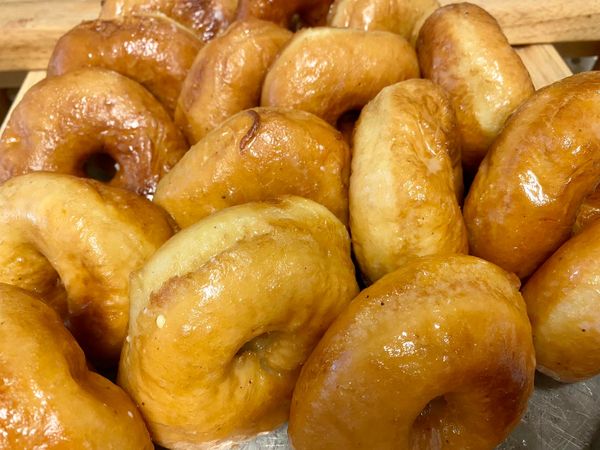
7. Glaze the Donuts
Dip each warm donut into the glaze, making sure it’s evenly coated. Let them rest on a baking sheet for a few minutes to allow the glaze to set.
Tips for the Best Homemade Donuts
- Temperature Matters: If your kitchen is cold, place your dough near a warm oven to help it rise.
- Nutmeg or No Nutmeg? Some people love the subtle spice, while others find it overpowering. Feel free to adjust or leave it out.
- Crispy or Soft? Frying at the right temperature (350°F) ensures crispy exteriors with soft, airy centers.
- Extra Flavors: Try adding cinnamon to the glaze or dipping the donuts in melted chocolate for a twist!
Conclusion
There’s something incredibly satisfying about biting into a warm, freshly made donut. This homemade donut recipe is perfect for weekend baking, special occasions, or just because you’re craving something sweet and nostalgic. Even if you’re new to donut-making, this step-by-step guide will have you frying up a delicious batch in no time.
So, will you leave the nutmeg in or take it out next time? Either way, you’re in for a treat! 🍩
Would you try making these? Let me know in the comments below! Happy baking! 😊