Old-Fashioned Apple Butter Whole Wheat Bread
A Savory, Nostalgic Loaf You Will Want to Eat Every Day
There are certain old-fashioned recipes that are so incredibly delicious, they can ruin you for any other baked good. This apple butter whole wheat bread is exactly that kind of recipe. In fact, it is the kind of bread that is so addictive, you might have to temporarily stop baking it just so you can stop eating it! If you are pulling this vintage classic out of the recipe box for the first time in nearly 50 years, you are in for a deeply nostalgic and satisfying treat.
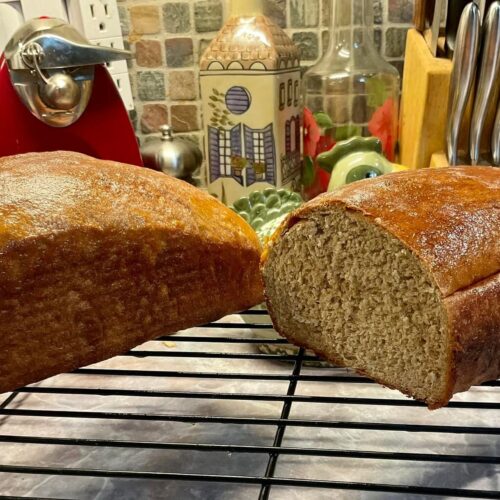
Despite featuring fruit preserves and honey in the dough, this hearty loaf is delightfully savory and not sweet at all. The apple butter melts into the background, providing an incredible depth of earthy flavor and locking in moisture without turning the loaf into a dessert bread. The combination of whole wheat flour and all-purpose flour creates a beautifully dense, sturdy structure that is perfect for slicing thick and toasting.
Baking bread from scratch is a labor of love that rewards you with the most incredible aromas filling your kitchen. This recipe yields two gorgeous, golden-brown loaves, making it the perfect bake for gifting one to a neighbor and keeping one for your own breakfast table. Finished with a simple egg wash, the crust bakes up shiny and beautifully crisp, while the inside remains tender and wholesome.

Why You’ll Love This Recipe
- Perfectly Savory: Unlike quick breads, this yeast bread uses apple butter for moisture and depth, resulting in a savory loaf that is not sweet at all.
- Two-Loaf Yield: The recipe generously makes two full loaves, which is ideal for holiday gifting or freezing one for later use.
- Beautiful Egg Wash Crust: Brushing the dough with a simple beaten egg wash right before baking creates a stunning, bakery-style shiny crust.
- Hearty Whole Grain Texture: Blending whole wheat flour with all-purpose flour ensures you get the nutritional benefits and robust flavor of whole grains without the loaf becoming a brick.
- Versatile Shaping Options: You can bake these in standard loaf pans or get creative by dividing the dough into strands and making beautiful braided loaves.
Ingredients
- Active Dry Yeast: 2 packages of active dry yeast to provide the lifting power for the heavy whole wheat flours.
- Granulated Sugar: 1 tablespoon of sugar to help activate and feed the yeast.
- Warm Water: 2 cups total of warm water, divided during the mixing process.
- Apple Butter: 1/2 cup of your favorite smooth apple butter.
- Unsalted Butter: 1/4 cup of butter, melted and slightly cooled.
- Honey: 2 tablespoons of honey for a touch of natural floral flavor.
- Kosher Salt: 1 1/2 tablespoons of salt to perfectly season the large volume of dough.
- Whole Wheat Flour: 3 1/2 cups of whole wheat flour for that classic, nutty wheat flavor.
- All-Purpose Flour: 2 to 2 1/2 cups of all-purpose flour to balance the heavy wheat and create a workable dough.
- Egg Wash: 1 large egg, beaten, mixed with 1 teaspoon of water to brush on the crust before baking.
Step-by-Step Instructions
Step 1: Proof the Yeast
In a large mixing bowl, combine the 2 packages of active dry yeast, the 1 tablespoon of sugar, and just 1/2 cup of the warm water. Stir gently and let the mixture sit undisturbed for about 5 to 10 minutes until it becomes foamy and bubbly. This proves that your yeast is alive and active.
Step 2: Combine the Wet Ingredients
Once the yeast is bubbly, pour in the remaining 1 1/2 cups of warm water. Stir in the 1/2 cup of apple butter, the 1/4 cup of melted butter, the 2 tablespoons of honey, and the 1 1/2 tablespoons of salt. Whisk everything together until the apple butter is fully incorporated into the liquids.
Step 3: Add the Flours
Begin adding the 3 1/2 cups of whole wheat flour to the wet mixture, beating it in exactly 1 cup at a time. Once the whole wheat flour is incorporated, begin adding the all-purpose flour gradually. Stop adding the all-purpose flour when the mixture forms a stiff, workable dough.
Step 4: Knead the Dough
Turn the stiff dough out onto a clean, floured surface. Knead the dough with your hands, adding just enough extra all-purpose flour to prevent it from sticking, until the dough becomes smooth and elastic. This usually takes about 8 to 10 minutes of steady kneading.
Step 5: The First Rise
Place the smooth dough into a lightly greased bowl. Cover the bowl with a clean, damp towel. Place the bowl in a warm, draft-free place and let it rise until it has completely doubled in size. Because whole wheat flour is heavy, this initial rise will take anywhere from 1 1/2 to 2 hours.
Step 6: Shape and the Second Rise
Gently punch the risen dough down to deflate the air bubbles. Divide the dough evenly into 2 separate parts. Shape each half into a tight loaf and place them into two greased loaf pans. Cover the pans with the damp towel and let them rise in a warm place until doubled again, which should take about 1 hour.
Step 7: Apply the Egg Wash and Bake
Preheat your oven to a hot 425°F (220°C). In a small bowl, beat the 1 egg with the 1 teaspoon of water. Gently brush this egg wash over the tops of the risen loaves. Place the pans in the oven and bake at 425°F for exactly 10 minutes.
Step 8: Reduce Heat and Finish
After 10 minutes, immediately reduce the oven temperature to 375°F (190°C). Continue baking the bread for about 25 more minutes. You will know the bread is fully baked when the crust is deep golden brown and the loaves sound hollow when you tap firmly on the top. Remove the bread from the pans immediately and let them cool completely on wire racks before slicing.
Expert Cooking Tips
- Improving the Rise: Whole wheat bread can sometimes be a bit dense. To improve the rise and get a fluffier loaf, try adding 2 tablespoons of vital wheat gluten to your dry ingredients. This gives the heavy whole wheat bran the extra structural support it needs to climb high.
- Check Your Water Temp: When proofing the yeast, ensure your water is warm (between 105°F and 110°F), but not hot. Water that is too hot will kill the yeast, and your bread will not rise at all.
- The Windowpane Test: To check if you have kneaded the dough enough, pinch off a small piece and stretch it gently with your fingers. If you can stretch it thin enough to see light through it without it tearing, the gluten is properly developed.
- Do Not Rush the Rise: Because this recipe contains a large volume of heavy whole wheat flour, the yeast has to work very hard. Be patient and allow the full 1.5 to 2 hours for the first rise, finding the warmest spot in your kitchen to help it along.
- Alternative Braided Shaping: If you want a more artisan presentation, skip the loaf pans. Divide each dough half into 4 separate strands and braid them together. Place the braided loaves on a baking sheet generously dusted with cornmeal for their second rise.
Variations to Try
- Spiced Apple Bread: If you want to lean into the autumnal flavors, add 2 teaspoons of ground cinnamon and 1/2 teaspoon of ground nutmeg to the flour mixture.
- Nutty Wheat Loaf: Fold 1 cup of chopped, toasted walnuts or pecans into the dough during the final few minutes of kneading for a wonderful textural crunch.
- Oat-Topped Loaves: Right after brushing the unbaked loaves with the egg wash, sprinkle a generous handful of old-fashioned rolled oats over the top so they adhere to the crust while baking.
What to Serve With Apple Butter Whole Wheat Bread
Because this bread is inherently savory, it is incredibly versatile. It makes the most phenomenal morning toast when slathered with salted European butter or an extra layer of sweet apple butter. It is also sturdy enough to be used for hearty deli sandwiches, or served in thick, warm slices alongside a steaming bowl of butternut squash soup or beef stew.
Storage & Reheating
Refrigerator
Homemade bread stales much faster in the refrigerator due to the cold temperatures crystallizing the starches. It is highly recommended to store your fully cooled loaves in a bread bag or an airtight container at room temperature, where they will stay fresh for 3 to 4 days.
Freezer
This bread is an excellent candidate for the freezer. Once the loaves are completely cool, slice them. Wrap the sliced loaf tightly in plastic wrap, then place it inside a heavy-duty freezer bag, pressing out all the excess air. Freeze for up to 3 months.
Reheating
To enjoy frozen bread, simply pull out individual slices as needed and pop them directly into your toaster. If you want to warm a whole, unsliced loaf, wrap it in aluminum foil and place it in a 350°F oven for about 15 minutes until it is soft and warmed through.
Frequently Asked Questions
Is this bread sweet like a cake?
No, not at all! Despite containing apple butter, honey, and a tablespoon of sugar, this bread is distinctly savory. The sweeteners merely feed the yeast and balance the slightly bitter notes of the whole wheat flour, resulting in a classic, hearty sandwich bread profile.
Can I use a stand mixer to knead the dough?
Absolutely. You can mix and knead this dough using a heavy-duty stand mixer fitted with a dough hook attachment. Knead on low speed for about 5 to 7 minutes, or until the dough clears the sides of the bowl and looks smooth and elastic.
Can I use 100% whole wheat flour instead of mixing it?
It is not recommended to skip the all-purpose flour entirely. Whole wheat flour is very heavy and absorbs a lot of liquid. Using 100% whole wheat without the balance of the lighter all-purpose flour will result in a very dense, dry, and crumbly brick of bread.
Why do I start baking at 425°F and then turn it down?
Starting the bread at a high heat of 425°F gives the yeast a final, rapid burst of activity known as “oven spring,” which helps the loaves rise tall and creates a beautiful crust. Reducing the heat to 375°F allows the dense interior to bake all the way through without burning the outside.
What is the purpose of the damp towel during the rise?
Covering the bowl with a damp towel traps the moisture inside, preventing the surface of the dough from drying out and forming a hard skin, which would restrict the dough’s ability to rise and expand freely.
Final Thoughts
Bringing a 50-year-old recipe back to life in your kitchen is a truly rewarding experience, especially when it yields something as comforting and wholesome as this apple butter whole wheat bread. The combination of savory wheat, subtle apple undertones, and a gorgeous egg-washed crust makes it clear why this recipe is hard to stop eating. Dust your counters with flour, embrace the therapeutic process of kneading, and enjoy the unparalleled taste of an authentic, old-fashioned homemade loaf.
Old-Fashioned Apple Butter Whole Wheat Bread
A vintage, 50-year-old recipe for a hearty, savory whole wheat bread enriched with apple butter and honey. Yields two beautiful, golden loaves!
Equipment
- Large mixing bowl
- 2 standard loaf pans
- Clean kitchen towel
- Wire cooling racks
Ingredients
- 2 pkg. active dry yeast
- 1 tbsp. granulated sugar
- 2 cups warm water divided (105°F - 110°F)
- 1/2 cup apple butter
- 1/4 cup unsalted butter melted
- 2 tbsp. honey
- 1 1/2 tbsp. kosher salt
- 3 1/2 cups whole wheat flour
- 2 to 2 1/2 cups all-purpose flour
- 1 large egg for egg wash
- 1 tsp. water for egg wash
Instructions
- In a large bowl, dissolve the 2 packages of yeast and 1 tbsp sugar in 1/2 cup of the warm water. Let sit for 5-10 minutes until bubbly.
- Stir in the remaining 1 1/2 cups of warm water, the apple butter, melted butter, honey, and salt.
- Beat in the whole wheat flour, exactly 1 cup at a time.
- Gradually add enough of the all-purpose flour to create a stiff, workable dough.
- Turn the dough onto a floured surface. Knead in enough extra flour to prevent sticking, continuing until the dough is smooth and elastic (about 8-10 minutes).
- Place in a lightly greased bowl, cover with a damp towel, and let rise in a warm place until doubled (about 1 1/2 to 2 hours).
- Punch the dough down and divide it evenly into 2 parts. Shape into loaves and place into two greased loaf pans.
- Cover with the damp towel again and let rise until doubled (about 1 hour).
- Preheat oven to 425°F.
- In a small bowl, beat the egg with 1 tsp of water. Brush this egg wash evenly over the tops of both loaves.
- Bake at 425°F for 10 minutes.
- Reduce the oven temperature to 375°F. Bake for an additional 25 minutes, or until the loaves sound hollow when tapped.
- Remove immediately from the pans and cool completely on wire racks.
Notes
Braided Option: Instead of loaf pans, you can divide each half into 4 strands, braid them, and let them rise on a baking sheet dusted with cornmeal. Sweetness: This bread is intended to be savory and hearty, not sweet.