Authentic Cast Iron Skillet Buttermilk Biscuits
The Secret to Fluffy, Southern-Style Skillet Biscuits
There is nothing quite as inviting as the smell of fresh biscuits baking in the oven. For generations, Southern cooks have relied on the trusty cast iron skillet to achieve the perfect biscuit: towering, tender, and boasting a gorgeously crisp, golden-brown bottom. If you have been searching for a foolproof, from-scratch recipe that yields those nostalgic, bakery-style results right in your own kitchen, you have finally found it.
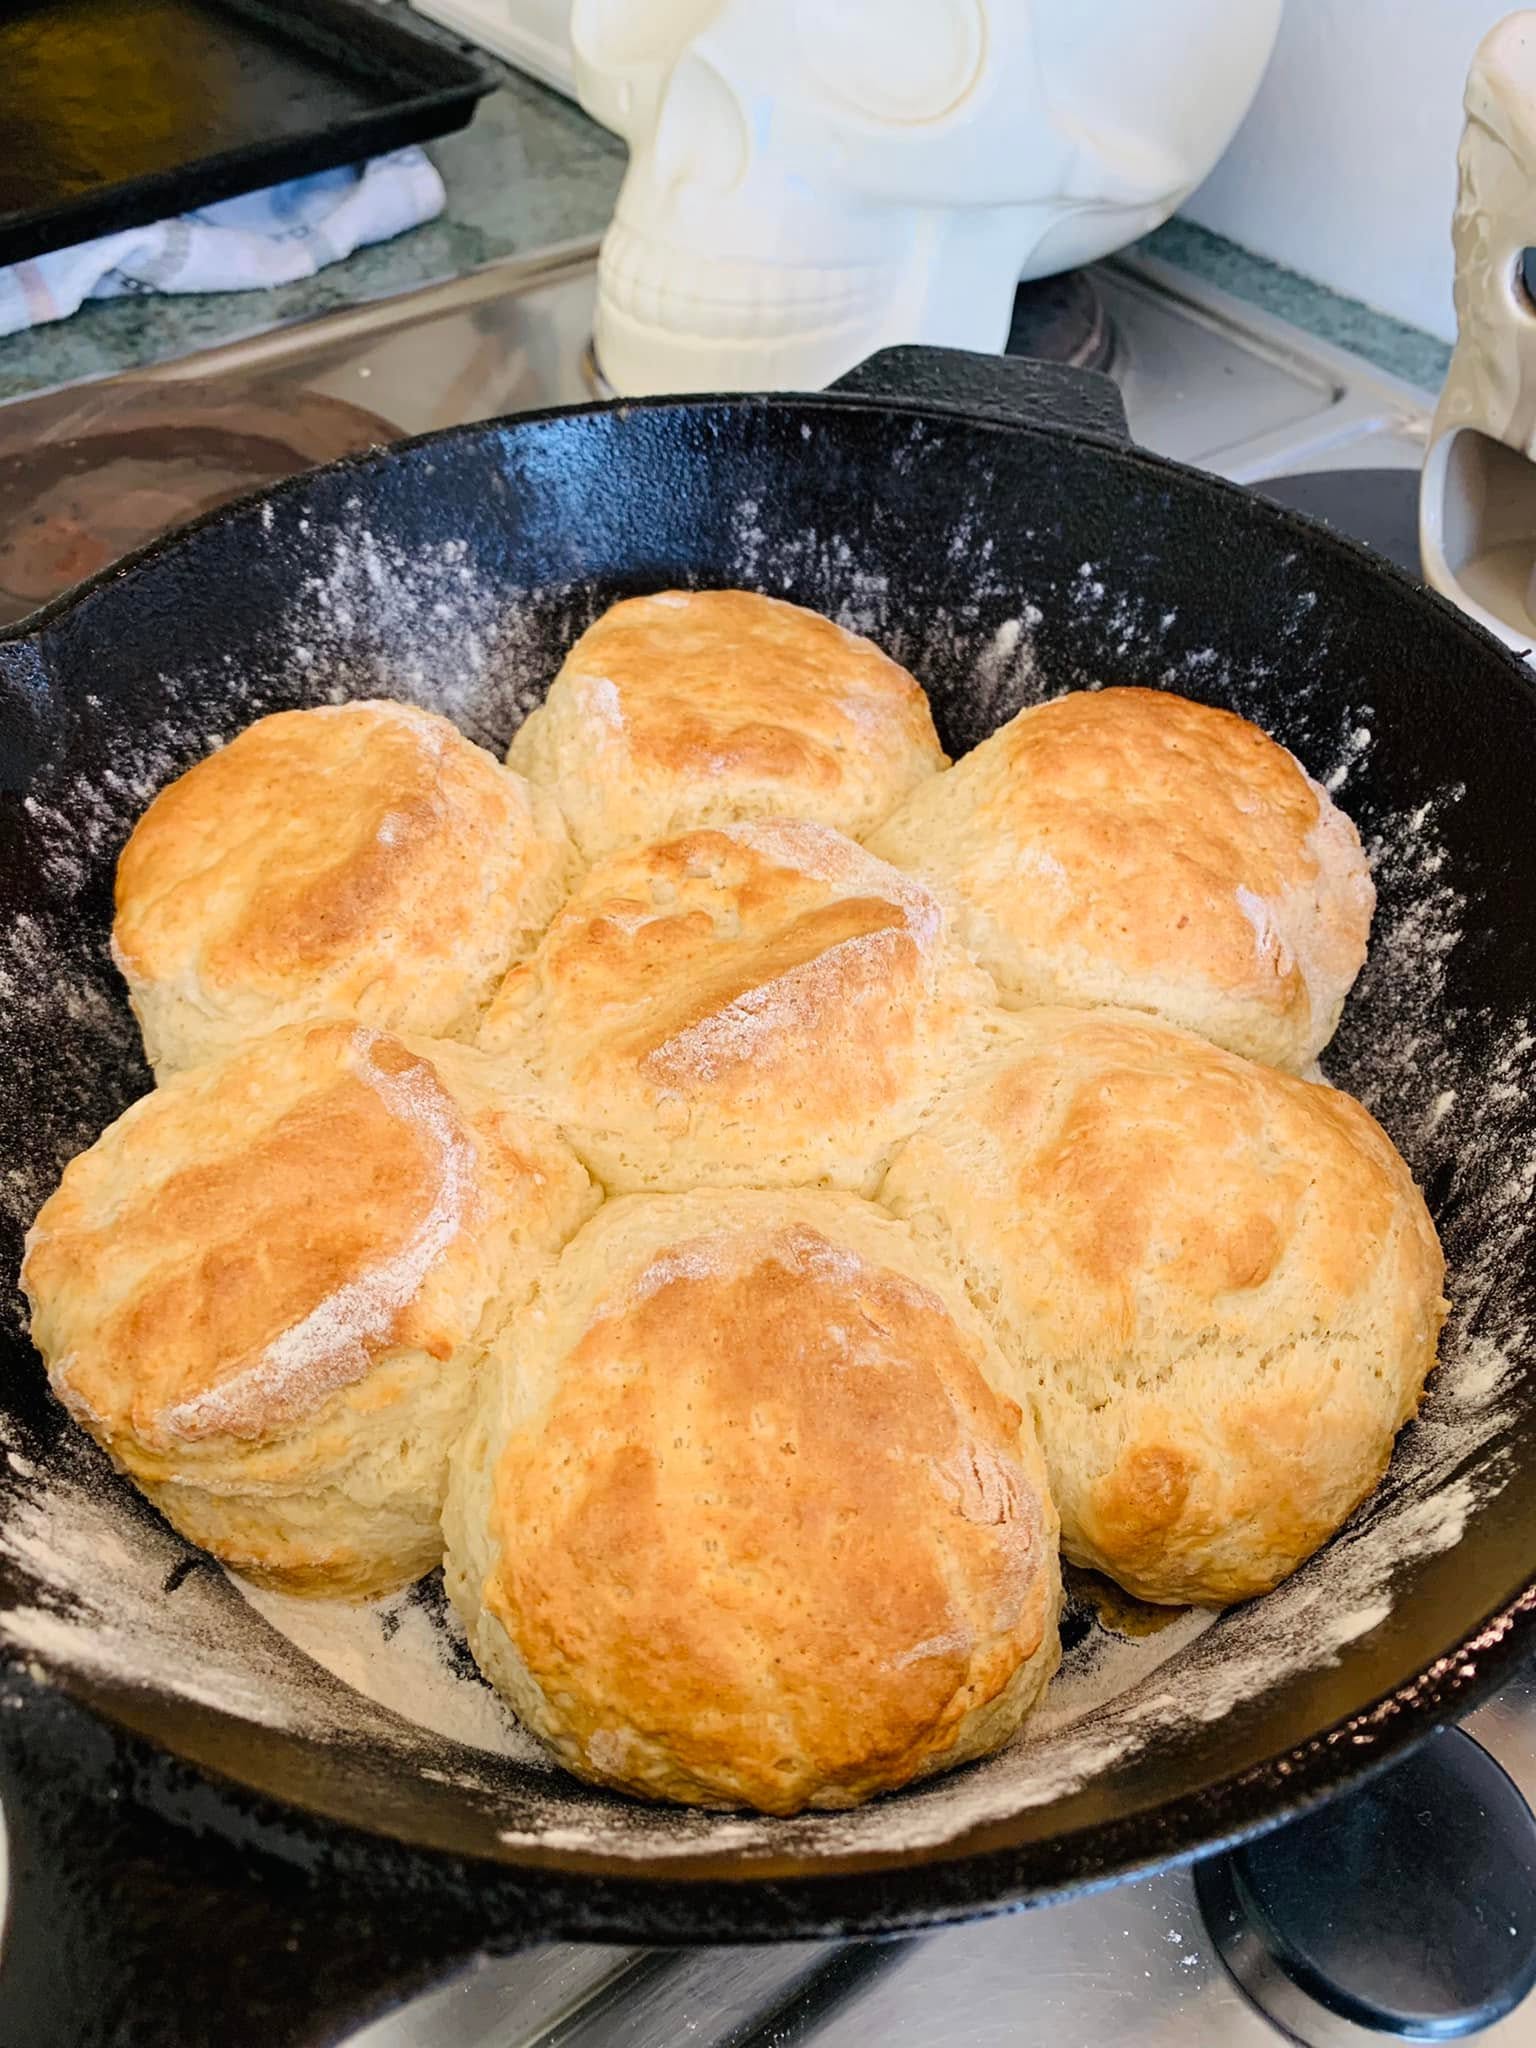
The beauty of this recipe lies in its absolute simplicity. You don’t need a laundry list of ingredients or complicated culinary techniques. The magic happens when you combine incredibly cold fat with the right flour, and bake them nestled closely together in a hot iron skillet. Placing the biscuits so their edges touch forces them to rise up tall and fluffy rather than spreading out flat.
Using White Lily self-rising flour is the ultimate key to achieving that signature, cloud-like texture. Because it is milled from soft winter wheat, it has a lower protein content than standard all-purpose flour, which prevents the dough from becoming tough and heavy. Whether you are splitting them open to smother in sausage gravy, or simply slathering them with melted butter and sweet blackberry jam, these homemade skillet biscuits are guaranteed to be the star of your breakfast table.
Why You’ll Love This Recipe
- Only 3 Main Ingredients: With self-rising flour, butter, and buttermilk, you can skip measuring out baking powder and salt.
- Crispy Cast Iron Crust: Baking these in a cast iron skillet creates a deeply browned, slightly crunchy bottom that baking sheets just cannot replicate.
- Mile-High Rise: Nestling the dough rounds close together in the pan forces them to climb upward, resulting in incredibly tall, split-able biscuits.
- Melt-in-Your-Mouth Texture: Using soft wheat flour ensures the crumb is impossibly light, tender, and fluffy.
- Quick to Make: From mixing the dough to pulling them out of the oven, this recipe takes less than 30 minutes.
- Perfect for Meal Prep: You can freeze the raw, cut biscuits directly in the skillet and bake them fresh on busy mornings.
Ingredients
- White Lily Self-Rising Flour: 2 cups, plus a little extra for dusting your countertop. This specific flour is essential for the lightest, fluffiest texture.
- Unsalted Butter: 1/2 cup (1 stick), very cold and cut into small cubes. (You can also substitute very cold vegetable shortening or lard).
- Buttermilk: 3/4 cup of cold, whole milk buttermilk. The acidity reacts with the self-rising flour to give the biscuits their rise.
- Melted Butter (Optional): 2 tablespoons of melted butter for brushing over the tops as soon as they come out of the oven.
Step-by-Step Instructions
Step 1: Prepare the Oven and Skillet
Preheat your oven to 450°F (230°C). Biscuits need an initial blast of high heat to create steam, which helps them rise quickly. Take a 9-inch or 10-inch cast iron skillet and grease the bottom and sides lightly with butter or a touch of shortening.
Step 2: Cut the Butter into the Flour
In a large mixing bowl, add your 2 cups of self-rising flour. Drop in the cubes of very cold butter. Using a pastry blender or two forks, cut the butter into the flour until the mixture resembles coarse, crumbly meal with a few pea-sized pieces of butter remaining. Those small lumps of cold fat are what create the flaky layers!
Step 3: Add the Buttermilk
Make a small well in the center of your flour mixture and pour in the cold buttermilk. Use a wooden spoon or a rubber spatula to gently fold the mixture together just until the dough forms a shaggy, sticky ball. Do not overmix, or your biscuits will be tough.
Step 4: Fold the Dough
Turn the shaggy dough out onto a lightly floured surface. Dust your hands with a little flour, and gently pat the dough out into a rough rectangle. Fold the dough in half over itself, give it a quarter turn, and gently pat it out again. Repeat this folding process 3 or 4 times. This technique, called lamination, creates beautifully distinct, flaky layers.
Step 5: Cut the Biscuits
Pat the folded dough out to a thickness of about 3/4 to 1 inch. Using a floured 2.5-inch or 3-inch biscuit cutter, press straight down into the dough. Do not twist the cutter! Twisting seals the edges of the dough and prevents the biscuits from rising. Lift the cutter straight up and out. Gently gather the dough scraps and press them together to cut the remaining biscuits.
Step 6: Arrange in the Skillet and Bake
Place the cut biscuits into your prepared cast iron skillet. Arrange them so their edges are just touching. Place the skillet in the hot oven and bake for 12 to 15 minutes, or until the tops are a beautiful golden brown.
Step 7: Brush and Serve
Carefully remove the hot skillet from the oven. Immediately brush the tops of the hot biscuits with the melted butter. Let them cool for just a couple of minutes in the pan before serving warm.
Expert Cooking Tips
- Keep Everything Cold: The secret to flaky biscuits is cold fat. If your kitchen is warm, chill your cubed butter in the freezer for 10 minutes before cutting it into the flour, and leave your buttermilk in the fridge until the very last second.
- Do Not Twist the Cutter: It bears repeating—never twist your biscuit cutter! Press straight down and pull straight up to keep the edges open so they can rise properly.
- Don’t Overwork the Dough: Handle the dough as little as possible. The warmth from your hands will melt the butter, and kneading it will develop gluten, leading to heavy, dense pucks instead of light, fluffy biscuits.
- Use a Sharp Cutter: A thin metal biscuit cutter works much better than a glass or a thick plastic cup, which compresses the dough edges.
- Dust with Flour: If you like that rustic, bakery-style look, give the tops of the raw biscuits a very light dusting of flour right before they go into the oven.
Variations to Try
- Cheddar and Chive: Fold 3/4 cup of sharp shredded cheddar cheese and 2 tablespoons of fresh, finely chopped chives into the flour mixture before adding the buttermilk.
- Bacon Black Pepper: Add 1/2 cup of crispy, finely crumbled bacon and a heavy teaspoon of freshly cracked black pepper for a savory breakfast treat.
- Sweet Honey Butter: Instead of brushing the baked biscuits with plain butter, mix 2 tablespoons of melted butter with 1 tablespoon of honey and brush the sweet glaze over the tops.
What to Serve With Fresh Biscuits
These cast iron biscuits are incredibly versatile. For breakfast, split them open while piping hot and serve them smothered in rich, peppery sausage gravy. They are also perfect for building savory breakfast sandwiches with fried eggs, thick-cut bacon, and sharp cheddar. If you are serving them alongside dinner, they are the ultimate companion for soaking up the broth from a hearty bowl of beef stew or chicken and dumplings.
Storage & Reheating
Refrigerator
Allow any leftover biscuits to cool completely to room temperature. Store them in an airtight container or a heavy-duty zip-top bag at room temperature for up to 2 days, or in the refrigerator for up to 4 days.
Freezer
Biscuits freeze beautifully, both baked and unbaked! To freeze unbaked biscuits, cut the dough rounds, place them on a parchment-lined baking sheet, and freeze until solid. Transfer to a freezer bag for up to 3 months. You can bake them directly from frozen, just add 3 to 5 extra minutes to the baking time. To freeze baked biscuits, wrap them tightly in foil and freeze for up to 2 months.
Reheating
To recapture that fresh-baked texture, wrap leftover biscuits in aluminum foil and place them in a 350°F (175°C) oven for about 5 to 8 minutes until warmed completely through. Avoid microwaving them if possible, as it tends to make the texture tough and rubbery.
Frequently Asked Questions
Can I make these without a cast iron skillet?
Yes, absolutely! While cast iron provides the crispiest bottom crust, you can place the cut biscuits on a parchment-lined baking sheet or in a standard 9-inch round cake pan. Just make sure their edges are still touching.
Why didn’t my biscuits rise?
If your biscuits turned out flat, it is usually due to one of three things: the butter got too warm and melted before baking, you twisted the biscuit cutter and sealed the edges, or your self-rising flour is expired and the leavening agents are no longer active.
Can I use regular milk instead of buttermilk?
Buttermilk is highly recommended because its acidity reacts with the self-rising flour to create a tall, tender biscuit. If you are in a pinch, you can make a substitute by adding 1 tablespoon of white vinegar or lemon juice to a measuring cup, then filling the rest of the cup with whole milk. Let it sit for 5 minutes to curdle before using.
What if I don’t have self-rising flour?
If you only have all-purpose flour, you can easily make your own self-rising blend. For every 1 cup of all-purpose flour, whisk in 1 1/2 teaspoons of baking powder and 1/4 teaspoon of fine salt.
Should I use butter or shortening?
This comes down to personal preference! Butter provides the best flavor and creates distinct, flaky layers. Shortening (or lard) creates an incredibly tender, soft, and crumbly texture. Many Southern bakers like to use a 50/50 split of half butter and half shortening to get the best of both worlds.
Final Thoughts
There is a unique sense of pride that comes with pulling a cast iron skillet full of towering, golden-brown biscuits out of the oven. With just three simple ingredients and a few easy folding techniques, you can master the art of from-scratch Southern biscuit making. Whether you serve them sweet with jam or savory with gravy, these are guaranteed to bring a touch of warm, old-fashioned comfort to your table.

Authentic Cast Iron Skillet Buttermilk Biscuits
Perfectly fluffy, tender, from-scratch buttermilk biscuits baked in a cast iron skillet for a gloriously crisp, golden-brown crust.
Equipment
- 9-inch or 10-inch Cast Iron Skillet
- Large mixing bowl
- Pastry blender or two forks
- 2.5-inch or 3-inch biscuit cutter
Ingredients
- 2 cups White Lily self-rising flour plus extra for dusting
- 1/2 cup 1 stick unsalted butter, very cold and cubed
- 3/4 cup cold whole buttermilk
- 2 tablespoons melted butter for brushing tops
Instructions
- Preheat oven to 450°F (230°C). Lightly grease a 9-inch or 10-inch cast iron skillet with butter or shortening.
- In a large bowl, add the self-rising flour. Drop in the cold, cubed butter.
- Use a pastry blender to cut the butter into the flour until the mixture resembles coarse crumbs with some pea-sized pieces remaining.
- Make a well in the center and pour in the cold buttermilk. Gently fold until a shaggy, sticky dough forms. Do not overmix.
- Turn the dough out onto a lightly floured surface. Gently pat it into a rough rectangle. Fold the dough in half over itself, turn it a quarter turn, and pat it out again. Repeat this folding process 3 or 4 times.
- Pat the dough out to a 3/4-inch to 1-inch thickness. Press a floured biscuit cutter straight down into the dough and pull straight up. Do not twist!
- Place the cut biscuits into the prepared skillet so their edges are touching. Gather dough scraps gently to cut remaining biscuits.
- Bake for 12 to 15 minutes until the tops are golden brown.
- Remove from the oven and immediately brush with the melted butter. Serve warm.
Notes
No Twisting: Twisting the cutter seals the dough edges, preventing them from rising tall. Freezing: You can freeze unbaked biscuits on a sheet pan, transfer to a bag, and bake them straight from frozen (add a few extra minutes to the bake time).