Marshmallow Peanut Butter Easter Eggs (No Mold Needed!)
When I see the Easter decorations come out—the ceramic bunnies, the pastel tablecloths, and the baskets lined with fake grass—my mind immediately goes to one thing: the candy.
Growing up, the chocolate-covered peanut butter egg was always the crown jewel of the Easter basket. But as I got older and started making my own confections, I realized that the store-bought versions had changed. They became grittier, drier, and smaller. I wanted to recreate that magic at home, but with a texture that was smoother, creamier, and undeniably better.
That is where these Marshmallow Peanut Butter Easter Eggs come in.
Unlike standard peanut butter ball recipes that rely solely on powdered sugar and butter, this recipe introduces a secret weapon: Marshmallow Fluff. This single ingredient transforms the filling from a dense, sandy paste into a light, airy nougat that melts in your mouth.
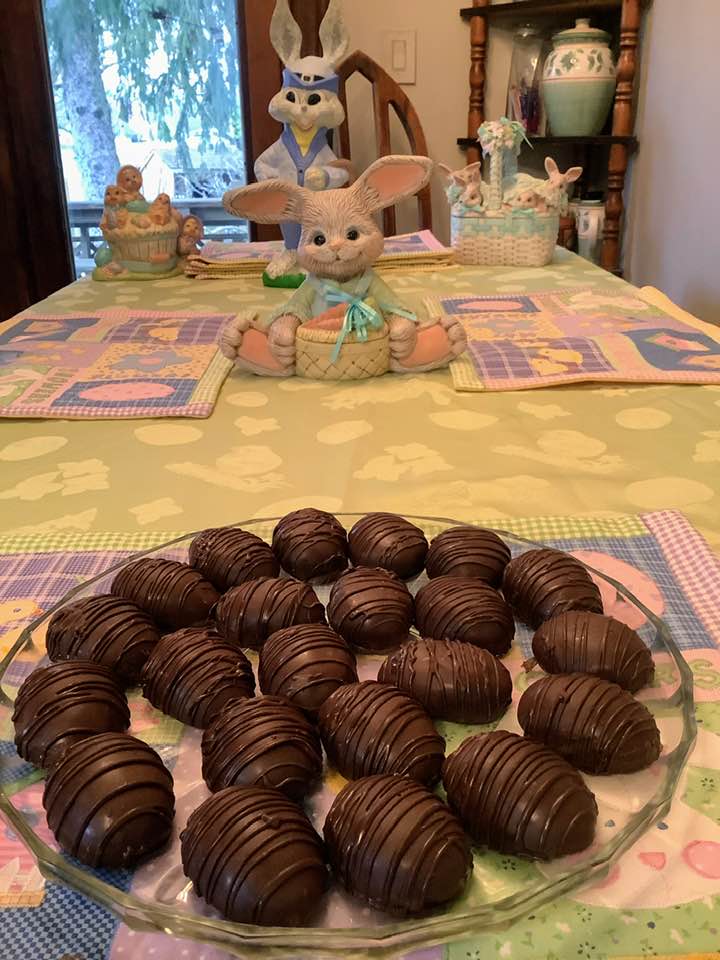
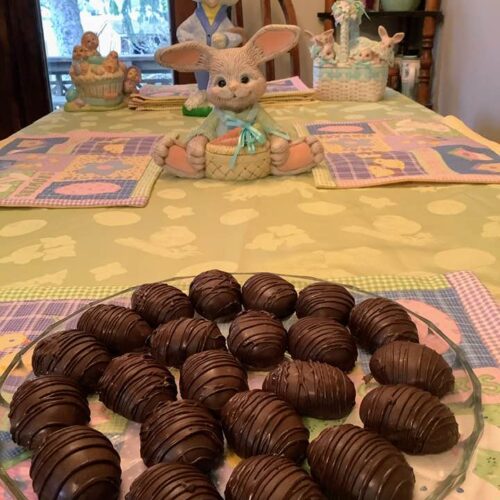
I recently whipped up a batch of these for the holiday. Now, I’ll be the first to admit—I am not a professional sculptor. I don’t own fancy silicone egg molds, and my free-form shaping might be a little “rustic.” But looking at that plate of chocolate-covered treats sitting in front of my dining room Easter bunny, I realized that perfection isn’t the point. The point is the taste. And let me tell you, these taste incredible.
If you are looking for a no-bake treat to fill your baskets this year, put down the Reese’s and try this homemade version.
Why You’ll Love This Recipe
This recipe has quickly become a family tradition for a few very good reasons:
-
The “Fluff” Texture: I cannot stress this enough—the marshmallow creme makes these eggs lighter than air. It cuts the richness of the peanut butter just enough so you can eat more than one without a stomach ache.
-
No Special Equipment: You do not need to buy an egg mold. In fact, I prefer the hand-shaped look. It proves they were made with love in a real kitchen, not a factory.
-
Freezer Friendly: You can make these weeks in advance. They freeze beautifully, meaning you can get your holiday prep done way before Easter Sunday.
-
Customizable: As you’ll see in the recipe card, there is an option to add salted peanuts for a crunch, or keep them smooth like I did.
Ingredients Breakdown
The ingredient list is simple, but each item plays a specific role in achieving that perfect consistency.
1. The Creamy Base
-
Butter: You need 3/4 cup of softened butter. It provides the rich mouthfeel.
-
Peanut Butter: The recipe calls for 14 oz of peanut butter. I recommend using a standard creamy variety like Jif or Skippy. Natural peanut butter (the kind that separates) is too oily for this confection and will make the eggs weep.
2. The Secret Ingredient
-
Marshmallow Fluff: You will need 1 cup of marshmallow fluff (or crème). This is the binder that gives the egg its unique, nougat-like stretch and softness.
3. Structure and Sweetness
-
Powdered Sugar: You will start with 3 cups, but as the recipe notes, you may need to add more until the candy reaches a “workable texture”. This is the variable part of the recipe—humidity in your kitchen can change how much sugar you need.
4. Flavor Enhancers
-
Vanilla Extract: 1 teaspoon to round out the flavor.
-
Salted Peanuts (Optional): If you like a “Snickers” vibe, you can add 1/2 cup of chopped salted peanuts. Personally, I prefer them smooth, but the crunch is a nice variation.
5. The Coating
-
Milk Chocolate Candy Coating: You can use almond bark, melting wafers, or high-quality chocolate chips with a little coconut oil. Milk chocolate is traditional for Easter, but dark chocolate works well too if you want to cut the sweetness.
Step-by-Step Instructions
Making these is a fun, hands-on process. It’s a great recipe to get the kids involved with—just be prepared for some sticky fingers!
Step 1: Cream the Base
Start by putting the softened butter and 1 cup of powdered sugar in a large bowl. Mix them on medium speed until the mixture is light and fluffy. This initial creaming step ensures you don’t have lumps of butter in your finished eggs.
Step 2: Add the Sticky Stuff
Add the peanut butter, marshmallow fluff, vanilla, and the chopped peanuts (if you are using them). Mix on medium speed until well-blended. At this point, the mixture will be very sticky and soft—don’t panic!
Step 3: The Texture Adjustment
Gradually add the remaining powdered sugar, 1/2 cup at a time. You are looking for a workable texture: not too sticky to handle, but not dry and crumbly. Keep adding sugar until it feels like a soft playdough.
Step 4: Shape the Eggs (Free Form)
This is the fun part. Pinch off a small amount of the mixture and roll it in your hands. Gently flatten it and taper one end to create an egg shape.
-
Tip: If the dough is sticking to your palms, dust your hands with a little powdered sugar. Place the shaped eggs on a baking sheet lined with aluminum foil or parchment paper.
Step 5: The Important Chill
Put the tray of shaped eggs into the refrigerator to firm up for about an hour. Do not skip this step. If you try to dip warm peanut butter balls into hot chocolate, they will fall apart and melt into the coating. They need to be cold and firm.
Step 6: Dipping and Drizzling
Melt your chocolate coating in a microwave-safe bowl in one-minute increments, stirring often to prevent overheating. Dip the cold eggs into the melted chocolate. I like to use a fork to lower the egg in, flip it to coat, and then tap the fork on the edge of the bowl to let the excess chocolate drip off. Return them to the foil-lined sheet.
As you can see in my photo, I finished mine with a little chocolate drizzle over the top. It hides any imperfections from the dipping fork and makes them look like they came from a fancy chocolatier.
Expert Tips for “Free Form” Success
Since we aren’t using molds, here are a few tricks to keep your eggs looking great:
-
Keep Them Cold: The recipe hint says to only remove a few eggs from the fridge at a time so they don’t thaw while you are working with them. This is the best advice I can give.
-
Smoothing: If your eggs look a little lumpy after shaping, dip your finger in water (just a tiny bit!) and smooth the surface before freezing. A smoother center means a smoother chocolate shell.
-
The “Foot”: When the chocolate sets, you might get a “foot” of pooled chocolate at the base. Once they are dry, you can take a small paring knife and trim the excess chocolate for a cleaner look.
Variations to Try
While the marshmallow peanut butter combo is classic, you can easily tweak this recipe:
-
Crispy Eggs: If you love texture, swap the salted peanuts for Rice Krispies cereal. It gives a satisfying crunch similar to my Dippin’ Buckeyes Recipe.
-
White Chocolate: For a very spring-like look, dip the eggs in white chocolate and use pastel sprinkles.
-
Old-Fashioned Roll: If you love the texture of this filling, you might also enjoy my Peanut Butter Roll which uses a similar fondant-style dough.
Serving and Storage
Refrigerator: Store these in an airtight container in the refrigerator for up to one week. The recipe notes that they taste better when brought to room temperature before eating, as the filling softens up nicely.
Freezer: These eggs freeze incredibly well. You can freeze them for easier handling before dipping, or freeze the finished product for up to 3 months. Just layer them with wax paper so they don’t stick together.
FAQs
Can I use marshmallow creme instead of fluff? Yes, they are essentially the same product and work interchangeably in this recipe.
Why is my filling too sticky? Peanut butter brands vary in oil content, and humidity affects powdered sugar. If it is too sticky to roll, just keep adding powdered sugar a tablespoon at a time until you can handle it without it sticking to your fingers.
Do I have to use peanuts? Not at all. The peanuts are listed as optional in the recipe. Leaving them out results in a silky smooth, creamy center that is very similar to a Reese’s egg.
Can I make these into balls instead of eggs? Absolutely. If you want to make these year-round, just roll them into balls. They are very similar to Homemade Peanut Butter Candy, just fluffier!
Conclusion
There is something so satisfying about biting into a homemade Easter egg and getting that soft, marshmallow-infused peanut butter center. It beats the store-bought variety every single time.
Don’t worry if your shapes aren’t factory-perfect. As I learned with my “free form” batch, the imperfections just mean they were made by hand. I hope these sweet treats find a spot in your Easter baskets this year!
If you try this marshmallow twist, let me know in the comments below. And be sure to pin this recipe to your Easter Recipes board!
Marshmallow Peanut Butter Easter Eggs
Ingredients
- 3/4 cup butter softened
- 3 cups powdered sugar plus more as needed
- 14 oz creamy peanut butter
- 1 cup marshmallow fluff
- 1 tsp vanilla extract
- 1/2 cup salted peanuts chopped (optional)
- Milk chocolate candy coating or almond bark
Instructions
- Cream Butter & Sugar: Put the softened butter and 1 cup of the powdered sugar in a large bowl. Mix on medium speed until the mixture is light and fluffy.
- Add Fillings: Add the peanut butter, marshmallow fluff, vanilla extract, and chopped peanuts (if using). Mix on medium speed until well-blended.
- Adjust Texture: Gradually add the remaining powdered sugar, 1/2 cup at a time. Mix until the candy reaches a workable texture—it should be firm enough to handle but not dry. If it is still too sticky, add a little more powdered sugar.
- Shape: Roll a small amount of the mixture in your hands and flatten/taper it until it resembles an egg shape.
- Chill: Place shaped eggs on a baking sheet lined with aluminum foil or parchment paper. Put the tray in the refrigerator for at least one hour to firm up.
- Melt Chocolate: Place the candy coating in a microwave-safe bowl. Microwave in one-minute increments, stirring after every minute, until smooth and melted.
- Dip: Dip the cold eggs into the chocolate coating. Lift out with a fork, tap to remove excess, and return to the lined sheet.
- Decorate: While wet, you can sprinkle with chopped peanuts or sprinkles. Alternatively, let them set and then drizzle with extra chocolate (as shown in photos).
- Store: Refrigerate for 30 minutes to set the coating completely. Store in an airtight container in the fridge.
Notes