Fluffy Cast Iron Skillet Biscuits (Easy 3-Ingredient Recipe!)
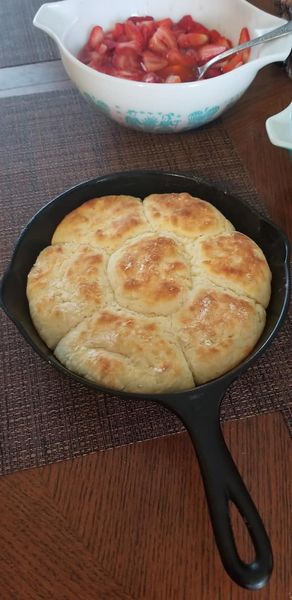
Is there anything more comforting than the smell and taste of warm, fluffy biscuits fresh from the oven? I certainly don’t think so! This recipe for classic cast iron skillet biscuits is a tried-and-true favorite, often requested and always delicious. It’s incredibly simple, relying on just three basic ingredients, but the real secret to their amazing texture lies in baking them huddled together in a trusty cast iron skillet.
There’s just something undeniably special about baking in cast iron. The way it holds and distributes heat is magic, giving these biscuits a wonderfully crisp, perfectly golden-brown bottom while ensuring the insides stay incredibly soft, tender, and fluffy. Forget complicated techniques and fussy ingredient lists; this is down-to-earth, homestyle baking at its absolute finest.
Whether you plan to slather them with butter and homemade jam, drizzle them with golden honey, smother them under creamy sausage gravy, or even use them as the base for a simple strawberry shortcake (like that tempting bowl peeking in the background!), these biscuits are guaranteed to be a crowd-pleaser. So, roll up your sleeves – let’s bake some comfort!
Why You’ll Absolutely Love These Cast Iron Skillet Biscuits
- Unbelievably Easy: With just 3 core ingredients (plus a little grease for the pan), biscuit-making doesn’t get much simpler than this.
- Quick to Make: Minimal prep time means you can whip these up for a weeknight dinner side or a lazy weekend breakfast without much fuss.
- The PERFECT Texture: The cast iron skillet is the key! It delivers those sought-after crispy bottoms and wonderfully fluffy, tender interiors every single time.
- Endlessly Versatile: Delicious enough to eat plain, but also the perfect vehicle for countless sweet and savory toppings or pairings.
- A Reliable Classic: This is a fundamental, dependable recipe that yields comforting, delicious results consistently. It’s the kind of recipe passed down through generations.
Ingredients You’ll Need
You likely already have these simple pantry staples on hand:
- Self-Rising Flour: This is the cornerstone! Self-rising flour conveniently includes a leavening agent (like baking powder) and salt, streamlining the recipe. For the fluffiest biscuits, ensure your flour is relatively fresh (check the expiration date!).
- Vegetable Shortening (like Crisco): Cold shortening is traditional for biscuits and gives them a distinct, super-tender, flaky texture that’s simply divine. Keep it chilled right until you use it! Can you substitute cold butter? Yes, but the texture will lean slightly more towards layered flaky rather than tender crumbly.
- Buttermilk: Cold buttermilk adds a subtle, pleasant tang and contributes significantly to a tender, moist crumb. Don’t have any? No problem! See the recipe notes below for a super easy DIY substitute.
- Grease for the Skillet: A little extra shortening, some butter, or even flavorful bacon grease works wonders to prevent sticking and contributes to that beautiful bottom crust.
Equipment Spotlight: The Mighty Cast Iron Skillet
While the ingredients are simple, the cast iron skillet plays a starring role in the success of these biscuits.
- Why Cast Iron is Best Here: It boasts superior heat retention and distribution. This even heating is what creates that signature golden, crispy crust on the bottom and sides while baking the biscuits through perfectly without overly browning the tops.
- Ideal Skillet Size: A well-seasoned 8-inch or 10-inch cast iron skillet is perfect for the quantity in this recipe. You want the raw biscuits to fit snugly together – this encourages them to rise upwards instead of spreading outwards.
- Seasoning is Key: Make sure your skillet is properly seasoned to build up that natural non-stick surface. A little extra grease in the pan before adding the biscuits provides insurance!
How to Make Cast Iron Skillet Biscuits: Step-by-Step
This recipe moves quickly, so have your ingredients ready!
1. Preheat and Prep Your Skillet: Get that oven nice and hot! Preheat it to 450°F (230°C). While it heats, generously grease your 8 or 10-inch cast iron skillet with your chosen fat (shortening, butter, or bacon grease). Don’t skimp here! A hot oven is vital for getting a good, quick rise (oven spring) from the biscuits.
2. Combine Flour and Shortening: Measure 2 cups of self-rising flour into a medium-sized mixing bowl. Add the 1/4 cup of cold shortening. Using a pastry blender, two knives, a fork, or even your clean fingertips, ‘cut’ the shortening into the flour. Keep working until the mixture looks like coarse meal or small gravel, with tiny pieces of shortening distributed throughout. Work relatively quickly to prevent the shortening from warming up too much.
3. Gently Add the Buttermilk: Make a little well in the center of your flour mixture. Pour in most of the 3/4 cup of cold buttermilk – maybe hold back a tablespoon or two initially. Using a fork, gently stir everything together just until the dough starts to clump.
Now, pay attention to the dough’s feel: Add the remaining buttermilk, just a tiny splash at a time, mixing lightly after each addition, only until the dough gathers into a soft, somewhat sticky ball and begins to pull away cleanly from the sides of the bowl. The golden rule: Do NOT overmix! Overmixing develops too much gluten, resulting in tough, chewy biscuits instead of light, fluffy ones. Stop mixing the moment the flour is just moistened, even if it looks a little uneven or shaggy. That’s okay!
4. Shape the Biscuits (Gently!): Lightly flour your hands and a clean work surface (like a counter or cutting board). Turn the soft dough out onto the floured surface. Gently, gently bring it together and pat or fold it over on itself just 2 or 3 times – no vigorous kneading needed! This light handling helps create flaky layers. Pat the dough out with your floured hands until it’s roughly 1/2 to 3/4 inch thick. Resist the urge to use a rolling pin, which can compact the dough too much.
Using a floured biscuit cutter (a round cutter about 2.5 inches works well, but even a floured drinking glass rim will do!), cut out your biscuits. Push the cutter straight down firmly. Avoid twisting the cutter, as this can pinch the edges and hinder the biscuits’ ability to rise tall. Carefully place the cut biscuit into the prepared skillet. Gather the leftover dough scraps gently (don’t re-knead!), pat them out again, and cut more biscuits until you’ve used up most of the dough. Aim to handle the scraps as little as possible. You should get about 7-8 biscuits.
5. Arrange in Skillet and Bake: Place the cut biscuits into your greased cast iron skillet. Nestle them right up against each other so they’re touching snugly. This mutual support helps them climb nice and high as they bake.
Carefully place the skillet into your fully preheated 450°F oven. Bake for approximately 12 to 15 minutes. They’re ready when the tops are a beautiful golden brown, and the biscuits sound slightly hollow if you give one a gentle tap. Ovens vary, so start checking around the 12-minute mark.
6. The Finishing Touch (Highly Recommended!): As soon as you pull that gorgeous skillet of biscuits out of the hot oven, grab some melted butter (about 1-2 tablespoons). While the biscuits are still piping hot, brush the tops generously with the melted butter. This not only adds delicious flavor but also gives them an irresistible sheen and helps keep the tops soft.
Pro Tips for the Fluffiest Biscuits
- COLD, COLD, COLD: Cannot stress this enough! Your shortening (or butter) and buttermilk must be thoroughly chilled. Cold fat creates steam pockets in the hot oven, leading to those coveted flaky layers. Some people even chill their flour!
- Handle With Care: Be gentle! Mix just until the ingredients come together. Handle the dough minimally when patting and cutting. Less manipulation = more tender biscuits.
- Hot Oven, Quick Rise: Don’t skimp on preheating. That initial blast of high heat is crucial for getting the biscuits to rise quickly and become light.
- Use Self-Rising Flour: Make sure you grabbed the right bag! If you only have all-purpose flour, you absolutely must add baking powder and salt (see the recipe card notes for amounts).
- Mastering the Moisture: As the original cook hinted, biscuit making often involves a bit of “feel.” Humidity levels and even the brand of flour can slightly affect how much liquid you need. Aim for a dough that’s soft and definitely a bit sticky/tacky, but not so wet you can’t handle it with floured hands. If it feels too dry to come together, add buttermilk by the teaspoon. If it feels impossibly sticky, add a tiny dusting more flour to your hands or work surface, not directly into the main dough mass.
Delicious Serving Suggestions
These warm cast iron skillet biscuits are begging to be eaten! Try them:
- The classic way: Split open and spread generously with soft butter and your favorite fruit jam or a drizzle of local honey.
- Southern comfort style: Smothered under a blanket of creamy sausage gravy.
- As the perfect sidekick: Serve alongside hearty chili, warm soup, or savory stew to sop up all the goodness.
- For an easy dessert: Split and top with those lovely macerated strawberries (like in the photo!) and a dollop of whipped cream for quick strawberry shortcakes.
- With dinner: They make a fantastic accompaniment to fried chicken, pot roast, or ham.
Storing and Reheating Leftovers
Let’s be honest, these biscuits are best devoured fresh and warm from the skillet! But if you happen to have leftovers:
- Storage: Allow the biscuits to cool completely. Store them in an airtight container or zip-top bag at room temperature. They’re best eaten within 1-2 days.
- Reheating: To bring back some of their charm, reheat gently. You can wrap them loosely in foil and warm them in a 300°F (150°C) oven for 5-10 minutes, or split and toast them lightly in a toaster oven. Microwaving tends to make them tough, so it’s not ideal.
I hope you enjoy making (and especially eating!) these wonderfully simple and satisfying cast iron skillet biscuits. Baking these feels like bringing a little bit of comforting, homestyle tradition right into your kitchen. Let me know in the comments if you give them a try and how you like to serve them!

Easy Cast Iron Skillet Biscuits (3-Ingredient)
Equipment
- 1 8-inch or 10-inch Cast Iron Skillet
- 1 Medium Mixing Bowl
- 1 Pastry Blender, Fork, or Knives (for cutting in shortening)
- 1 2.5-inch Round Biscuit Cutter (approx size)
Ingredients
- 2 cups Self-Rising Flour ensure it's fresh for best rise
- 1/4 cup Vegetable Shortening like Crisco, cold
- ~3/4 cup Buttermilk cold (Approximate - see Notes)
- 1-2 tbsp Shortening Butter, or Bacon Grease (for greasing skillet)
- 1-2 tbsp Butter melted (optional, for brushing tops)
Instructions
- Preheat & Prep: Preheat oven to 450°F (230°C). Generously grease the bottom and sides of your cast iron skillet.
- Combine Dry & Fat: In the mixing bowl, add the self-rising flour. Add the cold shortening. Cut the shortening into the flour using a pastry blender, fork, or your fingertips until mixture resembles coarse crumbs or small peas.
- Add Buttermilk: Make a well in the center. Pour in most of the cold buttermilk (start with about 2/3 cup). Stir gently with a fork just until dough begins to clump together.
- Adjust Liquid: Add remaining buttermilk, a tiny splash at a time, mixing gently after each addition, only until dough forms a soft, slightly sticky ball that pulls away from the bowl sides. DO NOT OVERMIX. Stop when flour is just moistened.
- Shape Gently: Turn dough onto a lightly floured surface. Gently fold or pat dough over itself 2-3 times (do not knead). Pat gently with floured hands to about 1/2 to 3/4-inch thickness.
- Cut Biscuits: Using a floured biscuit cutter, cut straight down – do not twist. Place cut biscuits into the prepared skillet. Gently gather scraps, re-pat lightly, and cut more biscuits.
- Arrange in Skillet: Nestle biscuits snugly together in the skillet so they are touching.
- Bake: Place skillet in the preheated oven. Bake for 12-15 minutes, or until tops are golden brown and cooked through.
- Butter Tops (Optional): As soon as biscuits come out of the oven, brush tops generously with melted butter.
- Serve: Serve warm and enjoy!
Notes
Gentle Handling: Mix minimally and handle dough gently to avoid tough biscuits. A slightly shaggy dough is okay.
Buttermilk Amount: The 3/4 cup is approximate. Add just enough liquid for the dough to come together softly. Factors like humidity affect the exact amount needed.
Buttermilk Substitute: No buttermilk? Add 3/4 tablespoon white vinegar or lemon juice to a measuring cup. Top with regular milk to the 3/4 cup line. Stir and let sit 5 minutes before using.
All-Purpose Flour: If substituting AP flour for self-rising, whisk together: 2 cups AP flour + 1 tablespoon baking powder + 1 teaspoon salt. Then proceed with the recipe.
Storage: Cool completely. Store in an airtight container at room temperature for 1-2 days. Reheat gently (oven or toaster oven recommended).
(End of WP Recipe Maker Plain Text Import)

