Restoring Rusty Cast Iron Dutch Oven (Found in the Woods!)
Some people dream of finding gold or buried treasure, but for a cast iron enthusiast like me, stumbling upon a vintage Dutch oven in the middle of the woods is just as exciting.
That is exactly what happened recently. I was walking near our camp in the woods when I spotted a shape half-buried in the leaves. It was heavy, covered in dirt, and completely encrusted in rust. But when I looked closer, I realized it wasn’t just any pot—it was a Petromax Dutch Oven. For those who don’t know, Petromax is a high-quality German brand known for its durability. Finding one out in the wild was like finding a diamond in the rough.
It looked rough. I mean, really rough. There was mold, dirt, and thick, flaking layers of rust both inside and out. Most people would have probably left it there, thinking it was trash. But I decided to try my hand at restoring it.
I brought it home and got to work. After about three hours of scrubbing, a little chemistry with vinegar and baking soda, and some serious elbow grease, I think I did pretty well. The transformation from a rusty relic to a sleek, black cooking vessel was incredibly satisfying.
If you have an old family skillet that has seen better days, or if you get lucky at a yard sale (or in the woods!), don’t throw it away. Here is exactly how I restored this beauty using safe, household ingredients.
Why You Should Restore Cast Iron
You might be wondering, “Why bother scrubbing a rusty pot for three hours?”
-
Quality: Older cast iron (and high-end brands like Petromax) is often smoother and lighter than modern, mass-produced pans.
-
Sustainability: Restoring a piece of cookware keeps it out of the landfill. Cast iron is virtually indestructible unless it’s cracked.
-
The Satisfaction: There is a unique pride in cooking a meal in a pot you brought back to life. Imagine making a hearty Big Batch Brunswick Stew in a pot that looked like scrap metal just a few days prior.
Supplies You Will Need
I didn’t use any harsh industrial chemicals or electrolysis tanks for this. I used things I had in my kitchen and garage.
-
Steel Wire Brush: Essential for knocking off the heavy, loose chunks of rust.
-
Steel Wool: For the detailed scrubbing.
-
Baking Soda: Acts as an abrasive and helps neutralize acids.
-
White Vinegar: The acid helps dissolve the rust.
-
Sponge: For scrubbing.
-
Canola Oil: My oil of choice for seasoning. It has a high smoke point and creates a durable finish.
-
Paper Towels or Rags: To wipe on the oil.
Step-by-Step Restoration Process
This process took me about three hours of active scrubbing in total. It wasn’t easy, but the results speak for themselves.
Step 1: The Initial Assessment and Scrape
Here is what I started with. As you can see, the interior was a disaster zone of rust and grime.
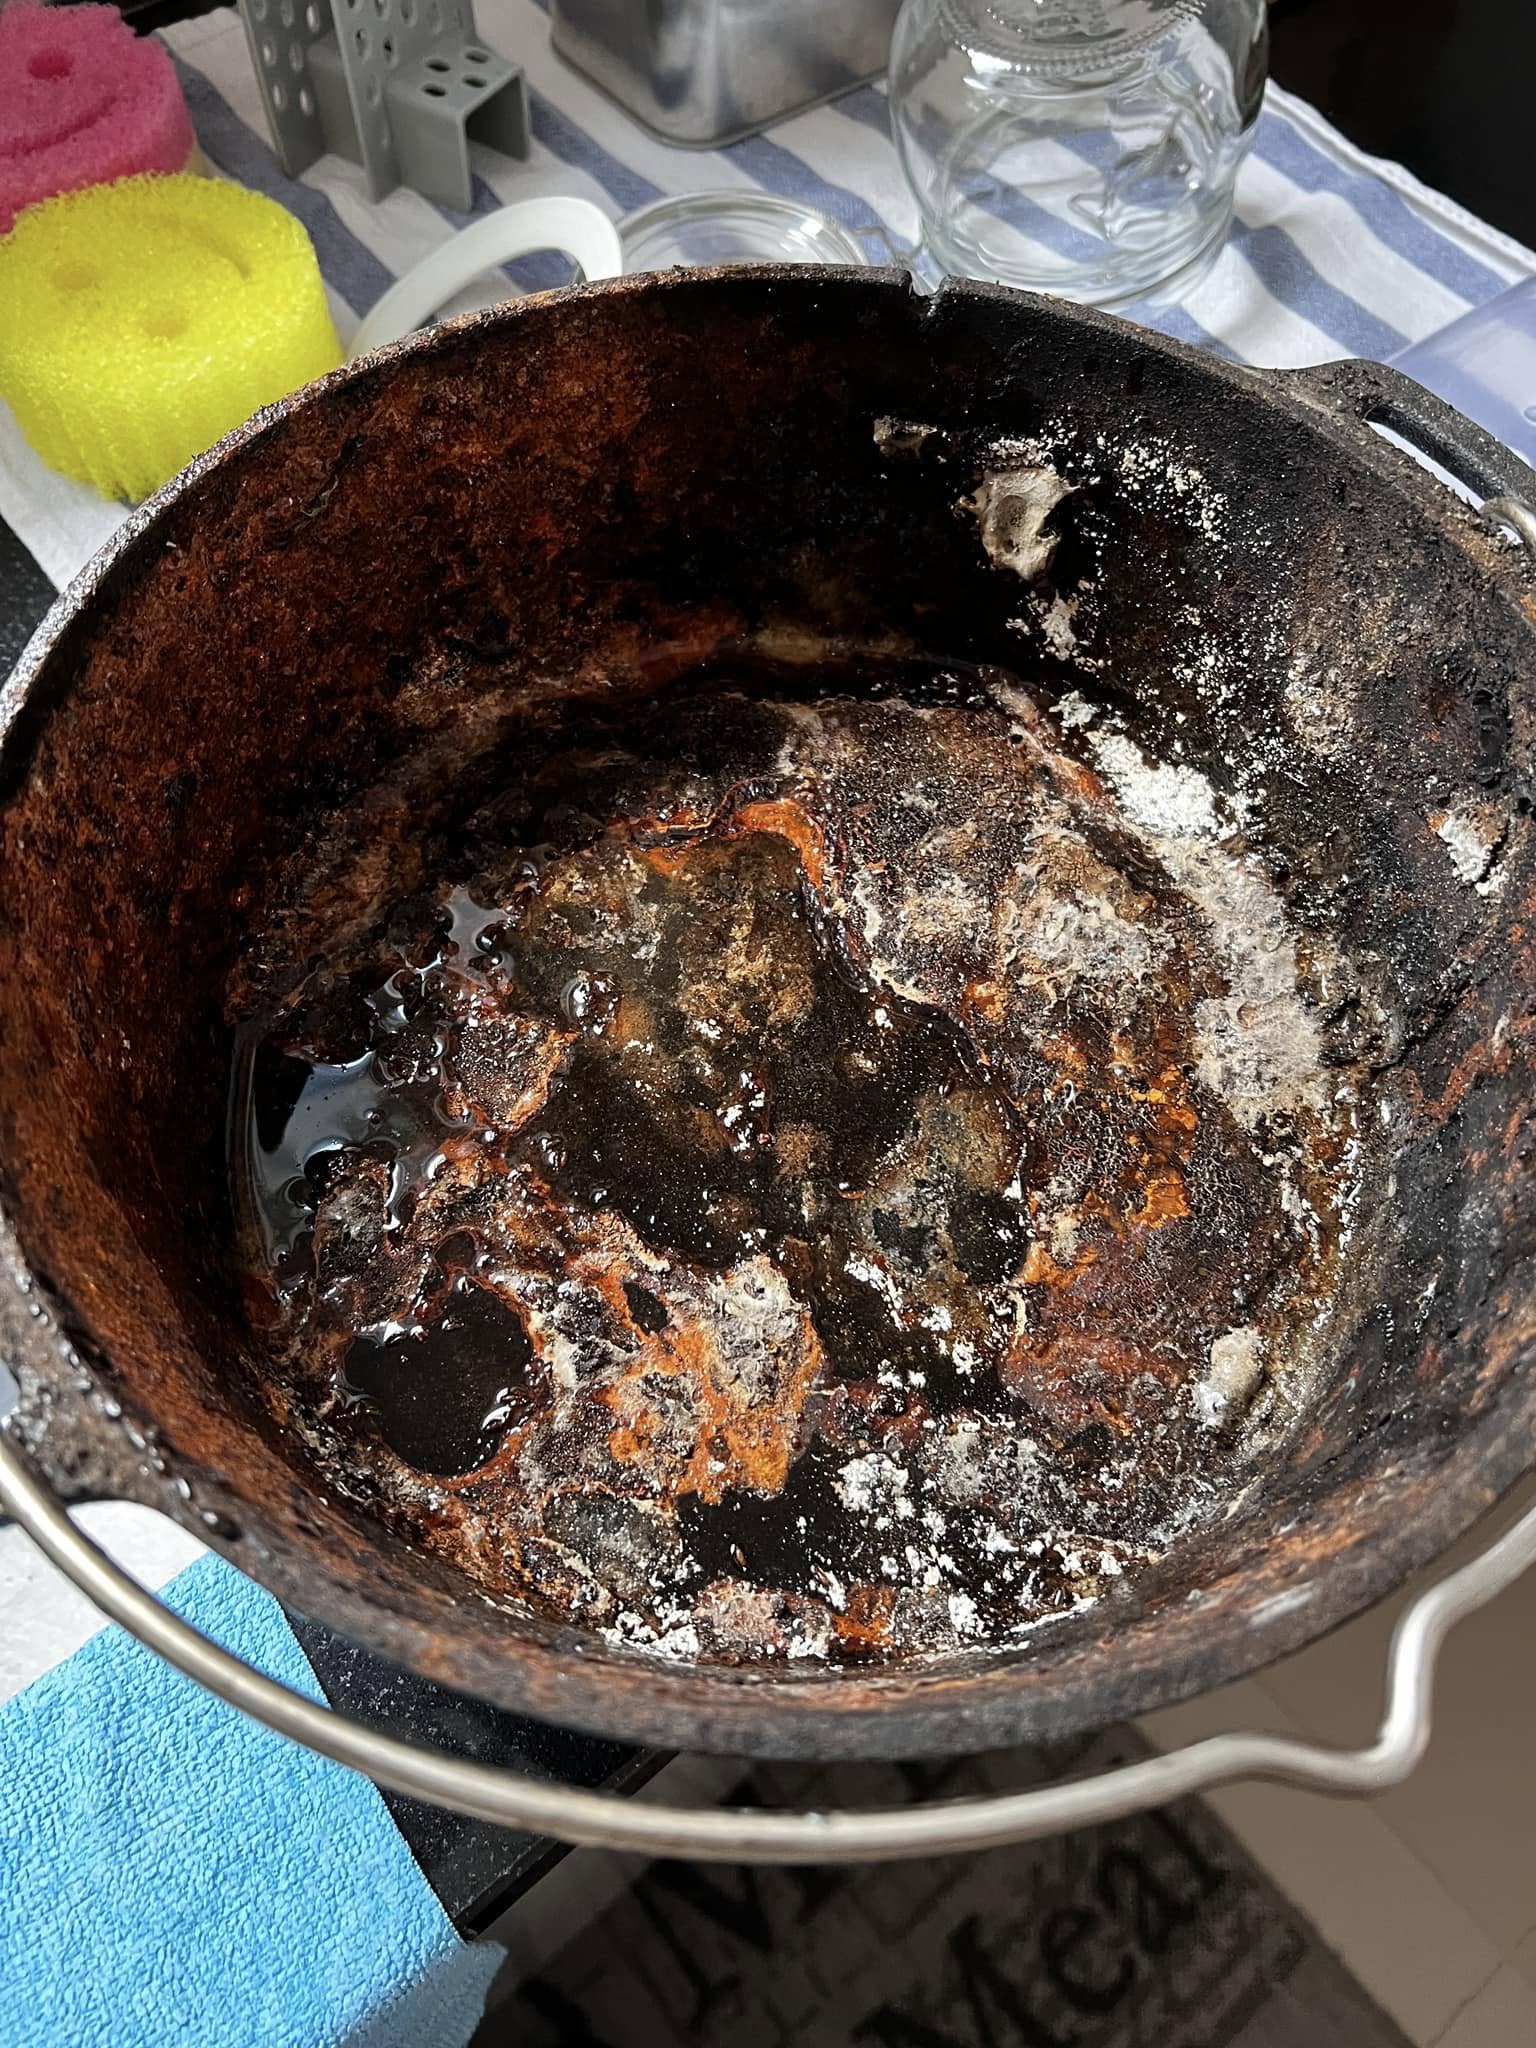
First, I used a steel wire brush to mechanically remove the bigger chunks of rust and debris. There was still mold and thick pieces of rust clinging to the sides, so I wanted to knock that loose before applying any liquids. If you find a pot in the woods, getting the “nature” off of it is priority number one!
Step 2: The Scrub (Baking Soda & Sponge)
Once the big chunks were gone, I went in with a sponge and baking soda. Baking soda is great because it’s abrasive enough to scour the metal but won’t damage the iron itself. I scrubbed the entire surface to start breaking the rust off.
Step 3: The Vinegar Soak Method
After washing off the first round of grime, I covered the wet iron with more baking soda and then added vinegar.
This is where the magic happens. The vinegar (acetic acid) reacts with the rust (iron oxide) to help loosen it from the good metal underneath. The baking soda causes it to bubble and fizz, which helps lift the dirt.
I put in some serious elbow grease here. Using steel wool, I scrubbed the vinegar and baking soda mixture into the iron. I repeated this process a few times—scrub, rinse, apply baking soda and vinegar, scrub again.
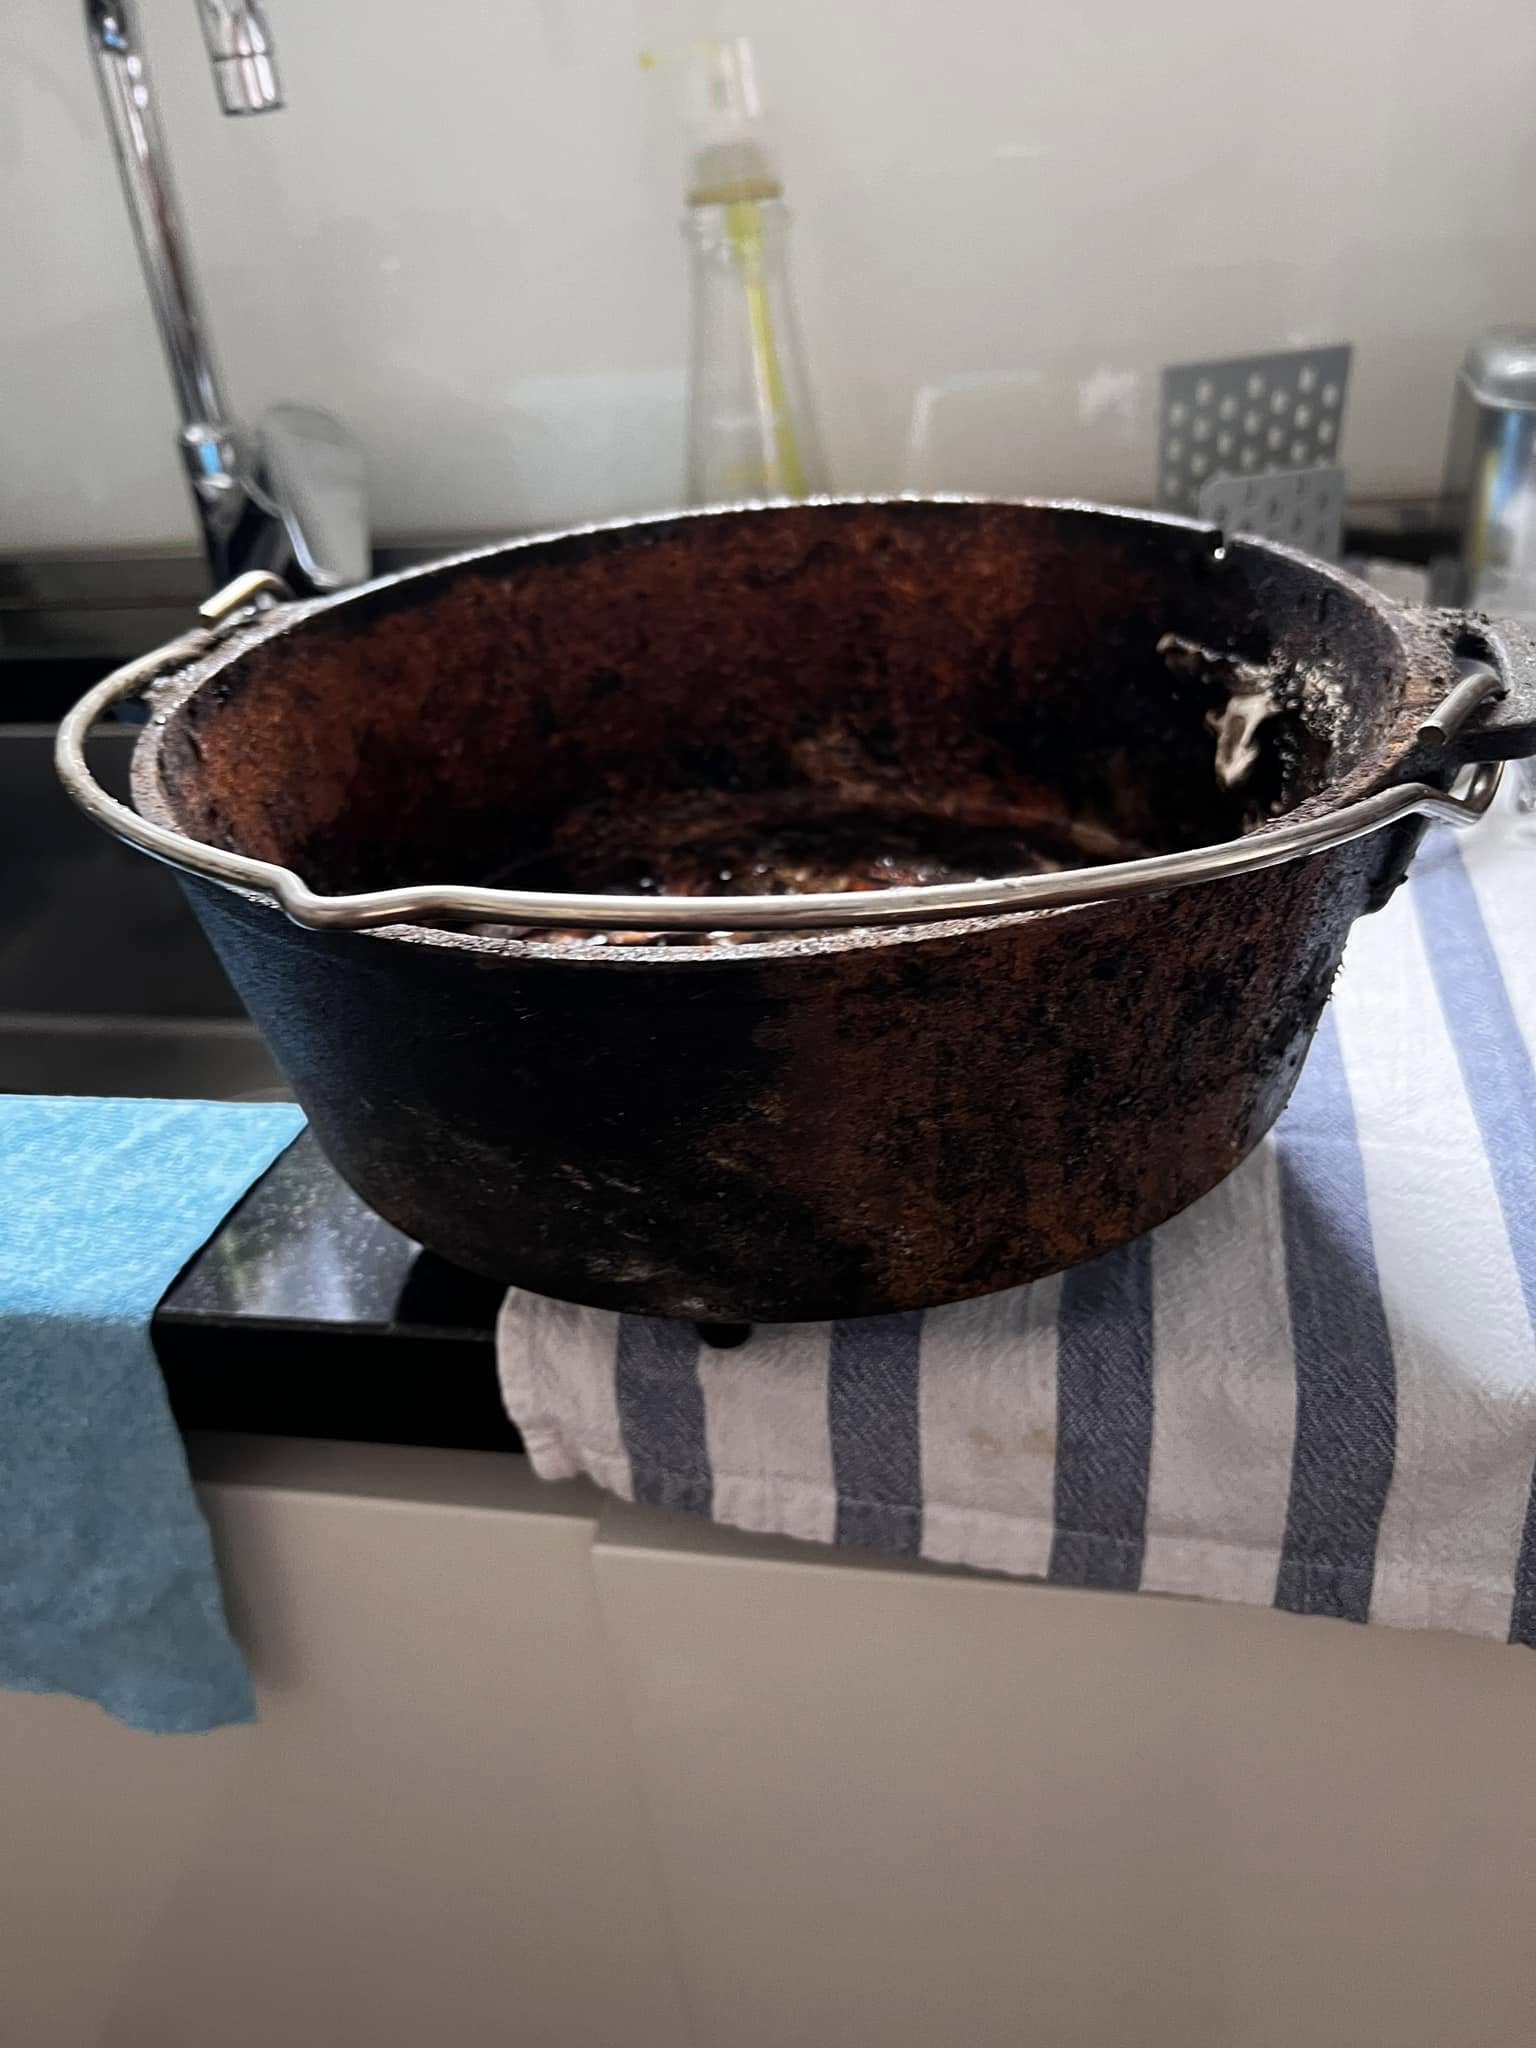
It took about 3 hours of scrubbing in total. My arms were tired, but I could start to see the grey, bare metal appearing beneath the orange crust.
Step 4: Washing to Bare Metal
Eventually, I was left with just bare metal. It was a dull grey color—this is exactly what you want. “Grey” means raw iron without any seasoning or rust. Once you hit this stage, you have to move fast because raw iron can “flash rust” (turn orange again) within minutes if left wet.
I dried it thoroughly with a towel and then put it on the stove for a minute to ensure every drop of moisture had evaporated.
Step 5: Seasoning with Canola Oil
Now came the rewarding part: turning that grey metal into a shiny black finish.
-
Apply Oil: I used canola oil. I wiped a thin layer all over the pot—inside, outside, the lid, the legs, everything.
-
Wipe it Off: This sounds counterintuitive, but after you apply the oil, wipe it off as if you made a mistake. You want a microscopically thin layer. If you leave too much oil, it will get sticky and tacky.
-
Bake: I put the Dutch oven upside down in the oven at a high temperature (around 450°F to 500°F) for an hour. This process is called polymerization, where the oil transforms into a hard, plastic-like surface that bonds to the metal.
I repeated this process 3 times. It took about 3 layers of canola oil to get to the stage you see in the final pictures.
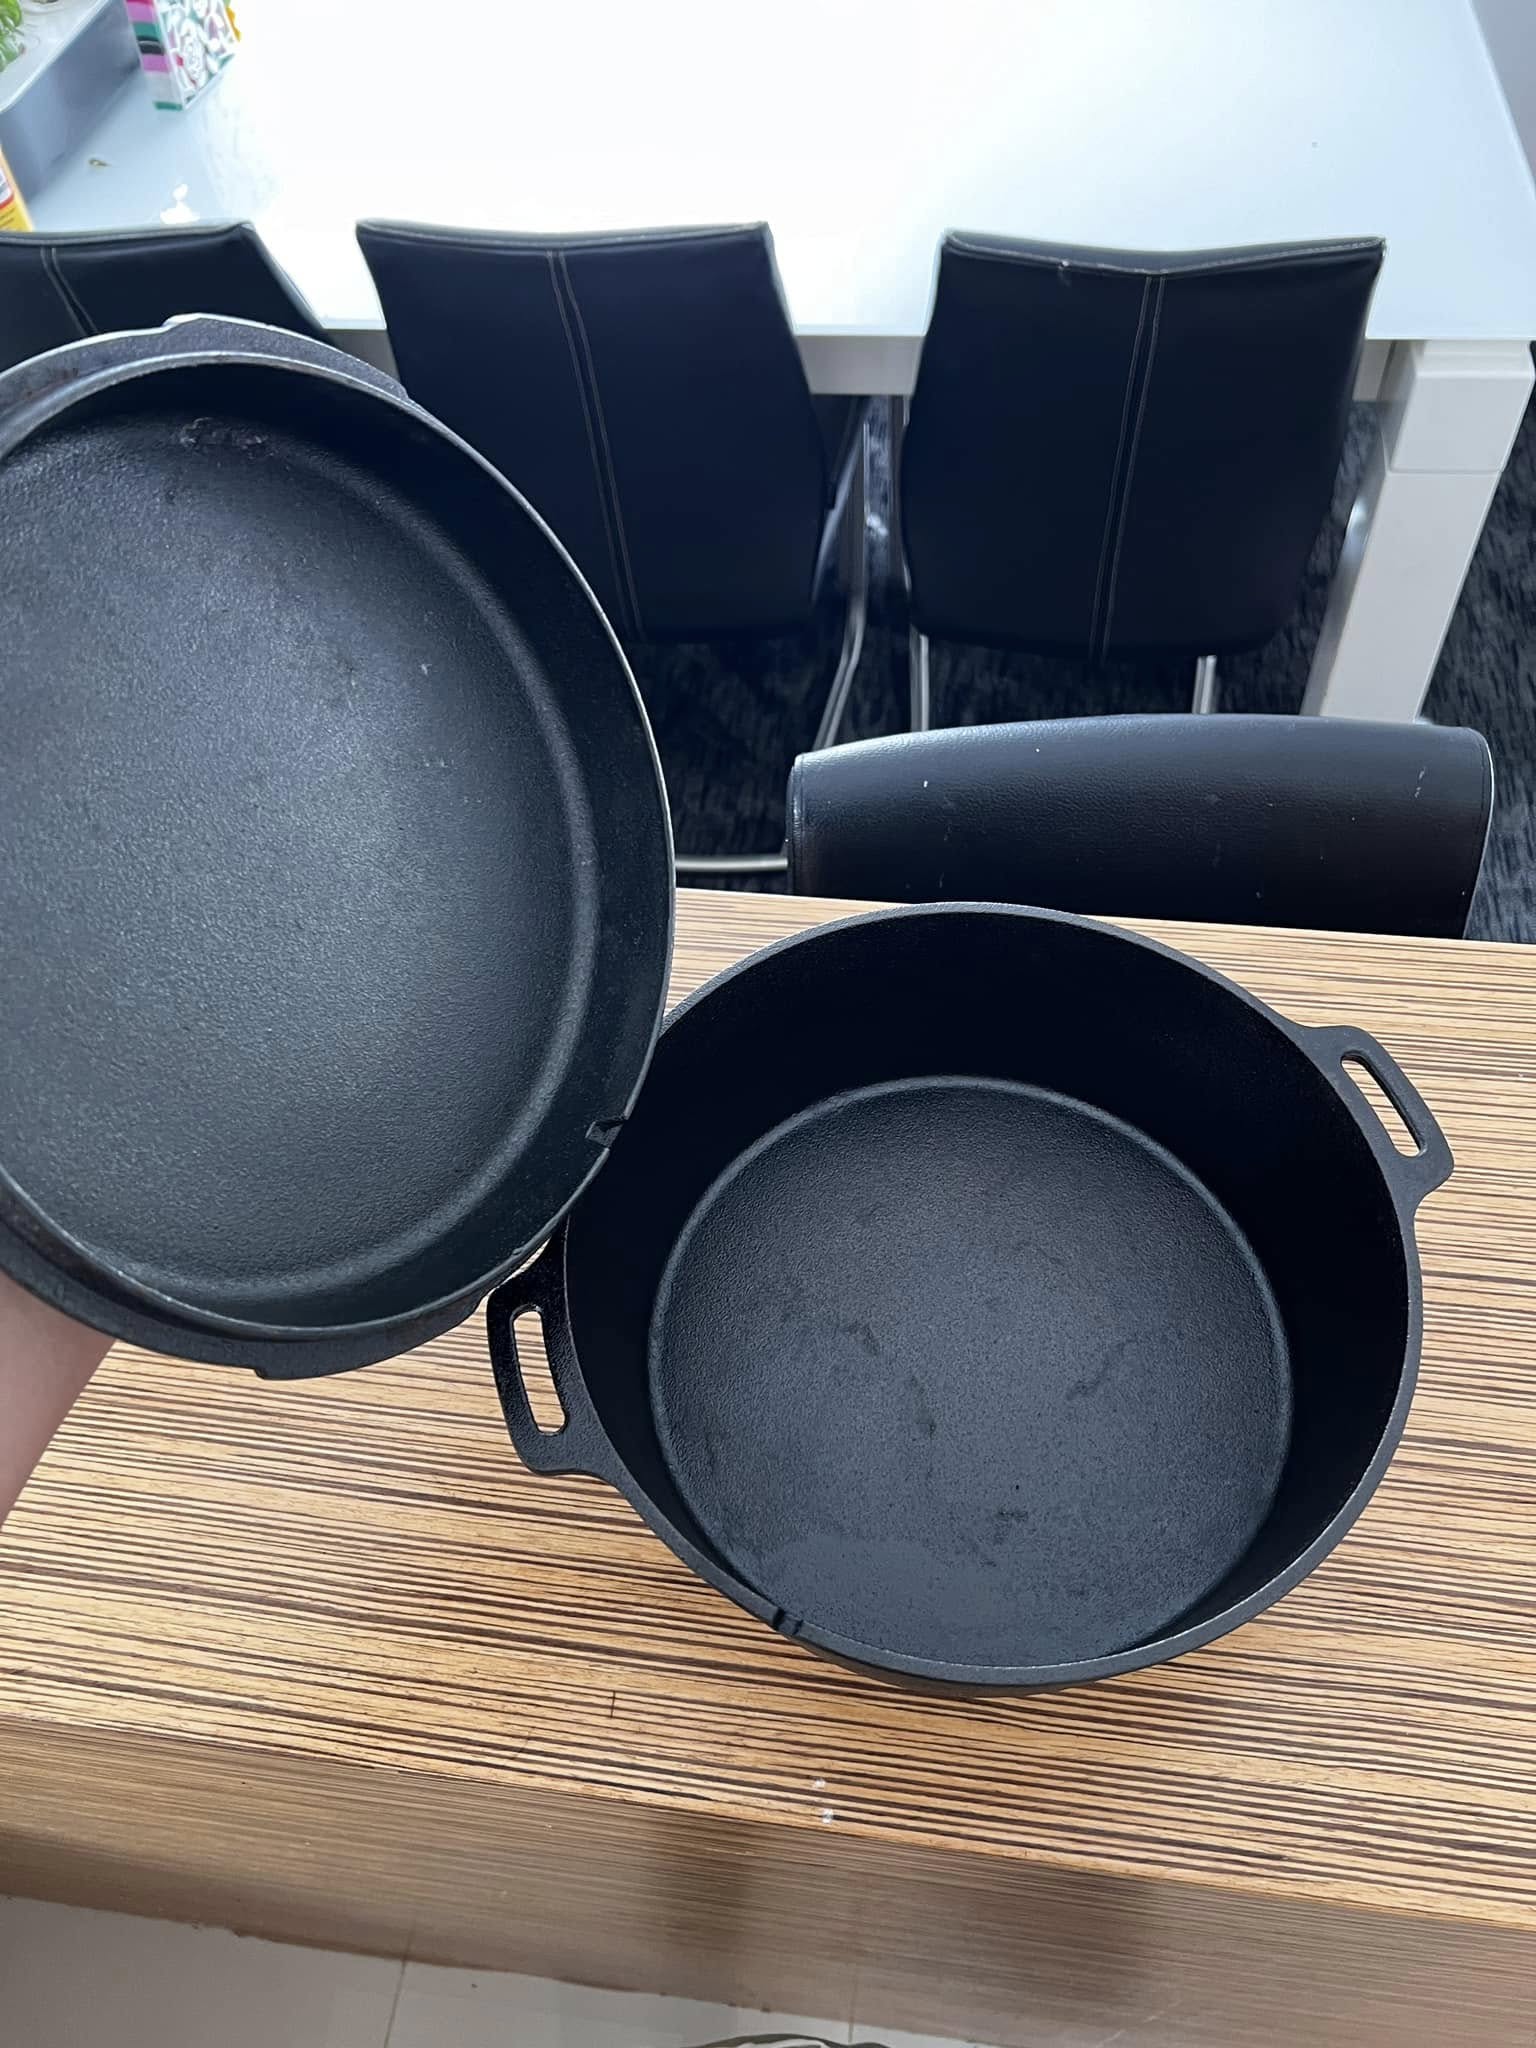
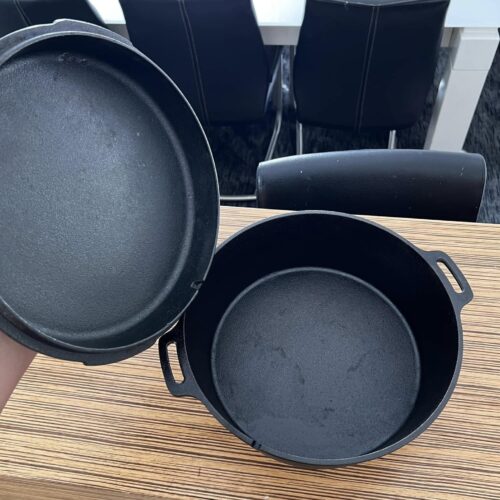
The Results: A Brand New Pot
Just look at this difference. The interior is now smooth, black, and ready for cooking. It looks like something you would buy off the shelf for hundreds of dollars, yet it cost me nothing but time and a little oil.
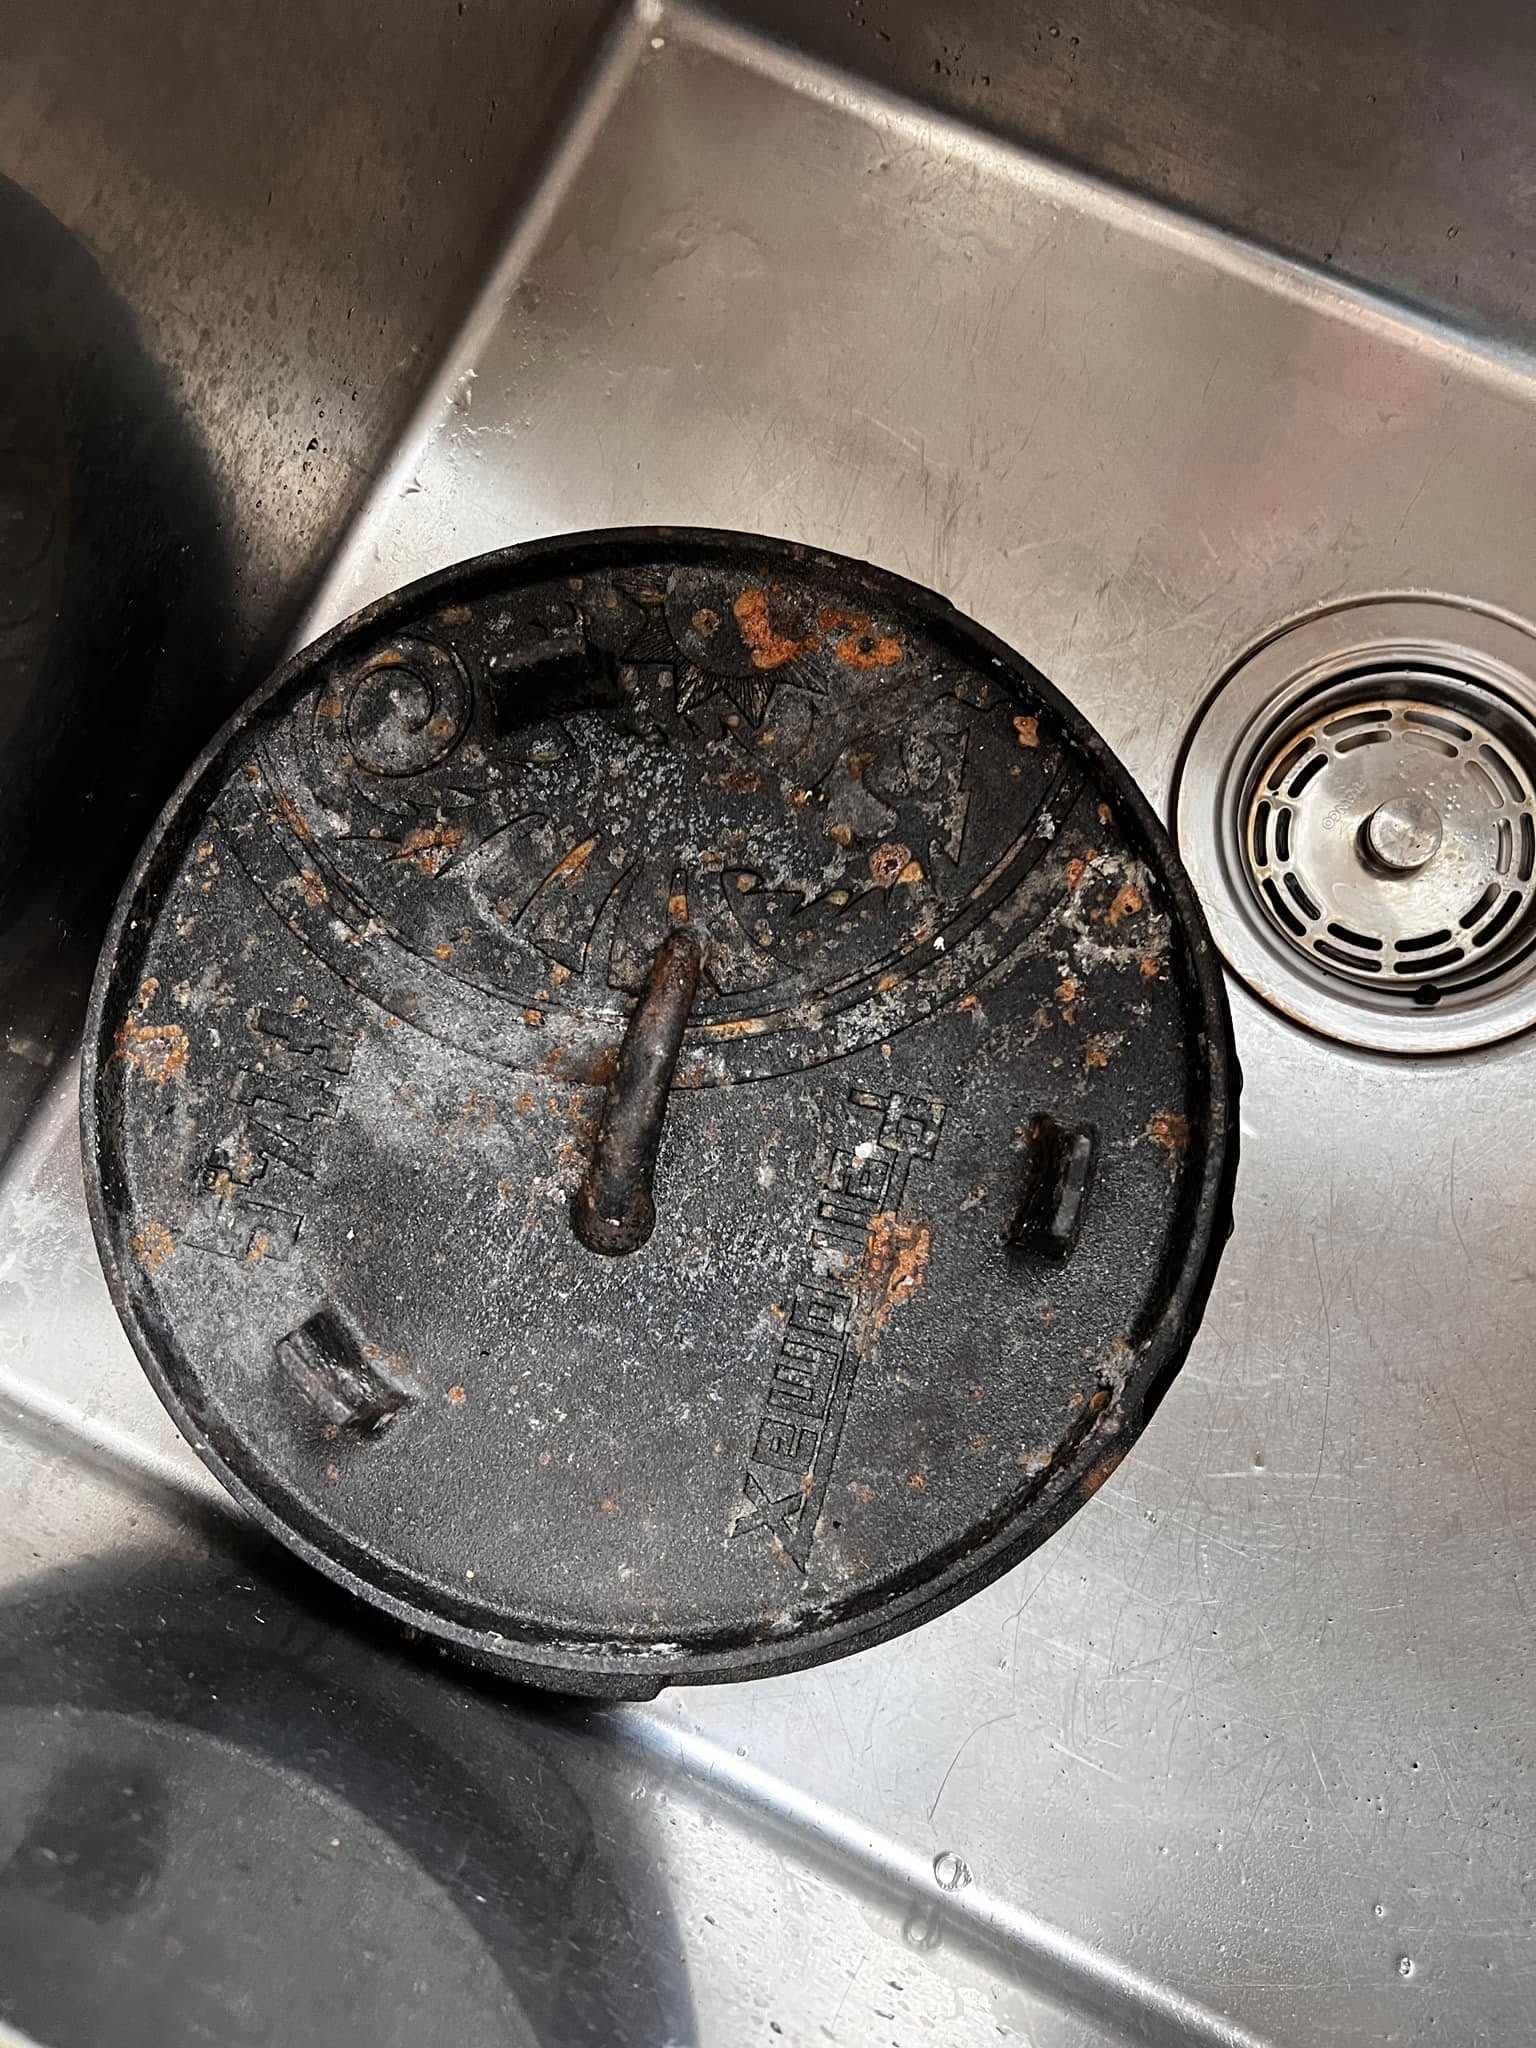
The lid, which was covered in barnacles of rust, now highlights the beautiful Petromax logo and dragon design.
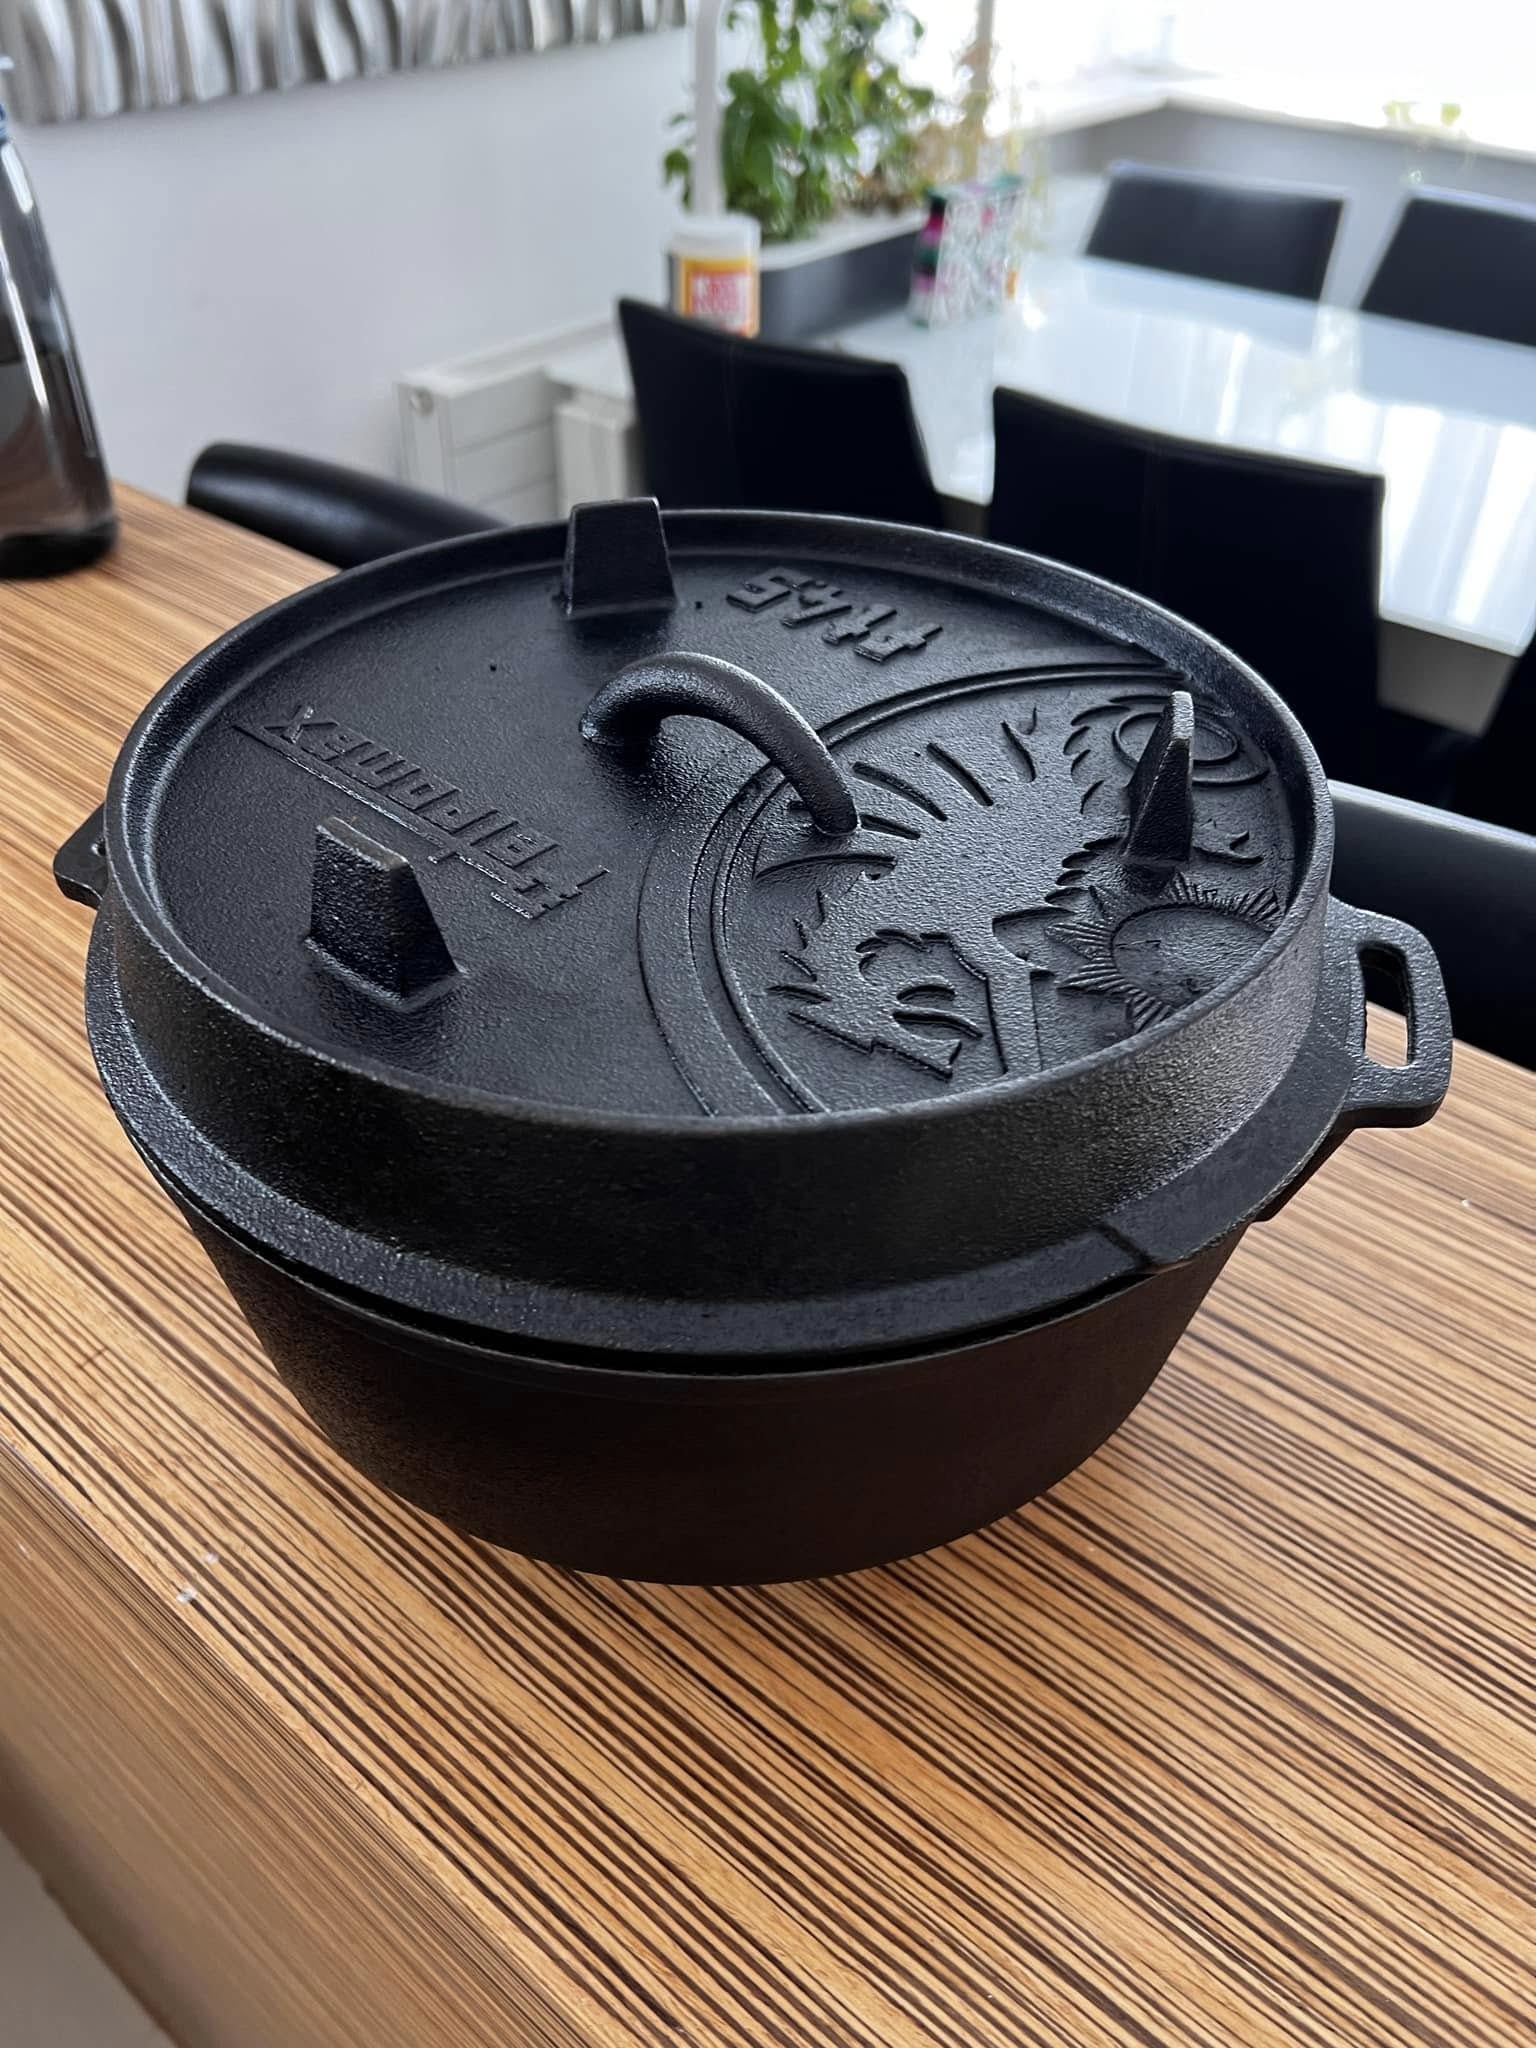
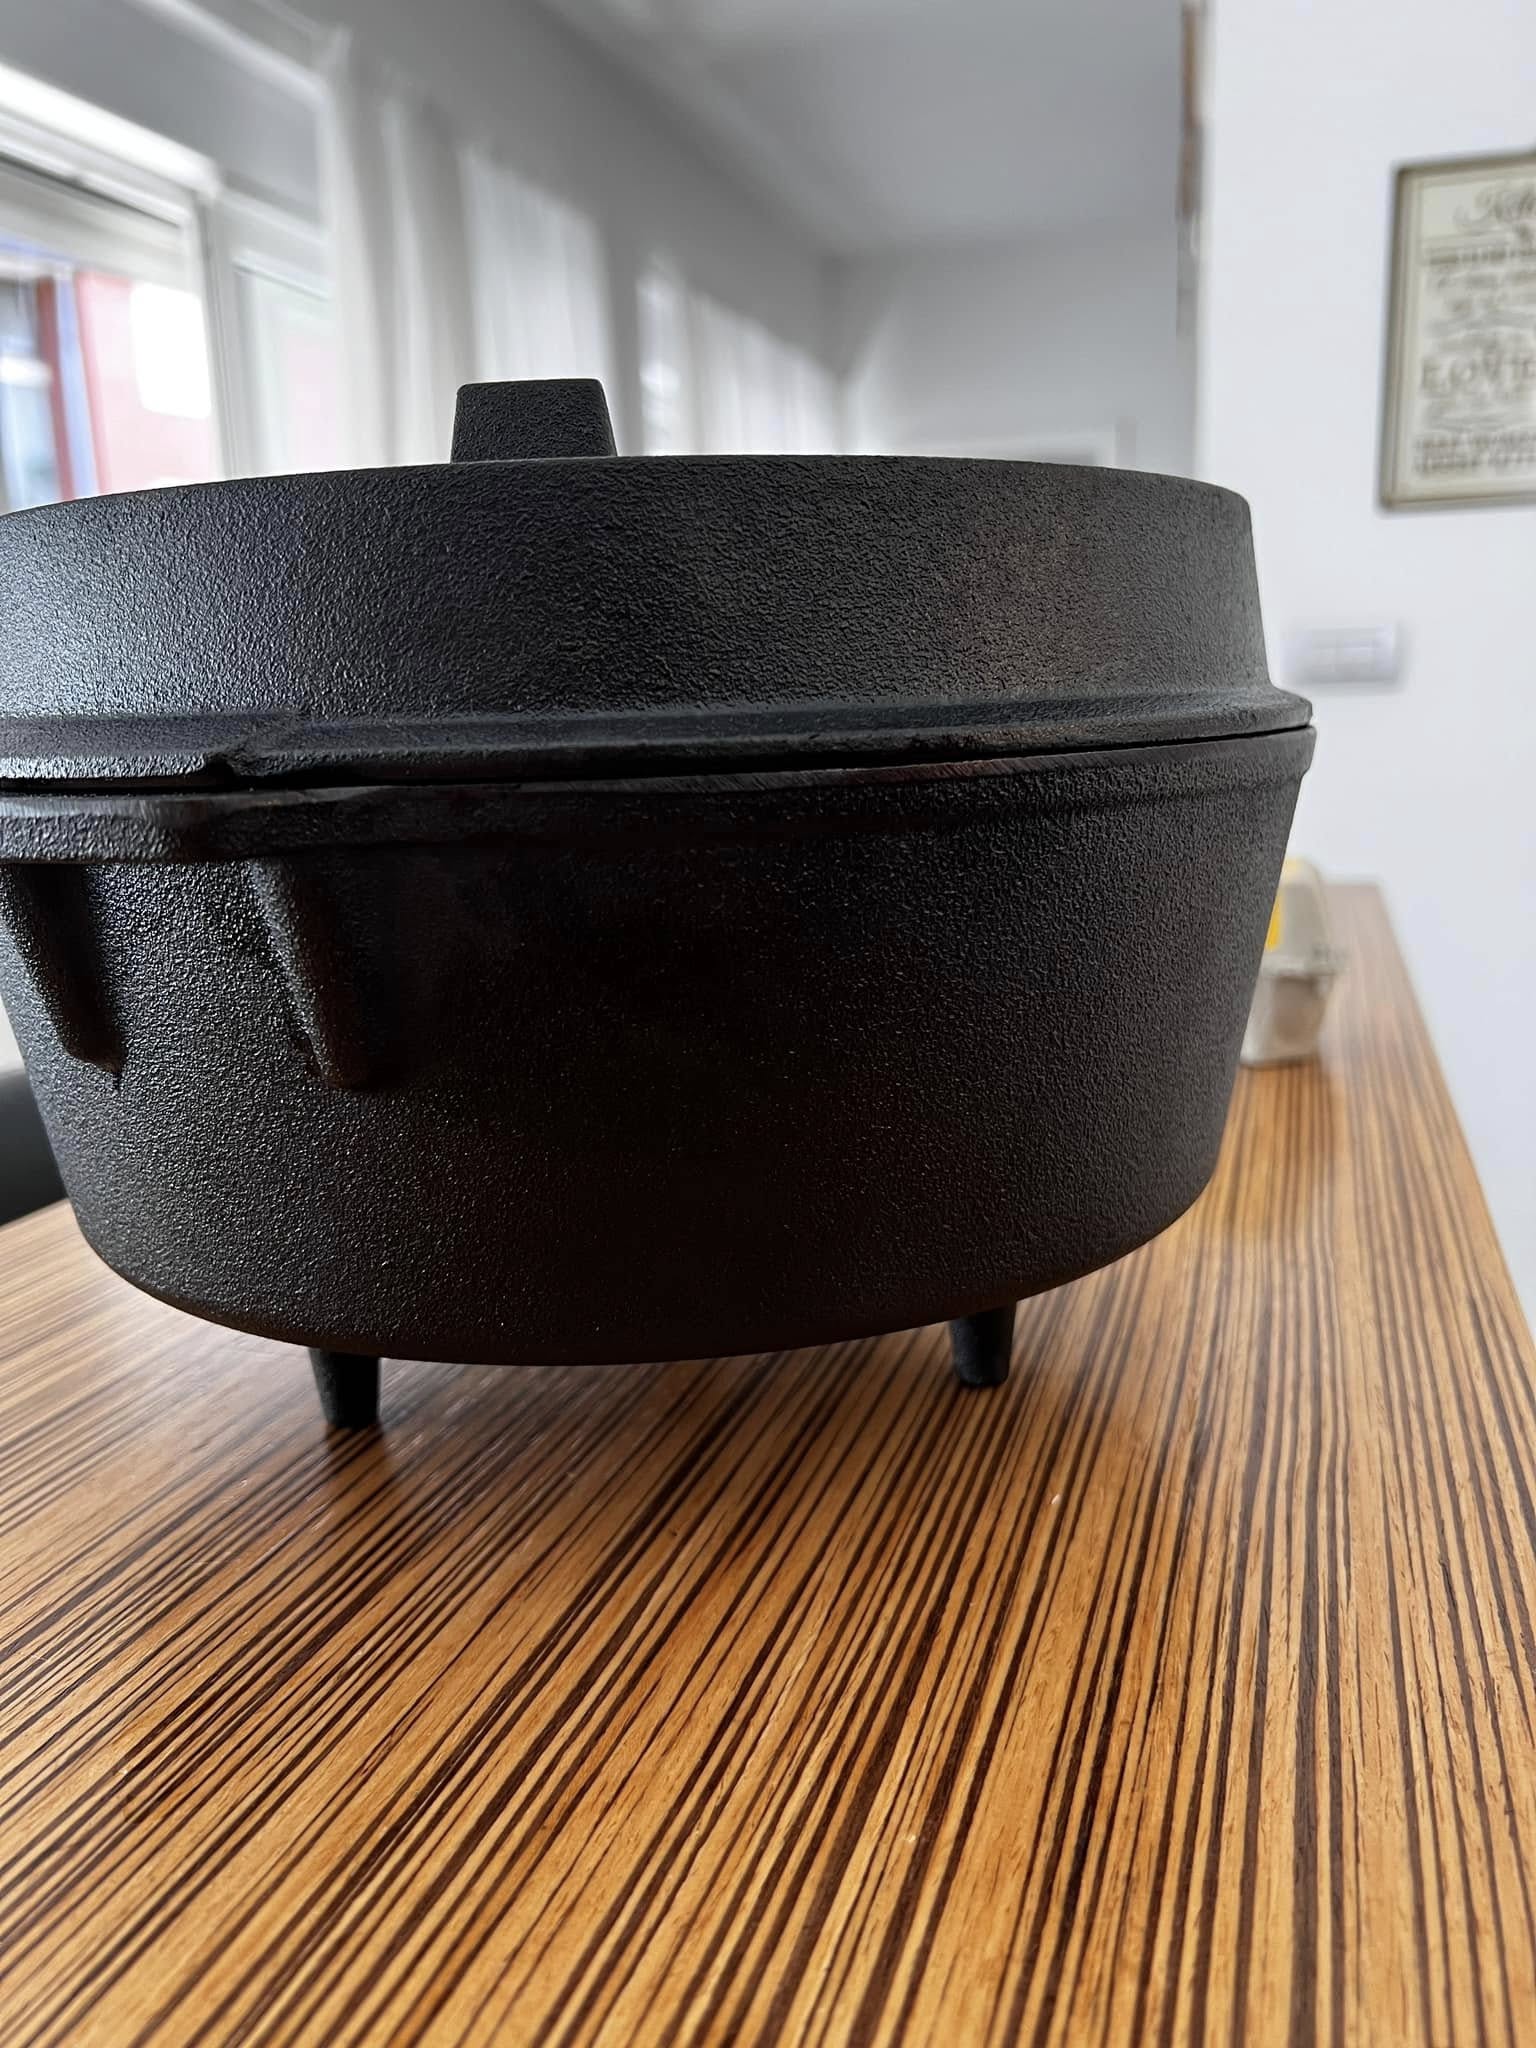
And the side profile is sleek and clean. The legs are sturdy, and the finish has that satin sheen that promises non-stick performance.
What to Cook in Your Restored Dutch Oven
Now that I have this 4-quart (approximate size) beauty restored, I am dreaming of all the things I can cook in it. A heavy Dutch oven like this is perfect for slow-cooking meals over a campfire or in the oven.
-
Campfire Cooking: This pot was found in the woods, so it belongs back there (temporarily!). It would be perfect for a Southern Pinto Beans with Ham Hocks recipe, letting it simmer over hot coals.
-
Baking Bread: Dutch ovens trap steam, making them ideal for baking rustic loaves. I plan to try this Homemade Sourdough Sandwich Bread inside it for a crispy crust.
-
Deep Frying: The high sides make it safe for frying. I can see a batch of Southern Fried Chicken Livers sizzling away in here.
-
Hearty Stews: Of course, nothing beats a classic stew. My Homemade Beef Stew in Bread Bowls would be the perfect way to break in the new seasoning.
Maintenance Tips
To keep my “new” Petromax looking this good, I’ll follow the standard cast iron rules:
-
Never soak it in water.
-
Dry immediately after washing.
-
Oil lightly after every use while it’s still warm.
Restoring this piece was a labor of love, but seeing the dragon logo emerge from the rust was worth every minute of scrubbing. It just goes to show that with a little care, cast iron really does last forever.
FAQs
Can I use soap on my restored cast iron? Yes! Modern dish soap is gentle enough not to strip the seasoning. Just don’t use a harsh scouring pad or the dishwasher.
What if I can’t get all the rust off with vinegar? If the rust is extremely deep (pitting), you might need a stronger method like a lye bath or electrolysis. But for surface rust and medium corrosion, the vinegar/baking soda scrub works wonders if you are patient.
Is rust dangerous if I cook on it? A little iron oxide won’t hurt you (our bodies need iron!), but it tastes metallic and gritty. It’s best to remove it all to get a smooth, non-stick surface.
Why did you use canola oil? I like canola oil because it is cheap, accessible, and has a relatively high smoke point. Flaxseed oil is popular too, but it can be brittle and flake off. Grapeseed oil is another excellent, albeit more expensive, choice.
Conclusion
I am so glad I decided to haul this heavy, rusty pot out of the woods instead of leaving it there. It has already become a conversation piece in my kitchen.
Have you ever found a piece of cast iron in an unlikely place? Or maybe you have a rusty skillet in the garage you’ve been afraid to tackle? Let me know in the comments below! And if you found this restoration guide helpful, please save it to your DIY or Cast Iron board on Pinterest.
How to Restore Rusty Cast Iron (Vinegar & Baking Soda Method)
Equipment
- Rusty cast iron pan or dutch oven
- Steel wire brush
- Steel wool (Grade 0 or 00)
- Baking soda
- White vinegar
- Sponge
- Canola oil (for seasoning)
- Paper towels
- Oven
Instructions
- Initial Cleaning: Use a steel wire brush to scrape off loose rust flakes, dirt, and mold. Rinse with water.
- The Scrub: Sprinkle a generous amount of baking soda onto the wet iron. Scrub with a sponge to start breaking up the surface rust.
- Vinegar Reaction: Pour white vinegar over the baking soda (it will fizz). While it is wet, use steel wool to scrub the metal vigorously.
- Repeat: Rinse the sludge away. Repeat the baking soda, vinegar, and steel wool process. You may need to do this 3-4 times depending on the severity of the rust. (This took me about 3 hours for a heavily rusted pot).
- Reveal Bare Metal: Continue scrubbing until you see dull grey metal with no orange spots remaining.
- Dry Immediately: Wash the pot one last time with soap and water, then towel dry. Place it on a hot stove burner for a minute to evaporate all moisture to prevent flash rusting.
- Seasoning - Layer 1: Preheat your oven to 450°F (230°C). Apply a thin layer of canola oil to the entire piece. Wipe it off with a clean paper towel until it looks dry (you want a micro-layer).
- Bake: Place the cast iron upside down in the oven for 1 hour. Turn the oven off and let it cool inside.
- Repeat Seasoning: Repeat the oil and bake process 2-3 more times for a durable, black finish.
Notes