Best Crispy Buttermilk Fried Chicken Recipe
The Ultimate Southern Comfort Food: Crispy Buttermilk Fried Chicken
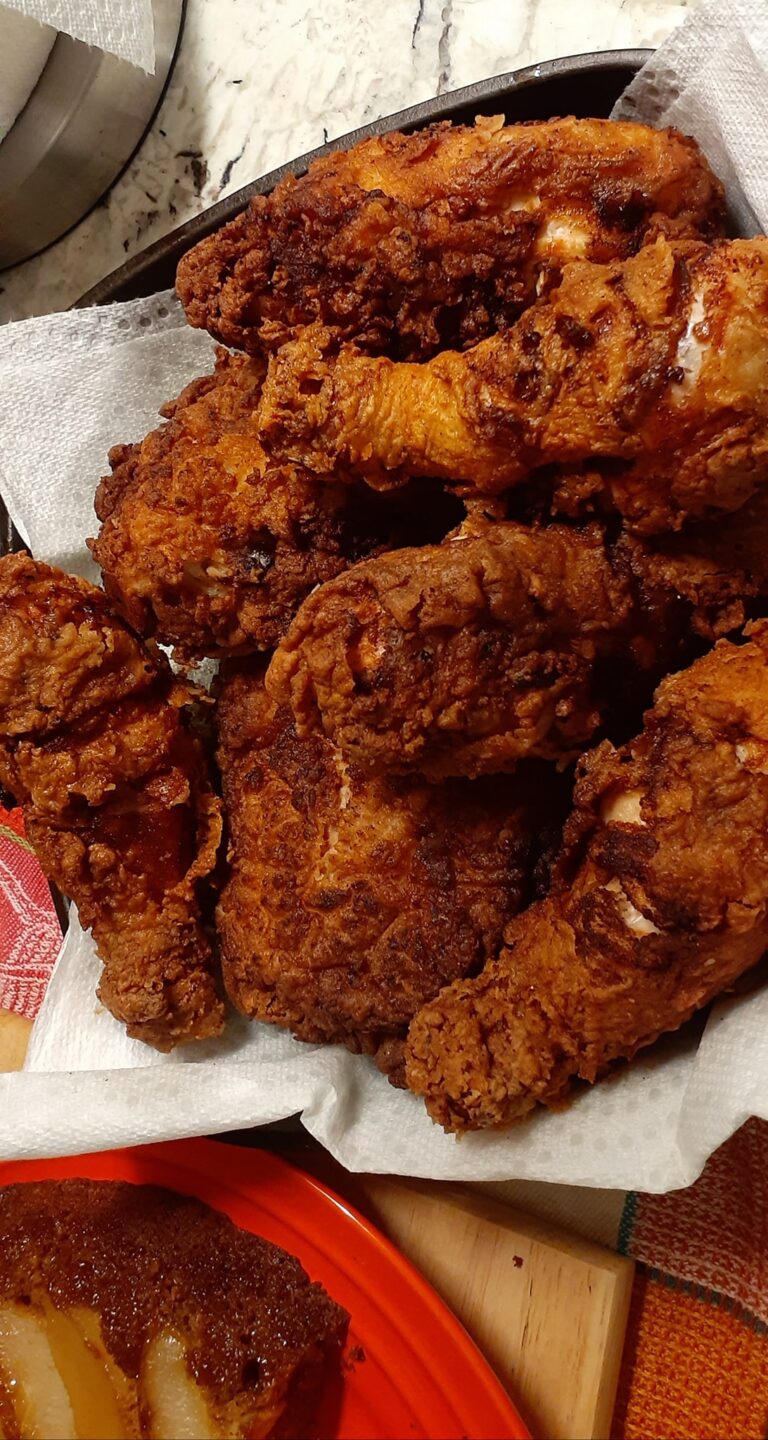
There is something truly special about biting into a piece of perfectly cooked fried chicken. You want that loud, satisfying crunch on the outside, followed immediately by incredibly juicy, tender, and flavorful meat on the inside. Making restaurant-quality fried chicken at home might seem intimidating, but with the right technique, it is surprisingly simple and deeply rewarding.
The secret to this spectacular recipe lies in a two-step process. First, the chicken takes a long bath in a mixture of tangy buttermilk and a dash of hot sauce. The acidity of the buttermilk breaks down the proteins, ensuring every single bite is melt-in-your-mouth tender, while the hot sauce adds just a whisper of savory flavor without making it overly spicy.
The second secret is the breading. By blending all-purpose flour with a generous amount of cornstarch and a heavy hand of savory spices, you create a coating that fries up incredibly light, shatteringly crisp, and beautifully golden. Whether you are planning a classic Sunday family dinner, packing a picnic basket, or just craving the ultimate comfort food, this buttermilk fried chicken will absolutely steal the show. Grab your cast iron skillet, and let’s get frying!

Why You’ll Love This Recipe
- Shatteringly Crisp Crust: The addition of cornstarch to the flour mixture guarantees a crust that stays incredibly crunchy, even after it cools down.
- Juicy, Tender Meat: A long soak in buttermilk tenderizes the poultry to perfection, locking in moisture so it never dries out in the hot oil.
- Perfectly Seasoned: A robust blend of paprika, garlic, onion, and black pepper ensures that the flavor goes far beyond just a plain flour coating.
- Make-Ahead Friendly: You can prep the marinade the night before, making the actual cooking process much quicker the next day.
- Nostalgic Comfort: There is nothing quite like a platter of homemade fried chicken to make a regular weeknight dinner feel like a special occasion.
Ingredients
- Chicken: 1 whole chicken, cut into 8 pieces (2 breasts, 2 thighs, 2 drumsticks, 2 wings). Alternatively, you can use 6 bone-in, skin-on chicken thighs.
- Buttermilk: 2 cups of buttermilk. This provides the acidic base to tenderize the meat and helps the breading stick.
- Hot Sauce: 2 tablespoons of your favorite hot sauce. Don’t worry, this won’t make the chicken fiery hot; it just adds a fantastic layer of savory depth.
- Flour: 2 cups of all-purpose flour to form the base of our crispy coating.
- Cornstarch: 1/2 cup of cornstarch. This is the secret ingredient for maximum crunch.
- Spices: 1 tablespoon kosher salt, 1 tablespoon black pepper, 1 tablespoon paprika, 1 teaspoon garlic powder, and 1 teaspoon onion powder.
- Frying Oil: Peanut oil or vegetable oil for frying. Peanut oil is highly recommended for its high smoke point and neutral flavor.
Step-by-Step Instructions
Step 1: Marinate the Chicken
In a large mixing bowl, whisk together the buttermilk and the hot sauce. Submerge all of your chicken pieces into the liquid, ensuring every piece is completely covered. Cover the bowl securely with plastic wrap and place it in the refrigerator. Let the chicken marinate for at least 4 hours, though overnight is ideal for the absolute best flavor and tenderness.
Step 2: Prepare the Seasoned Flour
When you are ready to cook, grab a wide, shallow baking dish (a pie dish or a large casserole dish works perfectly). Whisk together the all-purpose flour, cornstarch, salt, black pepper, paprika, garlic powder, and onion powder until the spices are evenly distributed throughout the flour.
Step 3: Dredge and Rest the Chicken
Remove the chicken from the refrigerator. Take one piece of chicken at a time out of the buttermilk, letting any excess liquid drip back into the bowl. Press the chicken firmly into the seasoned flour mixture, flipping it to coat all sides heavily. Press the flour into the skin to ensure it adheres. Transfer the coated chicken to a wire cooling rack and let it sit at room temperature for about 15 minutes. This resting period is crucial—it allows the flour to hydrate and stick to the chicken, preventing the crust from falling off in the oil.
Step 4: Heat the Frying Oil
While the chicken rests, fill a large, heavy-bottomed cast iron skillet or Dutch oven halfway with peanut oil or vegetable oil. Clip a deep-fry thermometer to the side of the pan and heat the oil over medium-high heat until it reaches exactly 350°F (175°C).
Step 5: Fry to Golden Perfection
Using metal tongs, carefully lower the breaded chicken pieces into the hot oil, dropping them away from you to prevent splashing. Do not overcrowd the pan; fry in batches if necessary. Fry the chicken for about 12 to 15 minutes per side. You are looking for a deep, golden-brown crust. Use a digital meat thermometer to ensure the internal temperature of the thickest part of the chicken reaches 165°F (74°C).
Step 6: Drain and Serve
Once fully cooked, carefully remove the chicken from the hot oil using tongs. Transfer the pieces to a clean wire rack set over a baking sheet to drain. Avoid draining on paper towels, as the steam will become trapped and make the crust soggy. Serve hot and enjoy!
Expert Cooking Tips
- Let It Rest: Never skip the resting step after dredging. Letting the breaded chicken sit on a wire rack for 15 minutes is the ultimate secret to a crust that stays attached to the meat while frying.
- Monitor Your Oil Temperature: The oil temperature will drop when you add the cold chicken. Keep an eye on your thermometer and adjust your stove heat to maintain a steady 325°F to 350°F while frying.
- Use a Wire Rack for Draining: Placing freshly fried chicken on paper towels traps steam underneath, which softens your beautiful crust. A wire rack allows air to circulate, keeping everything perfectly crunchy.
- Don’t Overcrowd the Pan: Frying too many pieces at once drastically drops the oil temperature, resulting in greasy, soggy chicken rather than crispy chicken. Work in batches for the best results.
- Check for Doneness Safely: Always use an instant-read meat thermometer to check if the chicken is done. Insert it into the thickest part of the meat without touching the bone; it should read 165°F (74°C).
Variations to Try
- Spicy Nashville Style: After frying, whisk some of the hot frying oil with cayenne pepper, brown sugar, and smoked paprika, then brush it heavily over the crispy chicken for a fiery kick.
- Herb and Parmesan: Add half a cup of grated parmesan cheese and two teaspoons of dried Italian herbs to your flour mixture for a savory, herbaceous twist.
- Gluten-Free Option: Swap the all-purpose flour for a high-quality 1:1 gluten-free baking blend. Keep the cornstarch, as it is naturally gluten-free and essential for the crunch!
What to Serve With Buttermilk Fried Chicken
This classic Southern main course deserves traditional comfort food sides. You cannot go wrong serving this alongside a giant mound of creamy garlic mashed potatoes and a boat of savory gravy.
For a little contrast, offer a crisp, tangy apple cider vinegar coleslaw to cut through the richness of the fried chicken. Finish the plate with warm, flaky buttermilk biscuits generously brushed with honey butter, and a refreshing pitcher of sweet tea.
Storage & Reheating
Refrigerator
Allow any leftover fried chicken to cool completely to room temperature. Store it in an airtight container lined with a dry paper towel in the refrigerator for up to 3 to 4 days.
Freezer
You can freeze cooked fried chicken! Once completely cooled, place the pieces in a single layer on a baking sheet and freeze until solid. Then, transfer them to a heavy-duty freezer bag for up to 3 months. Thaw in the refrigerator overnight before reheating.
Reheating
Never use the microwave to reheat fried chicken, or you will end up with a rubbery, soggy crust. To restore the crunch, preheat your oven to 400°F (200°C). Place the leftover chicken on a wire rack set over a baking sheet and bake for 15 to 20 minutes until heated through and crispy. Alternatively, pop it in an air fryer at 375°F for 8 to 10 minutes.
Frequently Asked Questions
Why do you soak chicken in buttermilk before frying?
Buttermilk is slightly acidic, which helps break down the tough protein structures in the meat, resulting in incredibly tender chicken. It also adds a wonderful tangy flavor and creates a slightly sticky surface that helps the seasoned flour adhere properly.
Why add cornstarch to the flour mixture?
Cornstarch prevents the development of gluten in the flour when it mixes with the moisture from the chicken. This translates to a lighter, crispier crust that shatters perfectly when you bite into it, rather than a heavy, bready coating.
Can I reuse the frying oil?
Yes, you can reuse frying oil one or two times if you treat it properly. Let the oil cool completely, then strain it through a fine-mesh sieve lined with cheesecloth or a coffee filter to remove any dark, burnt bits of breading. Store it in a sealed container in a cool, dark place.
Why is my fried chicken breading falling off?
Breading falls off for two main reasons: the chicken wasn’t patted dry before going into the buttermilk, or you skipped the resting phase. Letting the breaded chicken rest on a wire rack for 15 minutes before frying allows the flour to bond with the buttermilk, creating a glue-like seal that holds the crust in place.
How do I know when the chicken is done frying?
The outside should be a deep golden brown, which usually takes about 12 to 15 minutes per side for bone-in pieces. However, color can be deceiving. The only foolproof way to know it is fully cooked is to use a digital meat thermometer. The internal temperature must reach 165°F (74°C) at the thickest part of the piece.
Final Thoughts
Making your own buttermilk fried chicken at home is an incredibly rewarding culinary project. The combination of tender, juicy meat and a perfectly seasoned, shatteringly crisp crust is simply unbeatable. Whether you are serving it up for a Sunday family dinner or packing it for a summer picnic, this recipe is sure to become a highly requested favorite in your household. Do not rush the marinating process, respect the resting time, and get ready to enjoy the best fried chicken you have ever made!

Best Crispy Buttermilk Fried Chicken
Learn how to make the ultimate Southern comfort food! This buttermilk fried chicken features juicy, tender meat and a shatteringly crisp, perfectly seasoned crust.
Ingredients
- 1 whole chicken cut into 8 pieces, or use 6 bone-in chicken thighs
- 2 cups buttermilk
- 2 tablespoons hot sauce
- 2 cups all-purpose flour
- 1/2 cup cornstarch
- 1 tablespoon kosher salt
- 1 tablespoon black pepper
- 1 tablespoon paprika
- 1 teaspoon garlic powder
- 1 teaspoon onion powder
- Peanut oil or vegetable oil for frying
Instructions
- In a large bowl, whisk together the buttermilk and hot sauce. Add the chicken pieces, ensuring they are completely submerged. Cover and refrigerate for at least 4 hours (or overnight for best results).
- In a wide baking dish, whisk together the flour, cornstarch, salt, pepper, paprika, garlic powder, and onion powder until evenly combined.
- Remove the chicken from the buttermilk one piece at a time, letting the excess liquid drip off. Press the chicken firmly into the seasoned flour mixture until heavily coated on all sides.
- Set the breaded chicken aside on a wire cooling rack for 15 minutes to let the crust hydrate and set.
- Fill a large cast iron skillet or Dutch oven halfway with peanut oil. Heat the oil to 350°F (175°C).
- Using tongs, carefully drop the chicken pieces into the hot oil without overcrowding the pan. Fry for 12-15 minutes per side until deeply golden brown.
- Use a meat thermometer to ensure the internal temperature reaches 165°F (74°C).
- Remove the chicken from the oil and drain on a clean wire rack. Serve hot.
Notes
Resting is Key: Do not skip letting the breaded chicken rest for 15 minutes before frying. This prevents the crust from falling off in the oil. Draining: Drain the finished chicken on a wire rack, not paper towels, to ensure the bottom doesn't get soggy from trapped steam. Oil Maintenance: Keep an eye on your oil temperature, adjusting your stove to maintain a steady 325°F to 350°F during the frying process.