Old Fashioned Pineapple Upside Down Cake — A Skillet Memory
There is a distinct, heavy thud when a seasoned cast iron skillet is set onto the stovetop, a sound that immediately signals something wonderful is about to happen in the kitchen. If you close your eyes, you can almost smell the memory before the oven even turns on. It is the scent of deep molasses from brown sugar warming up, mingling with the bright, sharp tang of citrus and the woody notes of cinnamon and allspice. For generations, an old fashioned pineapple upside down cake has been the centerpiece of church potlucks, Sunday afternoon gatherings, and quiet evenings at home. It is a cake that carries history in its very foundation—or rather, its top.
Sometimes, the most enduring recipes in our kitchens are born out of sheer necessity and a refusal to abandon a baking plan just because the pantry is missing a single ingredient. Recently, I found myself with a deep craving for this classic dessert, but a trip to the grocer revealed completely bare shelves where the traditional pineapple rings usually sit. Rather than walking away, I picked up a can of pineapple tidbits. In the grand tradition of home economics, you make do with what you have on hand. As many of you in our Old Fashioned Family Recipes Facebook community know, adapting on the fly is how our grandmothers cooked every single day.
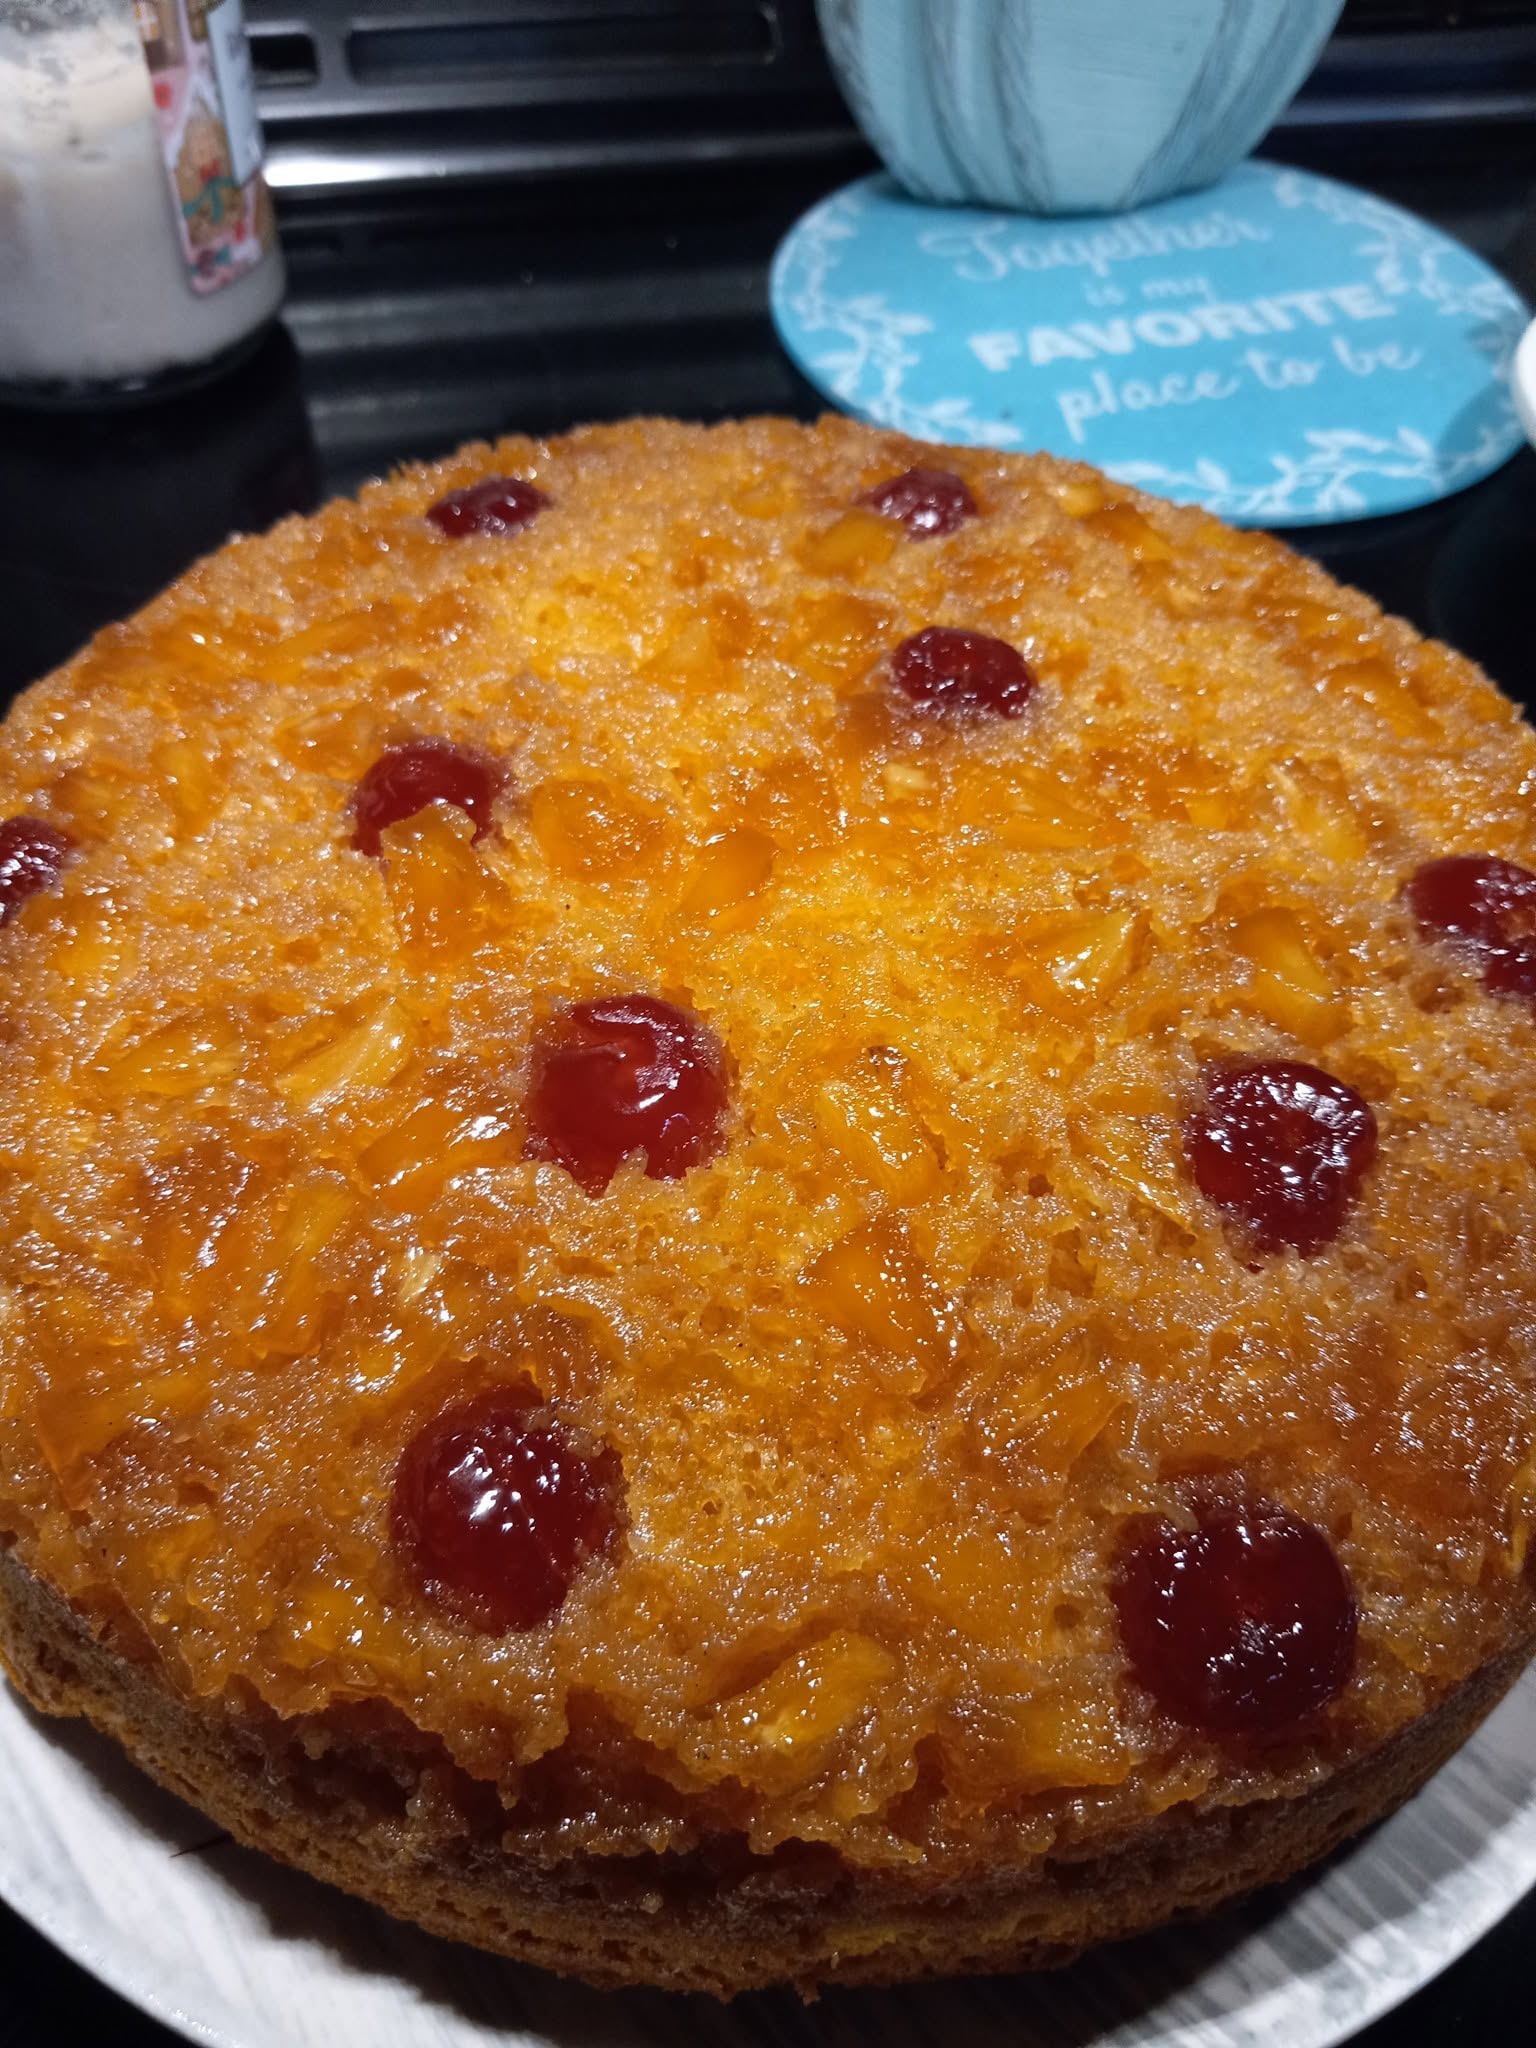
When you look at the finished cake, you see how this happy accident completely transforms the dessert. Instead of distinct rings, the tidbits create a continuous, glowing golden crust that covers every square inch of the cake. Every single forkful guarantees a taste of caramelized fruit, ruby red maraschino cherries, and that rich, sticky glaze. The addition of warm spices and a heavy drizzle of maple syrup elevates a standard yellow cake mix into a deeply complex, comforting treat that tastes like it took all afternoon to prepare. It is a testament to the fact that you do not need perfect ingredients to create a perfect memory.
Why this recipe works
-
The thermal mass of cast iron creates the ultimate glaze: A heavy cast iron skillet conducts and holds heat far better than a thin aluminum baking pan. As the cake bakes, the bottom of the skillet gets intensely hot, melting the brown sugar, maple syrup, and pineapple juices together into a bubbling, thick, perfectly caramelized syrup that soaks directly into the crumb of the cake without burning.
-
Fruit tidbits ensure an even distribution of moisture: Traditional large pineapple rings often leave dry gaps of plain cake in between the fruit. By using smaller tidbits packed tightly together, you create a solid, unbroken layer of fruit. This blanket of pineapple shields the cake from drying out and guarantees that every single slice has the exact same texture and flavor profile.
-
Replacing water with fruit juice transforms the crumb: Boxed yellow cake mixes are wonderfully consistent, but they lack the depth of a scratch-made batter. By discarding the required water and using the reserved, vitamin-rich pineapple juice instead, you are forcing the cake to absorb pure flavor. The acidity in the juice also tenderizes the gluten in the flour, resulting in a significantly softer, tighter crumb.
-
A custom spice blend adds bakery-level warmth: A standard boxed mix can taste slightly flat. By intentionally whisking in extra brown sugar, aromatic cinnamon, sharp allspice, and a heavy splash of real vanilla extract, you bridge the gap between a modern convenience ingredient and a true, old fashioned scratch-cake flavor.
What you’ll need
-
Yellow Cake Mix: This is the structural foundation of the dessert. A standard 15.25-ounce box provides the perfect balance of dry ingredients and leavening agents. You are going to heavily modify it, so any reliable name brand will serve your purposes perfectly.
-
Pineapple Tidbits (Canned in Juice): You will need one large can. Avoid pineapples canned in heavy syrup, as you are already adding substantial sugar to the skillet. The natural juice is vital for mixing into the batter.
-
Brown Sugar: You need this for both the skillet base and the cake batter. Light brown sugar offers a gentle molasses note, while dark brown sugar will give you a much deeper, almost toffee-like glaze. Pack it tightly into your measuring cup to ensure you have enough to create a thick crust.
-
Maple Syrup: A heavy drizzle over the brown sugar before layering the fruit adds an earthy, woodland sweetness that pairs beautifully with the tropical pineapple.
-
Maraschino Cherries: These provide that iconic, jewel-toned visual appeal. You must drain them very thoroughly and pat them completely dry so their red syrup does not bleed into your golden pineapple glaze.
-
Vegetable Oil and Eggs: These are the fats and binders required by your specific box mix instructions. They provide the necessary richness and structure for the batter to rise around the heavy fruit.
-
Ground Cinnamon and Allspice: These warming spices are the secret to an old fashioned flavor profile. The cinnamon offers a sweet, woody aroma, while the allspice provides a complex, slightly peppery backdrop that cuts through the intense sweetness of the caramelized sugar.
-
Vanilla Extract: A generous splash enhances all the other flavors in the pan, rounding out the sharp acidity of the pineapple and the deep notes of the maple.
-
Pan Spray: A very thorough coating of non-stick baking spray is essential for the cast iron skillet. This ensures that when the moment of truth arrives, your cake releases cleanly, leaving no precious fruit behind in the pan.
Substitutions & Variations
If you keep a dairy-free kitchen, simply ensure your chosen boxed cake mix does not contain milk powders. For a gluten-free adaptation, select a high-quality 1-to-1 gluten-free yellow cake mix; the baking time may need to be extended by five to seven minutes, so watch the center closely. If you do not have maple syrup in the pantry, a drizzle of dark corn syrup or even honey will provide a similar sticky binding agent for the brown sugar glaze.
How to make Old Fashioned Pineapple Upside Down Cake
Step 1: Preparing the Cast Iron Canvas
Begin by placing your oven rack in the center position and preheating your oven to 350°F. Take a well-seasoned 10-inch or 12-inch cast iron skillet and coat the entire interior generously with baking spray. You must ensure the sides are covered just as well as the bottom, as the sugar will bubble up the edges. Take your brown sugar and pack it firmly and evenly across the bottom of the skillet. You want just enough to completely obscure the black iron underneath. Once the sugar is packed tight, take your maple syrup and drizzle it slowly and evenly over the sugar layer. This creates the sticky foundation that will hold your fruit in place.
Step 2: Arranging the Jewel-Toned Fruit
Open your can of pineapple tidbits and pour the contents through a fine-mesh strainer set over a bowl. You must save every drop of that juice for the batter. Take the drained tidbits and scatter them across the brown sugar and maple syrup layer. Because you are using tidbits instead of rings, you have the freedom to pack them in tightly, edge to edge, creating a solid blanket of fruit. Take your thoroughly dried maraschino cherries and nestle them evenly throughout the pineapple layer. Press them down slightly so they are flush against the bottom of the skillet; this ensures they will be fully visible and beautifully set when the cake is inverted.
Step 3: Mixing the Spiced Batter
In a large, sturdy mixing bowl, empty the contents of your yellow cake mix. Check the back of the box for the required oil and egg measurements, and add those directly to the dry mix. Now, instead of adding the water called for on the instructions, pour in the reserved pineapple juice. Add your two extra tablespoons of brown sugar, a healthy sprinkle of ground cinnamon, a sprinkle of allspice, and a generous splash of vanilla extract. Use a hand mixer on medium speed to blend the ingredients. You are looking for a smooth, thick, completely cohesive batter that smells intensely of warm spices and tropical fruit. Do not overmix; just blend until no dry pockets of flour remain.
Step 4: Pouring and Baking
Carefully pour the spiced batter directly over your arranged fruit in the cast iron skillet. Use a rubber spatula to gently spread the batter out to the edges, ensuring it covers all the fruit evenly. Be careful not to press too hard, or you will disturb the carefully laid pineapple and cherries underneath. Transfer the heavy skillet into the preheated oven. Bake for exactly 40 minutes. You are watching for the edges of the cake to pull away slightly from the sides of the skillet, and for the center to spring back immediately when lightly touched with your finger. The sugar syrup should be actively bubbling up around the very edges of the pan.
Step 5: The Essential Inversion
Remove the heavy skillet from the oven and set it on a heat-proof surface. You must let it rest for exactly five minutes—no more, no less. If you try to flip it immediately, the molten sugar will run everywhere. If you wait too long, the sugar will harden and cement the fruit to the iron. After five minutes, place a large, flat serving plate or platter upside down completely covering the skillet. Wearing thick oven mitts, grasp the plate and the skillet handles firmly together. In one swift, confident motion, flip the entire assembly over. Let the skillet sit upside down on the plate for about thirty seconds to allow gravity to pull every drop of the glaze down over the cake, then slowly lift the skillet straight up and away.
Destiny’s tips
-
I always dry my cherries completely: If you pull maraschino cherries straight from the jar and put them in the pan, the red syrup will mix with the brown sugar and dye your beautiful golden pineapple a muddy pink color. I always roll them thoroughly in paper towels until they leave no wet spots behind.
-
In my kitchen, the flip requires total commitment: When it is time to invert the cake onto the platter, hesitation is your enemy. I always make sure I have a solid grip with heavy-duty oven mitts, and I turn the pan over in one fast, smooth arc.
-
I always check the center with a wooden skewer: Because the cast iron holds so much heat, the edges of the cake will bake faster than the center. I always insert a long wooden skewer right into the middle; it should come out with just a few moist crumbs attached, never wet batter.
-
In my kitchen, leftover juice is liquid gold: If your can of tidbits yielded more juice than the box mix required for water, do not pour it down the drain! I save that extra juice to brush over the warm cake just after flipping, giving it an extra punch of bright flavor.
-
I always serve this warm, never hot: The sugar glaze needs a few moments to set up and slightly crystallize on top of the fruit. Slicing into it while it is boiling hot will cause the cake to tear. Let it rest for at least fifteen minutes after flipping before you present it.
What to serve with Old Fashioned Pineapple Upside Down Cake
-
Vanilla Bean Ice Cream: A cold, slowly melting scoop of high-quality vanilla bean ice cream provides a stunning temperature contrast to the warm, spiced cake.
-
Freshly Whipped Cream: A dollop of heavy cream, whipped by hand with just a hint of powdered sugar and vanilla, cuts through the intense sweetness of the caramelized pineapple.
-
A Strong Cup of Black Coffee: The bitter, dark notes of a freshly brewed cup of black coffee perfectly balance the rich, sticky molasses flavor of the brown sugar glaze.
-
A Cold Glass of Whole Milk: Sometimes, the most traditional pairings are the best. A frosty glass of milk is the perfect nostalgic accompaniment to a heavy, sweet slice of cake.
Frequently Asked Questions
Can I use crushed pineapple instead of tidbits?
You certainly can use crushed pineapple, and it will yield an even more dense, jam-like topping. However, you must be incredibly diligent about squeezing out the excess moisture. Crushed pineapple holds significantly more liquid than tidbits, and if you do not press it dry in a strainer before laying it on the brown sugar, your glaze will become watery and the bottom of your cake will turn out soggy rather than caramelized.
Do I have to bake this in a cast iron skillet?
While a cast iron skillet provides the most authentic, deeply caramelized crust due to its superior heat retention, you can bake this in a standard 9×13 inch metal baking pan if necessary. If using a thinner metal pan, you will need to keep a close eye on the baking time, as it may bake slightly faster than the heavy iron. You will also miss out on the very dark, thick crust that only cast iron can truly develop.
Why did my fruit stick to the bottom of the pan?
Fruit usually sticks for one of two reasons: the pan was not adequately greased, or the cake was allowed to cool for too long before flipping. Cast iron requires a very heavy hand with the pan spray for this recipe. More importantly, as the brown sugar glaze cools, it turns back into a hard candy state. You must invert the cake precisely five minutes after it comes out of the oven, while the syrup is still molten and fluid.
How should I store the leftover cake?
Because this cake is incredibly moist from the fruit and the glaze, it should be stored in an airtight container in the refrigerator to maintain its texture and prevent spoiling. It will keep beautifully for up to four days. When you are ready for another slice, simply place it on a plate and warm it in the microwave for fifteen to twenty seconds to soften the crumb and reactivate the sticky brown sugar glaze.
There is a quiet joy in standing over the counter, lifting that heavy skillet away, and watching the steam rise off a perfectly golden, glowing pineapple cake. It connects us to the kitchens of our past, reminding us that baking is as much about the feeling it creates as the food it yields. I hope this skillet cake brings a touch of that vintage warmth into your home this week. I would love to hear how yours turned out — drop a comment below or come share a photo in our Facebook group! [LINK: https://www.facebook.com/groups/957724288519331]
Old Fashioned Pineapple Upside Down Cake
Ingredients
- 1 15.25 oz box yellow cake mix
- 1 large can pineapple tidbits reserve the juice
- 1/2 cup brown sugar for the pan, packed to cover
- 2 tablespoons brown sugar for the batter
- 2 tablespoons maple syrup
- 1 jar maraschino cherries drained and patted dry
- Vegetable oil amount as called for on cake mix box
- Eggs amount as called for on cake mix box
- 1/2 teaspoon ground cinnamon
- 1/4 teaspoon ground allspice
- 1 teaspoon vanilla extract
- Pan spray
Instructions
- Preheat and Prep: Preheat your oven to 350°F. Generously coat a 10-inch or 12-inch cast iron skillet with baking pan spray.
- Build the Base: Pack the 1/2 cup of brown sugar evenly across the bottom of the skillet to completely cover the iron. Drizzle the maple syrup evenly over the sugar.
- Add the Fruit: Drain the pineapple tidbits, reserving all the juice in a separate bowl. Scatter the tidbits evenly over the sugar layer. Nestle the dried cherries among the pineapple.
- Mix the Batter: In a large mixing bowl, combine the yellow cake mix, the oil, and the eggs according to the box instructions. Instead of water, use the reserved pineapple juice. Add the remaining 2 tablespoons of brown sugar, cinnamon, allspice, and vanilla extract. Blend well.
- Assemble: Carefully pour the spiced batter over the fruit in the skillet, spreading it gently to the edges.
- Bake: Bake for 40 minutes, or until the edges are bubbling and the center springs back to the touch.
- Flip and Serve: Remove from the oven and let the skillet rest for exactly 5 minutes. Place a large plate upside down over the skillet and carefully, using oven mitts, flip the pan over. Lift the skillet away to reveal the fruit topping.