Old Fashioned Fried Chicken Livers — Crispy Southern Comfort
There is an incredibly specific aroma that fills a kitchen when offal hits hot cooking oil. It is deeply rich, earthy, and unmistakably savory, instantly transporting me back to the linoleum floors of my childhood. I remember standing on my tiptoes, peering over the edge of the stove as a heavy metal pan crackled and popped. You knew something special was happening when the chicken livers were brought out. Recently, in our Old Fashioned Family Recipes Facebook community, we had a lively discussion about the forgotten art of preparing traditional organ meats. It seems so many home cooks have abandoned these cuts because they require a bit of patience and specific preparation to turn out right.
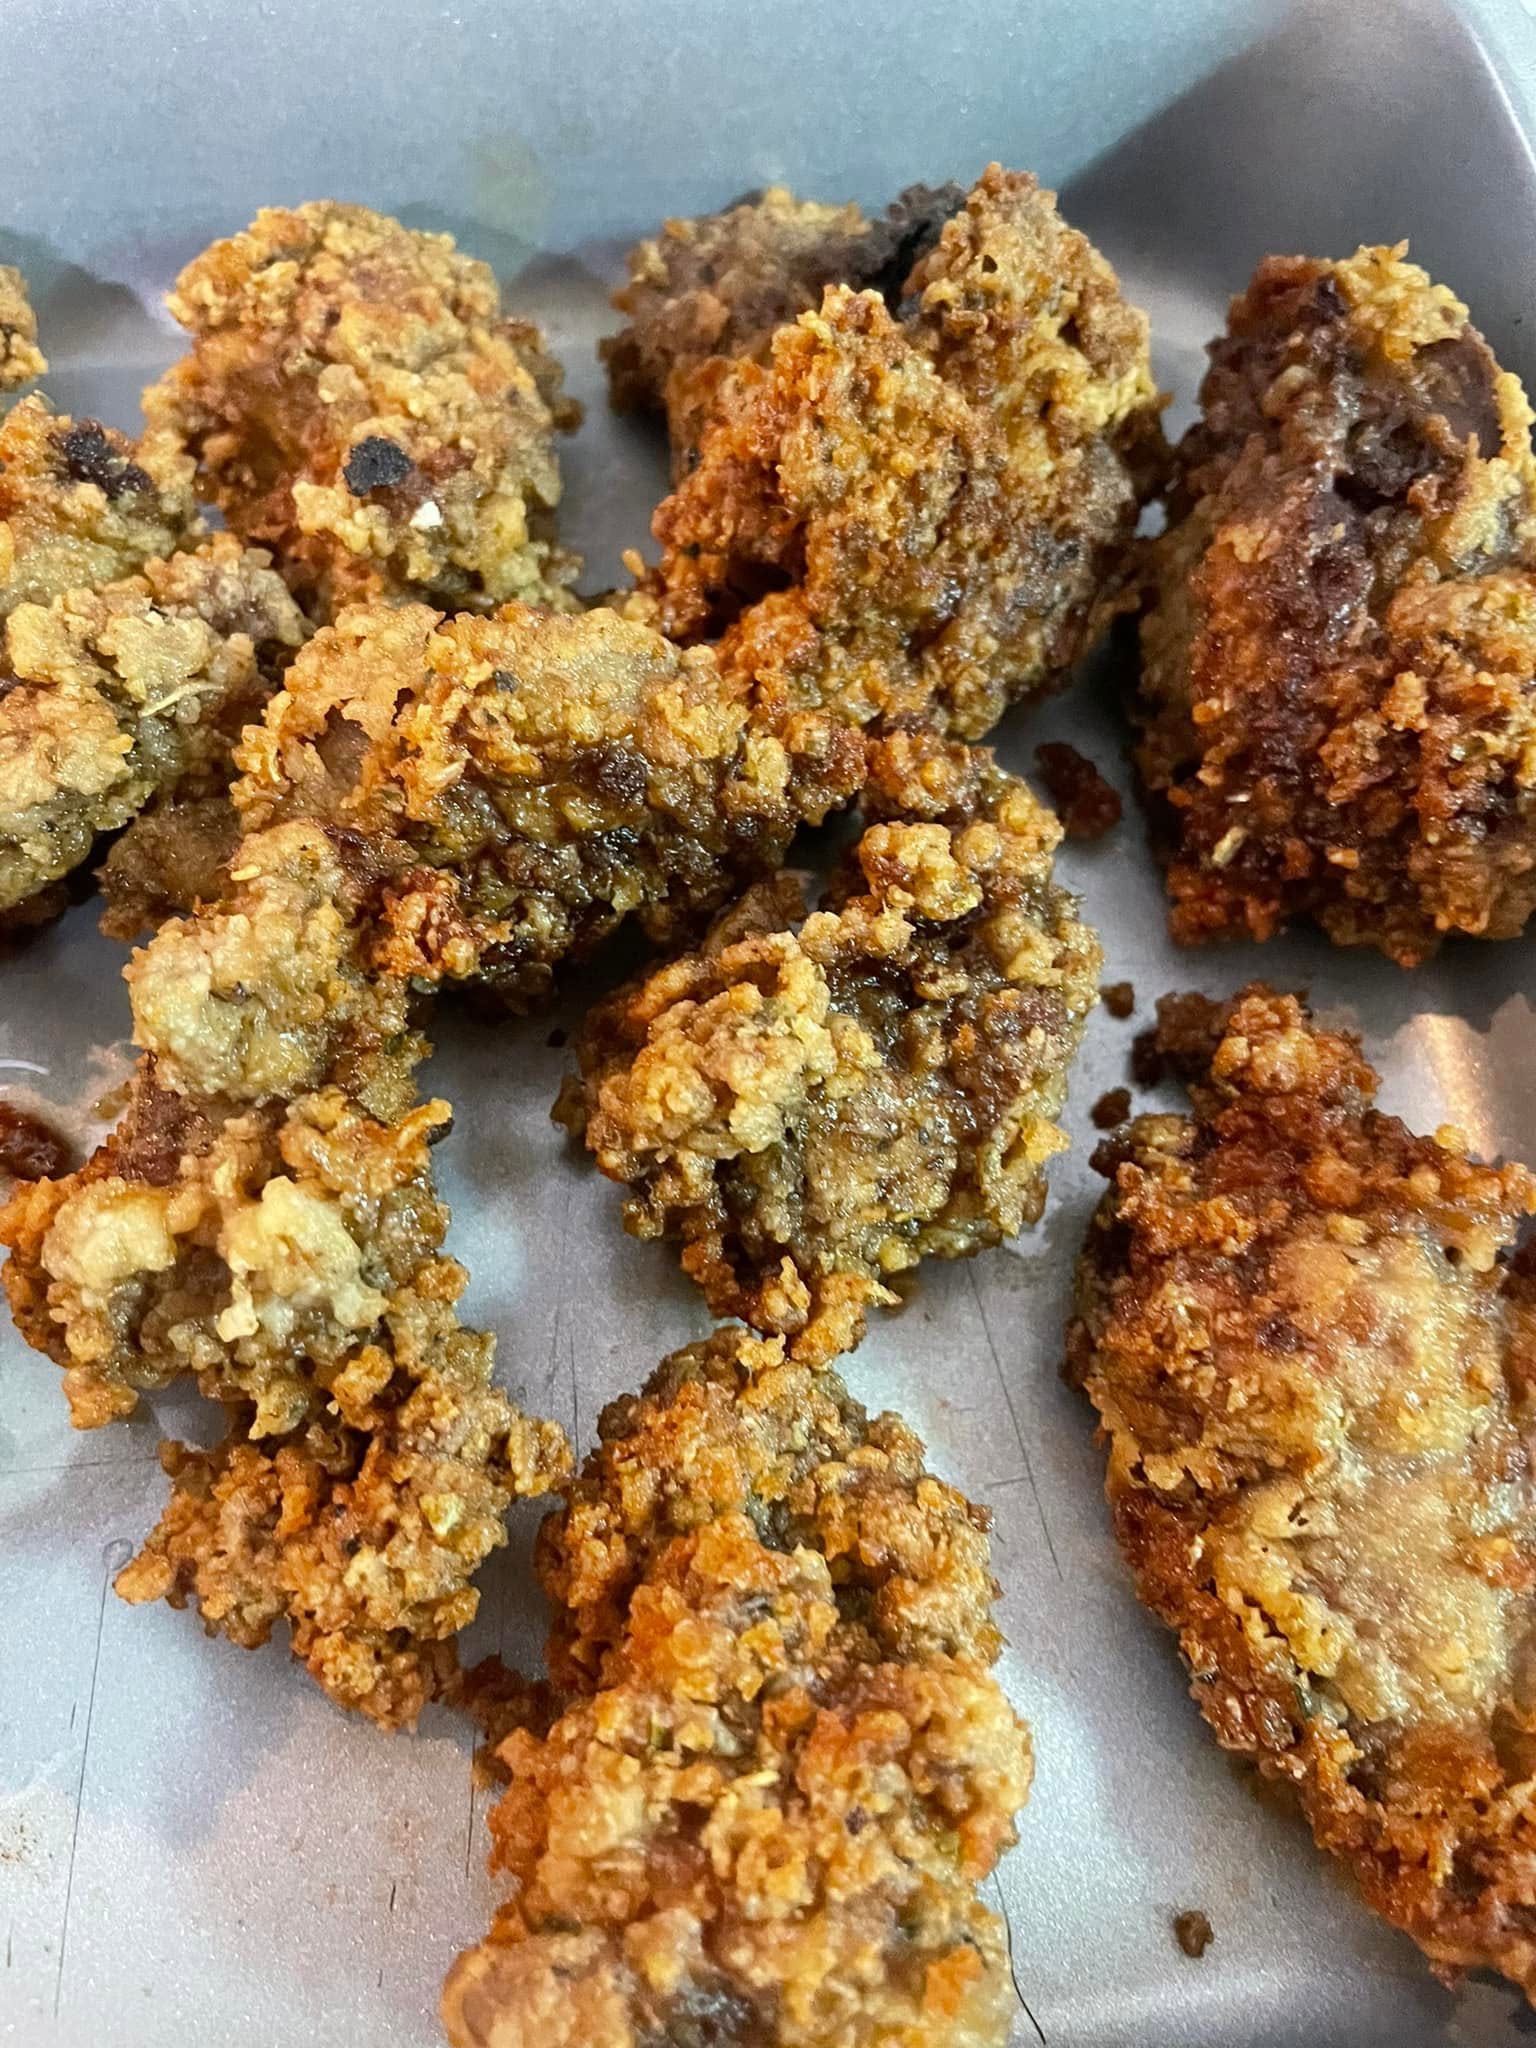
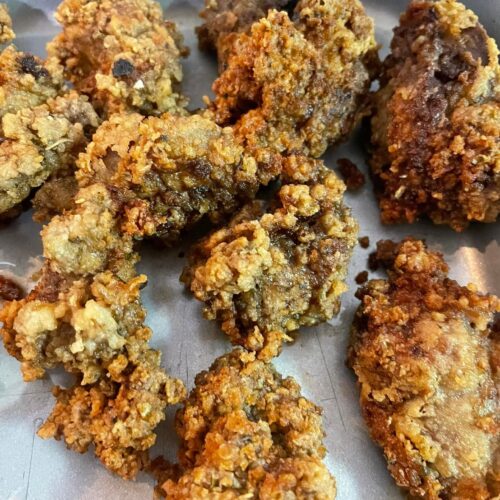
But a properly prepared, old fashioned fried chicken liver is a revelation of texture and flavor. If you look closely at the photograph of my batch in file image_43f3ea.jpg, you can see the heavy, cragged, golden-brown crust. That thick, crispy armor is the hallmark of a careful breading process, protecting the incredibly tender, rich meat inside. Achieving that thick crust requires a few extra steps—rinsing, trimming, a deliberate ice-water soak, and a specialized dry coating that clings to every crevice. It is a messy, hands-on process that will leave your fingers coated in flour, but the sensory reward is worth every moment spent standing over the hot oil. Just be prepared for the agonizing wait after you pull them from the grease; they smell so incredible that you will be tempted to try one immediately, but you must let them rest, or you will certainly burn your mouth.
Why this recipe works
-
The saltwater soak draws out impurities: Chicken livers carry a significant amount of residual blood, which can impart a harsh, metallic bitterness if not properly addressed. Submerging the trimmed pieces in a pot of ice water generously seasoned with kosher salt acts as a rapid brine. The salt draws out those bitter metallic fluids while the ice-cold temperature firms up the incredibly soft tissue, making them much easier to handle and bread.
-
A triple-threat breading builds structural integrity: Using plain all-purpose flour alone often results in a thin, fragile crust that slides right off the meat. By cutting the flour with cornstarch, you create a coating that fries up incredibly brittle and crisp. Adding coarse panko breadcrumbs introduces distinct, heavy crags that trap the hot oil, resulting in the beautifully textured, clumpy crust you see resting in my holding pan.
-
Patting the meat dry prevents steaming: Moisture is the absolute enemy of a fried crust. If you pull the livers straight from the soaking water and drop them into the dry mix, the excess water will turn the flour into a gummy paste that steams off in the hot oil. Taking the time to pat them completely dry with paper towels ensures the seasoning and breading adhere directly to the surface of the meat.
-
Frying in a wok controls the temperature and splatter: While a cast iron skillet is wonderful, utilizing a wok for deep frying is an old fashioned kitchen secret. The high, sloping sides catch the aggressive popping and splattering that naturally occurs when frying organ meats, keeping your stovetop clean. Furthermore, the concentrated pool of oil at the bottom maintains a steady, roaring heat needed to fry the crust quickly before the interior overcooks.
What you’ll need
-
Fresh Chicken Livers: You want to purchase the freshest livers available, usually found in a small plastic tub in the poultry section. Look for pieces that are deeply colored, ranging from dark mahogany to a slightly lighter purplish-red, and avoid any that look excessively grey or mushy.
-
Kosher Salt: You will need a generous amount of coarse kosher salt for the ice-water bath. The large flakes dissolve slowly and help pull the residual blood from the organ meat without making the final dish overwhelmingly salty.
-
All-Purpose Flour: This forms the base of your breading station. It provides the initial powdery coating that fills in the natural folds and lobes of the liver, creating a sticky base for the heavier ingredients to cling to.
-
Cornstarch: This is the secret to a shatteringly crisp exterior. Cornstarch lacks gluten, meaning it fries up into a light, airy, and incredibly crunchy shell that prevents the crust from feeling heavy or doughy.
-
Panko Breadcrumbs: While traditional southern recipes often rely solely on flour, adding large, airy panko crumbs gives you those prominent, jagged golden clumps that make the crust so incredibly satisfying to bite into.
-
Tony Chachere’s Creole Seasoning: A staple in southern kitchens, this pre-mixed blend provides a sharp, salty, and slightly spicy backbone to the breading. It cuts through the heavy richness of the organ meat.
-
Italian Seasoning, Garlic Powder, and Onion Powder: This specific trio of aromatics adds necessary depth. The dried herbs offer a subtle earthiness, while the garlic and onion powders provide an aggressive, savory bite that stands up to the intense flavor of the liver.
-
Canola Oil: You need a neutral oil with a very high smoke point. Canola oil can withstand the high heat required to instantly fry the breading without imparting a burnt or fishy flavor to the meat.
Substitutions & Variations
If you cannot find panko breadcrumbs, crushed saltine crackers are a historically accurate, old fashioned substitute that will provide a very similar, heavy texture. For a gluten-free adaptation, replace the all-purpose flour with a high-quality 1-to-1 gluten-free baking blend and ensure your panko crumbs are certified gluten-free. If you want to replicate an even older tradition, you can fry these in melted beef tallow or refined lard, which will introduce an unparalleled, deep savory richness to the final crust.
How to make Old Fashioned Fried Chicken Livers
Step 1: The Initial Cleaning and Trimming
Begin by emptying your tub of chicken livers directly into a large colander set in your sink. Run cold water over them, using your hands to gently separate the lobes. Move them to a large cutting board. You must take a sharp paring knife and carefully trim away any white connective tissue, strings of fat, or green spots (which are remnants of the gallbladder and taste intensely bitter). Cut the larger lobes into smaller, uniform bite-sized pieces so they fry evenly. Place the trimmed pieces back into the colander and give them one more thorough rinse under cold running water.
Step 2: The Saltwater Brine
Fill a large mixing bowl or pot with cold water and drop in a heavy handful of ice cubes. Pour in about two tablespoons of kosher salt and stir until the salt is mostly dissolved and the water is freezing to the touch. Submerge your thoroughly rinsed, trimmed chicken livers directly into the ice water. Let them sit undisturbed for at least twenty to thirty minutes. You will notice the water turning a cloudy, murky red as the salt pulls the metallic-tasting blood and impurities out of the soft tissue.
Step 3: Building the Breading Station
While the meat is soaking, prepare your dry coating. Take a wide, shallow dish—a vintage Pyrex pie plate works beautifully for this—and add your all-purpose flour, cornstarch, and panko breadcrumbs. Sprinkle in a heavy dose of Tony Chachere’s Creole seasoning, garlic powder, onion powder, and Italian seasoning. Use a dry whisk or a dinner fork to blend these ingredients aggressively. You want the spices uniformly distributed throughout the white flours so that every single bite of the finished crust carries that savory, herbaceous punch.
Step 4: Drying and Dredging
Once the soaking time has elapsed, pour the livers back into the colander to drain away the murky saltwater. Rinse them very briefly under cold water one last time. Now, lay out several layers of paper towels on your counter. Spread the livers out across the towels and use more paper towels to press down firmly, patting them completely dry. Do not skip this step. Working in small batches, drop the dry livers into your seasoned flour mixture. Use your hands to toss them, pressing down hard so the panko and cornstarch force their way into every little fold and crevice. Shake off the loose excess and move the breaded pieces to a dry plate.
Step 5: Frying to a Golden Brown
Place your wok or a heavy, deep-sided cast iron Dutch oven onto the stove. Pour in enough canola oil to submerge the meat—usually about two to three inches deep. Fire up your burner to medium-high heat. You are looking for a temperature of roughly 350°F. If you do not have a thermometer, drop a single panko crumb into the oil; if it sizzles aggressively and floats immediately to the top, you are ready. Carefully lower the breaded livers into the hot oil, dropping them away from you to prevent splashing. Fry them for about four to six minutes, turning them gently with a metal spider or slotted spoon, until you see that deeply cragged, dark golden-brown crust form.
Step 6: The Crucial Resting Period
Once they achieve that beautiful golden armor, use your slotted spoon to lift them out of the roaring hot oil. Let the excess grease drip away for a moment, then transfer them to a metal cooling grate set over the wok, or onto a paper-towel-lined holding pan. Now comes the hardest part. The smell filling your kitchen will be absolutely intoxicating—rich, fried, and deeply spiced. I have learned this lesson the hard way: wait a few minutes before trying a sample. The interior of the liver holds heat like a furnace, and every time I rush to eat these directly out of the pan, I burn my mouth severely. Let them rest for at least five minutes before serving.
Destiny’s tips
-
I always use a splatter screen: Even with the high sides of a wok, chicken livers contain internal pockets of moisture that can cause the hot oil to pop violently. I always keep a wire mesh splatter screen handy to place over the wok while they fry, protecting my arms and the stove.
-
In my kitchen, resting the breading is key: After I press the livers into the flour and panko mixture, I let them sit on a dry wire rack for about ten minutes before frying. This gives the starches time to hydrate from the meat’s natural moisture, cementing the heavy crust to the liver so it doesn’t fall off in the oil.
-
I always fry in very small batches: Crowding the wok will immediately drop the temperature of your canola oil. If the oil gets too cold, the crust will stop frying and start absorbing grease, leaving you with a soggy, heavy mess. I fry no more than six or seven bite-sized pieces at a time.
-
In my kitchen, visual cues beat the clock: Because livers vary so wildly in size even after trimming, I rely entirely on the color of the crust. When the flour turns that specific, dark golden hue and the panko crumbs look toasted and brittle, the interior is perfectly cooked—tender, slightly pink in the very center, and never chalky.
What to serve with Old Fashioned Fried Chicken Livers
-
Creamy Buttermilk Mashed Potatoes: A towering mound of fluffy potatoes whipped with real butter provides a smooth, cooling contrast to the sharp crunch and intense savory flavor of the fried crust.
-
Slow-Simmered Green Beans: Fresh green beans cooked down slowly in chicken broth and bacon fat offer a salty, tender vegetal bite that cuts right through the heavy richness of the deep-fried organ meat.
-
Southern White Gravy: A thick, peppery milk gravy made from scratch is the traditional dipping sauce. The creamy base mellows the earthy, metallic notes of the liver beautifully.
-
A Tall Glass of Sweet Tea: You absolutely need an ice-cold, heavily steeped black tea, sweetened with simple syrup, to cleanse your palate between heavy, crispy bites.
Frequently Asked Questions
Why do my fried chicken livers taste bitter?
If your livers taste bitter or harshly metallic, you likely skipped or shortened the cleaning process. The gallbladder, which occasionally leaves green spots on the liver lobes, is incredibly bitter and must be trimmed away entirely. Furthermore, the saltwater and ice bath is non-negotiable; it draws out the old blood that gives the meat that undesirable iron-heavy flavor.
How do I stop the livers from exploding in the hot oil?
Chicken livers pop in hot oil because moisture gets trapped inside the natural membranes of the organ. As the water boils, it turns to steam and bursts through the meat. Cutting them into smaller, bite-sized pieces helps release some of this tension. More importantly, patting them completely dry with paper towels before breading removes surface moisture, which is the primary cause of aggressive oil splattering.
Can I pan-fry these instead of deep frying?
You can pan-fry them in a shallow layer of oil, but you will not achieve the thick, uniformly cragged crust seen in my photograph. Pan-frying often flattens the breading on the sides touching the skillet and leaves the raw edges exposed. Deep frying in a wok ensures the hot oil surrounds the meat instantly, setting the flour and panko on all sides simultaneously.
How should I store and reheat the leftovers?
Fried chicken livers are notoriously difficult to store without losing their crunch. If you have leftovers, store them in a paper-towel-lined glass container in the refrigerator for up to two days. Never use a microwave to reheat them, or the crust will turn gummy and rubbery. Place them on a wire rack set over a baking sheet and heat them in a 400°F oven for about eight minutes to restore the crispy exterior.
Old Fashioned Fried Chicken Livers
Ingredients
- 1 lb fresh chicken livers
- 2 tablespoons kosher salt for soaking
- 1 cup all-purpose flour
- 1/4 cup cornstarch
- 1/2 cup panko breadcrumbs
- 1 tablespoon Tony Chachere’s Creole seasoning
- 1 teaspoon garlic powder
- 1 teaspoon onion powder
- 1 teaspoon Italian seasoning
- Canola oil for deep frying
Instructions
- Empty the chicken livers into a colander. Rinse under cold water. Using a paring knife, trim away any white fat, connective tissue, or green spots. Cut large lobes into uniform bite-sized pieces. Rinse again.
- Fill a large bowl with ice water and the kosher salt. Submerge the trimmed livers and let them sit for 20 to 30 minutes to draw out impurities.
- In a wide, shallow dish, whisk together the flour, cornstarch, panko breadcrumbs, Creole seasoning, garlic powder, onion powder, and Italian seasoning until completely blended.
- Drain the livers and rinse them briefly. Lay them out on paper towels and pat them completely dry.
- Working in small batches, toss the dry livers into the seasoned flour mixture. Press down firmly so the breading sticks to every crevice. Shake off the excess.
- Heat 2 to 3 inches of canola oil in a wok or heavy Dutch oven over medium-high heat until it reaches 350°F.
- Carefully drop the breaded pieces into the hot oil. Fry for 4 to 6 minutes, turning occasionally, until a dark golden-brown, craggy crust forms.
- Remove with a slotted spoon and let rest on a metal grate over the wok or in a paper-towel-lined holding pan. Wait at least 5 minutes before eating to avoid burning your mouth!
Notes
Safety Warning: Use a splatter screen over your wok while frying, as organ meats hold internal moisture that can cause the hot oil to pop.