Double-Layer Old-Fashioned Pineapple Upside-Down Cake
A Show-Stopping Twist on a Nostalgic Classic
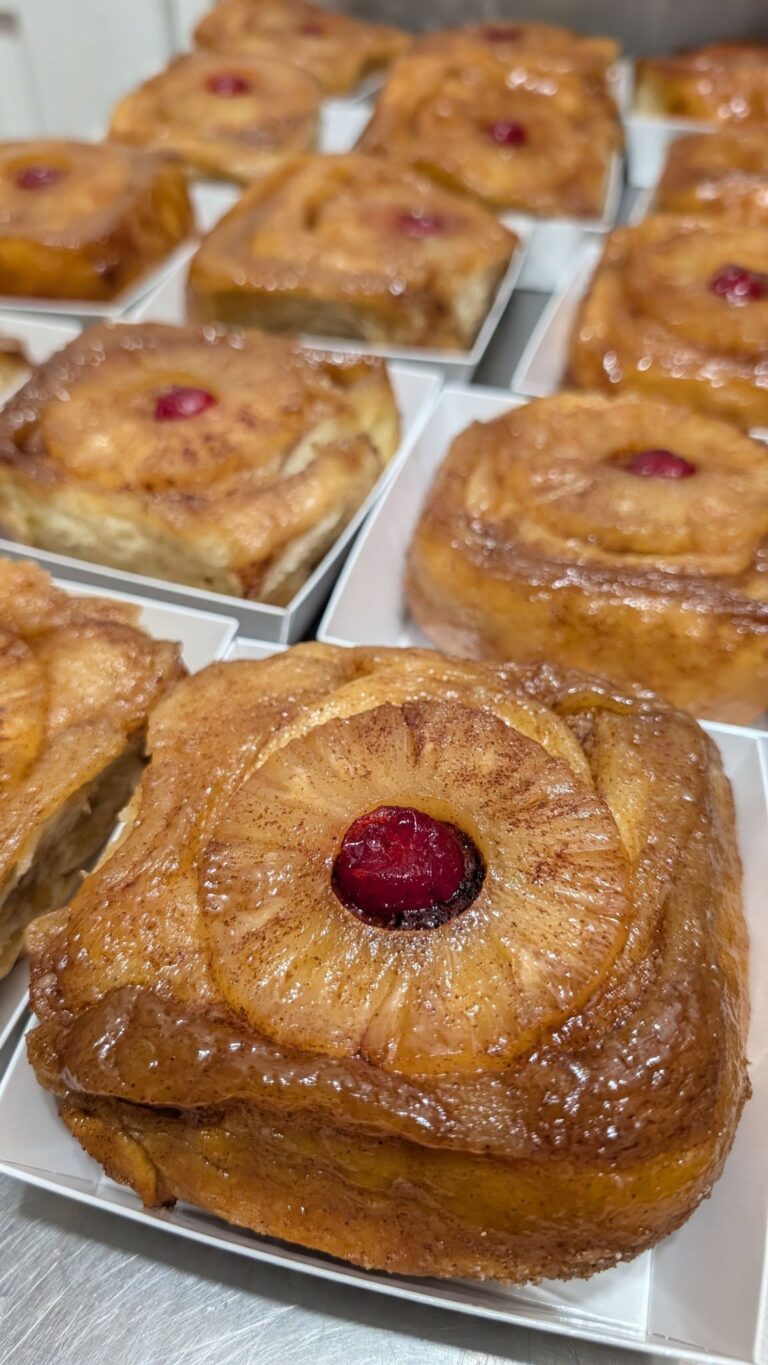
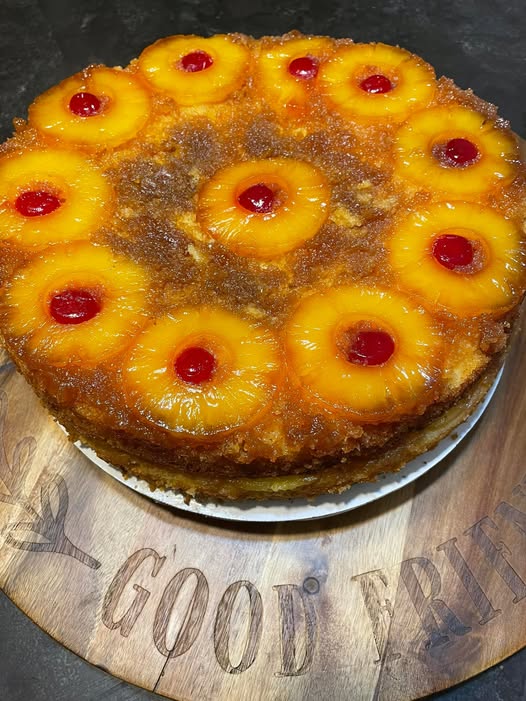
There is something undeniably magical about the moment you invert a freshly baked pineapple upside-down cake onto a platter, lifting the pan to reveal that gorgeous, bubbling layer of caramelized brown sugar, golden fruit, and bright red cherries. For many of us, this dessert is steeped in nostalgia, bringing back memories of childhood kitchens where mothers and grandmothers expertly baked these cakes from scratch in heavy electric skillets. It is the kind of treasured, old-fashioned recipe that begs to be sliced into thick wedges like a pie and served warm.
While the traditional single-layer version is a classic, turning this nostalgic treat into an impressive two-layer cake elevates it into a true centerpiece. By baking one layer with the iconic fruit and caramel topping and a second, plain layer to serve as the sturdy base, you create a towering dessert that is perfect for holidays, birthdays, and special family gatherings. The double layers provide the perfect ratio of tender, vanilla-scented cake to sticky, buttery fruit glaze.
The secret to achieving that perfect, flawless top lies in the classic combination of melted butter and brown sugar spread thickly in the bottom of the pan. As the cake bakes, this mixture transforms into a rich caramel that seeps into the edges of the sponge. Whether you grew up helping arrange the pineapple rings in the pan or are making it for the very first time, this impressive double-layer adaptation will quickly become a highly requested favorite in your home.
Why You’ll Love This Recipe
- Impressive Presentation: The unique two-layer structure turns a humble, old-fashioned skillet cake into a bakery-worthy showstopper.
- Rich Caramel Glaze: Baking the butter and brown sugar underneath the batter creates a built-in, sticky caramel topping that eliminates the need for frosting.
- Perfectly Moist Crumb: Using a little bit of the reserved pineapple juice in the cake batter ensures the crumb stays incredibly tender and moist.
- Nostalgic Appeal: Arranging the vibrant yellow pineapple rings and bright red cherries instantly brings back fond memories of classic Southern baking.
- Easy to Assemble: Despite its towering appearance, this cake relies on straightforward, from-scratch baking techniques that are incredibly forgiving.
Ingredients
- Butter: 1/2 cup (1 stick) unsalted butter, melted, for the topping, plus 1/2 cup (1 stick) softened butter for the cake batter.
- Brown Sugar: 1 cup of packed light or dark brown sugar to create the sticky caramel glaze.
- Canned Pineapple Slices: 1 (20-ounce) can of pineapple slices in juice. Do not drain the juice; you will need it for the batter!
- Maraschino Cherries: 1 jar of maraschino cherries, stems removed, to place in the center of the pineapple rings.
- All-Purpose Flour: 2 cups of all-purpose flour, spooned and leveled.
- Baking Powder: 2 teaspoons of baking powder to give the layers a tall, fluffy rise.
- Salt: 1/2 teaspoon of fine salt to balance the intense sweetness.
- Granulated Sugar: 1 cup of white sugar for the cake batter.
- Eggs: 2 large eggs, brought to room temperature.
- Vanilla Extract: 2 teaspoons of high-quality pure vanilla extract.
- Milk: 1/2 cup of whole milk, mixed with 1/4 cup of the reserved pineapple juice to hydrate the batter.
Step-by-Step Instructions
Step 1: Prepare the Cake Pans
Preheat your oven to 350°F (175°C). You will need two 9-inch round cake pans for this recipe. Generously grease the sides of both pans. In one of the pans (which will become the top layer), pour the 1/2 cup of melted butter evenly across the bottom. Sprinkle the 1 cup of packed brown sugar evenly over the melted butter. Leave the second pan plain and greased.
Step 2: Arrange the Fruit Topping
Remove the pineapple rings from the can, reserving the juice in a small bowl. Pat the rings dry with a paper towel. Arrange the pineapple slices in a single layer over the brown sugar in the first pan. Place one bright red maraschino cherry directly into the center hole of each pineapple ring, and place any remaining cherries in the spaces between the slices.
Step 3: Mix the Dry Ingredients
In a medium mixing bowl, whisk together the 2 cups of all-purpose flour, the 2 teaspoons of baking powder, and the 1/2 teaspoon of salt. Set this mixture aside.
Step 4: Cream the Butter and Sugar
In the bowl of a stand mixer or a large bowl using an electric hand mixer, beat the 1/2 cup of softened butter and the 1 cup of granulated sugar together on medium-high speed for about 3 minutes, until the mixture is pale, light, and fluffy.
Step 5: Add the Eggs and Vanilla
Reduce the mixer speed to low. Add the room-temperature eggs one at a time, beating well after each addition. Scrape down the sides of the bowl with a rubber spatula. Pour in the 2 teaspoons of vanilla extract and mix until combined.
Step 6: Combine Wet and Dry
In a measuring cup, stir together the 1/2 cup of whole milk and the 1/4 cup of reserved pineapple juice. With the mixer on low speed, alternate adding the dry flour mixture and the milk mixture to the butter, beginning and ending with the flour. Mix only until the batter is just combined—do not overmix!
Step 7: Bake the Layers
Divide the thick batter evenly between your two prepared pans. Gently spread the batter over the top of the fruit in the first pan, being careful not to shift the pineapple rings. Smooth the batter in the second, plain pan. Bake at 350°F for 30 to 35 minutes, or until a toothpick inserted into the center of the cakes comes out clean.
Step 8: The Crucial Flip
Remove the pans from the oven. Let the plain cake layer cool completely in its pan. For the pineapple layer, let it rest in the pan for exactly 10 minutes. Place a wire cooling rack over the top of the pan, and quickly invert it. Gently lift the pan away to reveal the caramelized topping. Allow this layer to cool completely.
Step 9: Assemble the Double Layer
Once both cakes are completely cool, gently remove the plain cake from its pan and place it on your serving platter or wooden board. Carefully lift the caramelized pineapple layer and place it directly on top of the plain layer. Slice into wedges and serve!
Expert Cooking Tips
- Dry the Fruit Completely: Canned pineapple holds a massive amount of water. Always pat the pineapple rings and the cherries completely dry before placing them in the pan. Excess water will thin out the brown sugar and prevent the caramel from setting properly.
- Do Not Rush the Inversion: Letting the pineapple layer rest in the pan for exactly 10 minutes is critical. If you flip it immediately, the molten sugar will run right off the cake. If you wait too long, the caramel will harden and cement the fruit to the pan.
- Level the Cakes: If your plain bottom layer bakes with a dome on top, use a serrated knife to carefully trim the dome off so it is perfectly flat. This ensures your heavy pineapple layer sits securely on top without sliding.
- Room Temperature Ingredients: Make sure your butter, eggs, and milk are all at room temperature before mixing. This allows the batter to emulsify properly, creating a tender, fluffy cake rather than a dense one.
Variations to Try
- Coconut Pineapple Cake: Substitute the 1/2 cup of whole milk in the batter with full-fat canned coconut milk, and sprinkle 1/2 cup of shredded coconut over the plain cake layer before stacking them together.
- Pecan Crunch: For a wonderful textural contrast, sprinkle a generous handful of chopped pecans over the melted butter and brown sugar before you lay down the pineapple rings.
- Cast Iron Skillet Method: To replicate the deeply caramelized edges of an old-fashioned electric skillet cake, bake the pineapple layer in a well-greased 10-inch cast iron skillet instead of a standard cake pan.
What to Serve With Pineapple Upside-Down Cake
Because this cake has a sticky, intensely sweet caramel glaze, it pairs beautifully with simple, creamy accompaniments. Serve warm slices with a generous dollop of unsweetened whipped cream or a large scoop of premium vanilla bean ice cream melting over the edges. It is also exceptional alongside a strong cup of dark roast coffee to balance the sugar.
Storage & Reheating
Refrigerator
Store leftover cake loosely covered with plastic wrap or in a cake keeper in the refrigerator for up to 4 days. Storing it in the fridge prevents the fresh fruit topping from spoiling and keeps the caramel glaze intact.
Freezer
You can freeze pineapple upside-down cake, though the texture of the fruit may soften slightly upon thawing. Wrap individual slices tightly in plastic wrap, then place them in a zip-top freezer bag for up to 2 months. Thaw overnight in the refrigerator.
Reheating
To enjoy the cake warm, place a slice on a microwave-safe plate and heat it for 15 to 20 seconds. The brief burst of heat will soften the crumb and make the brown sugar caramel deliciously gooey again.
Frequently Asked Questions
Why did my fruit stick to the bottom of the pan?
If your pineapple and cherries stuck, you likely waited too long to flip the cake out of the pan. The brown sugar and butter mixture turns into candy as it cools. You must flip the pan while the mixture is still hot and fluid, adhering strictly to the 10-minute waiting rule.
Can I use fresh pineapple instead of canned?
It is not recommended. Fresh pineapple contains an active enzyme called bromelain that can sometimes interact poorly with baking powder and ruin the texture of the cake. Canned pineapple is pasteurized, which deactivates the enzyme, and it provides a softer, more uniform texture.
Do I put anything between the two cake layers?
You do not need to add frosting or filling between the layers. The plain bottom layer acts as a sturdy base to support the heavy, syrupy top layer. However, if you want extra moisture, you can lightly brush the top of the plain layer with a little reserved pineapple juice before stacking.
How do I stop the caramel from bubbling over in the oven?
To prevent a messy oven, it is always a good idea to place a large baking sheet on the rack directly underneath your cake pans. This will catch any sticky sugar or butter that might bubble up and over the edges during baking.
Final Thoughts
Bringing a nostalgic family recipe back to life is one of the greatest joys of home baking. By transforming the classic skillet pineapple upside-down cake into a stunning two-layer masterpiece, you get to enjoy all those beloved flavors in an impressive new format. The combination of tender vanilla cake, sticky caramel, and vibrant fruit is a timeless classic for a reason. Grab your cake pans, let the kids help arrange the cherries, and enjoy a slice of sweet, old-fashioned comfort.

Double-Layer Old-Fashioned Pineapple Upside-Down Cake
A stunning, two-layer twist on the nostalgic Southern classic! Features a tender from-scratch cake base topped with a gorgeous, sticky brown sugar and pineapple ring glaze.
Equipment
- 2 (9-inch) round cake pans
- Stand mixer or electric hand mixer
- Wire cooling rack
Ingredients
- Topping:
- 1/2 cup 1 stick unsalted butter, melted
- 1 cup light or dark brown sugar packed
- 1 20 oz can pineapple slices in juice (reserve 1/4 cup juice)
- 1 jar maraschino cherries stems removed
- Cake Batter:
- 2 cups all-purpose flour
- 2 tsp baking powder
- 1/2 tsp salt
- 1/2 cup 1 stick unsalted butter, softened
- 1 cup granulated sugar
- 2 large eggs room temperature
- 2 tsp vanilla extract
- 1/2 cup whole milk room temperature
- 1/4 cup reserved pineapple juice
Instructions
- Preheat oven to 350°F (175°C). Grease the sides of two 9-inch round cake pans.
- Pour the 1/2 cup melted butter evenly into the bottom of one cake pan. Sprinkle the brown sugar evenly over the butter.
- Pat the pineapple slices and cherries dry. Arrange the pineapple rings over the brown sugar in a single layer. Place a cherry in the center of each ring.
- In a medium bowl, whisk together the flour, baking powder, and salt.
- In a large bowl, beat the softened butter and granulated sugar until light and fluffy (about 3 mins).
- Add the eggs one at a time, beating well. Stir in the vanilla extract.
- Combine the milk and reserved pineapple juice. Alternate adding the dry ingredients and the milk mixture to the butter, mixing just until combined.
- Divide the batter evenly between the two pans, carefully spreading it over the fruit in the first pan, and smoothing the plain batter in the second pan.
- Bake for 30-35 minutes until a toothpick comes out clean.
- Remove from oven. Let the plain cake cool completely in its pan. Let the pineapple layer rest for exactly 10 minutes, then invert it onto a wire rack to cool.
- Once completely cool, place the plain cake on a serving platter. Carefully place the pineapple layer directly on top. Slice and serve!
Notes
The Flip: Do not skip the 10-minute wait before flipping the pineapple layer. It allows the caramel to thicken slightly without hardening to the pan. Assembly: If the plain bottom layer has a dome, trim it flat with a serrated knife before stacking so the top layer doesn't slide.