Stunning Stained Glass Window Cookies
The Most Beautiful Cookie on Your Holiday Tray
When it comes to holiday baking, presentation is just as important as flavor. These stained glass window cookies are guaranteed to be the absolute showstopper of your dessert table. They look like intricate, delicate works of art, yet they are surprisingly simple to pull off in a standard home kitchen.
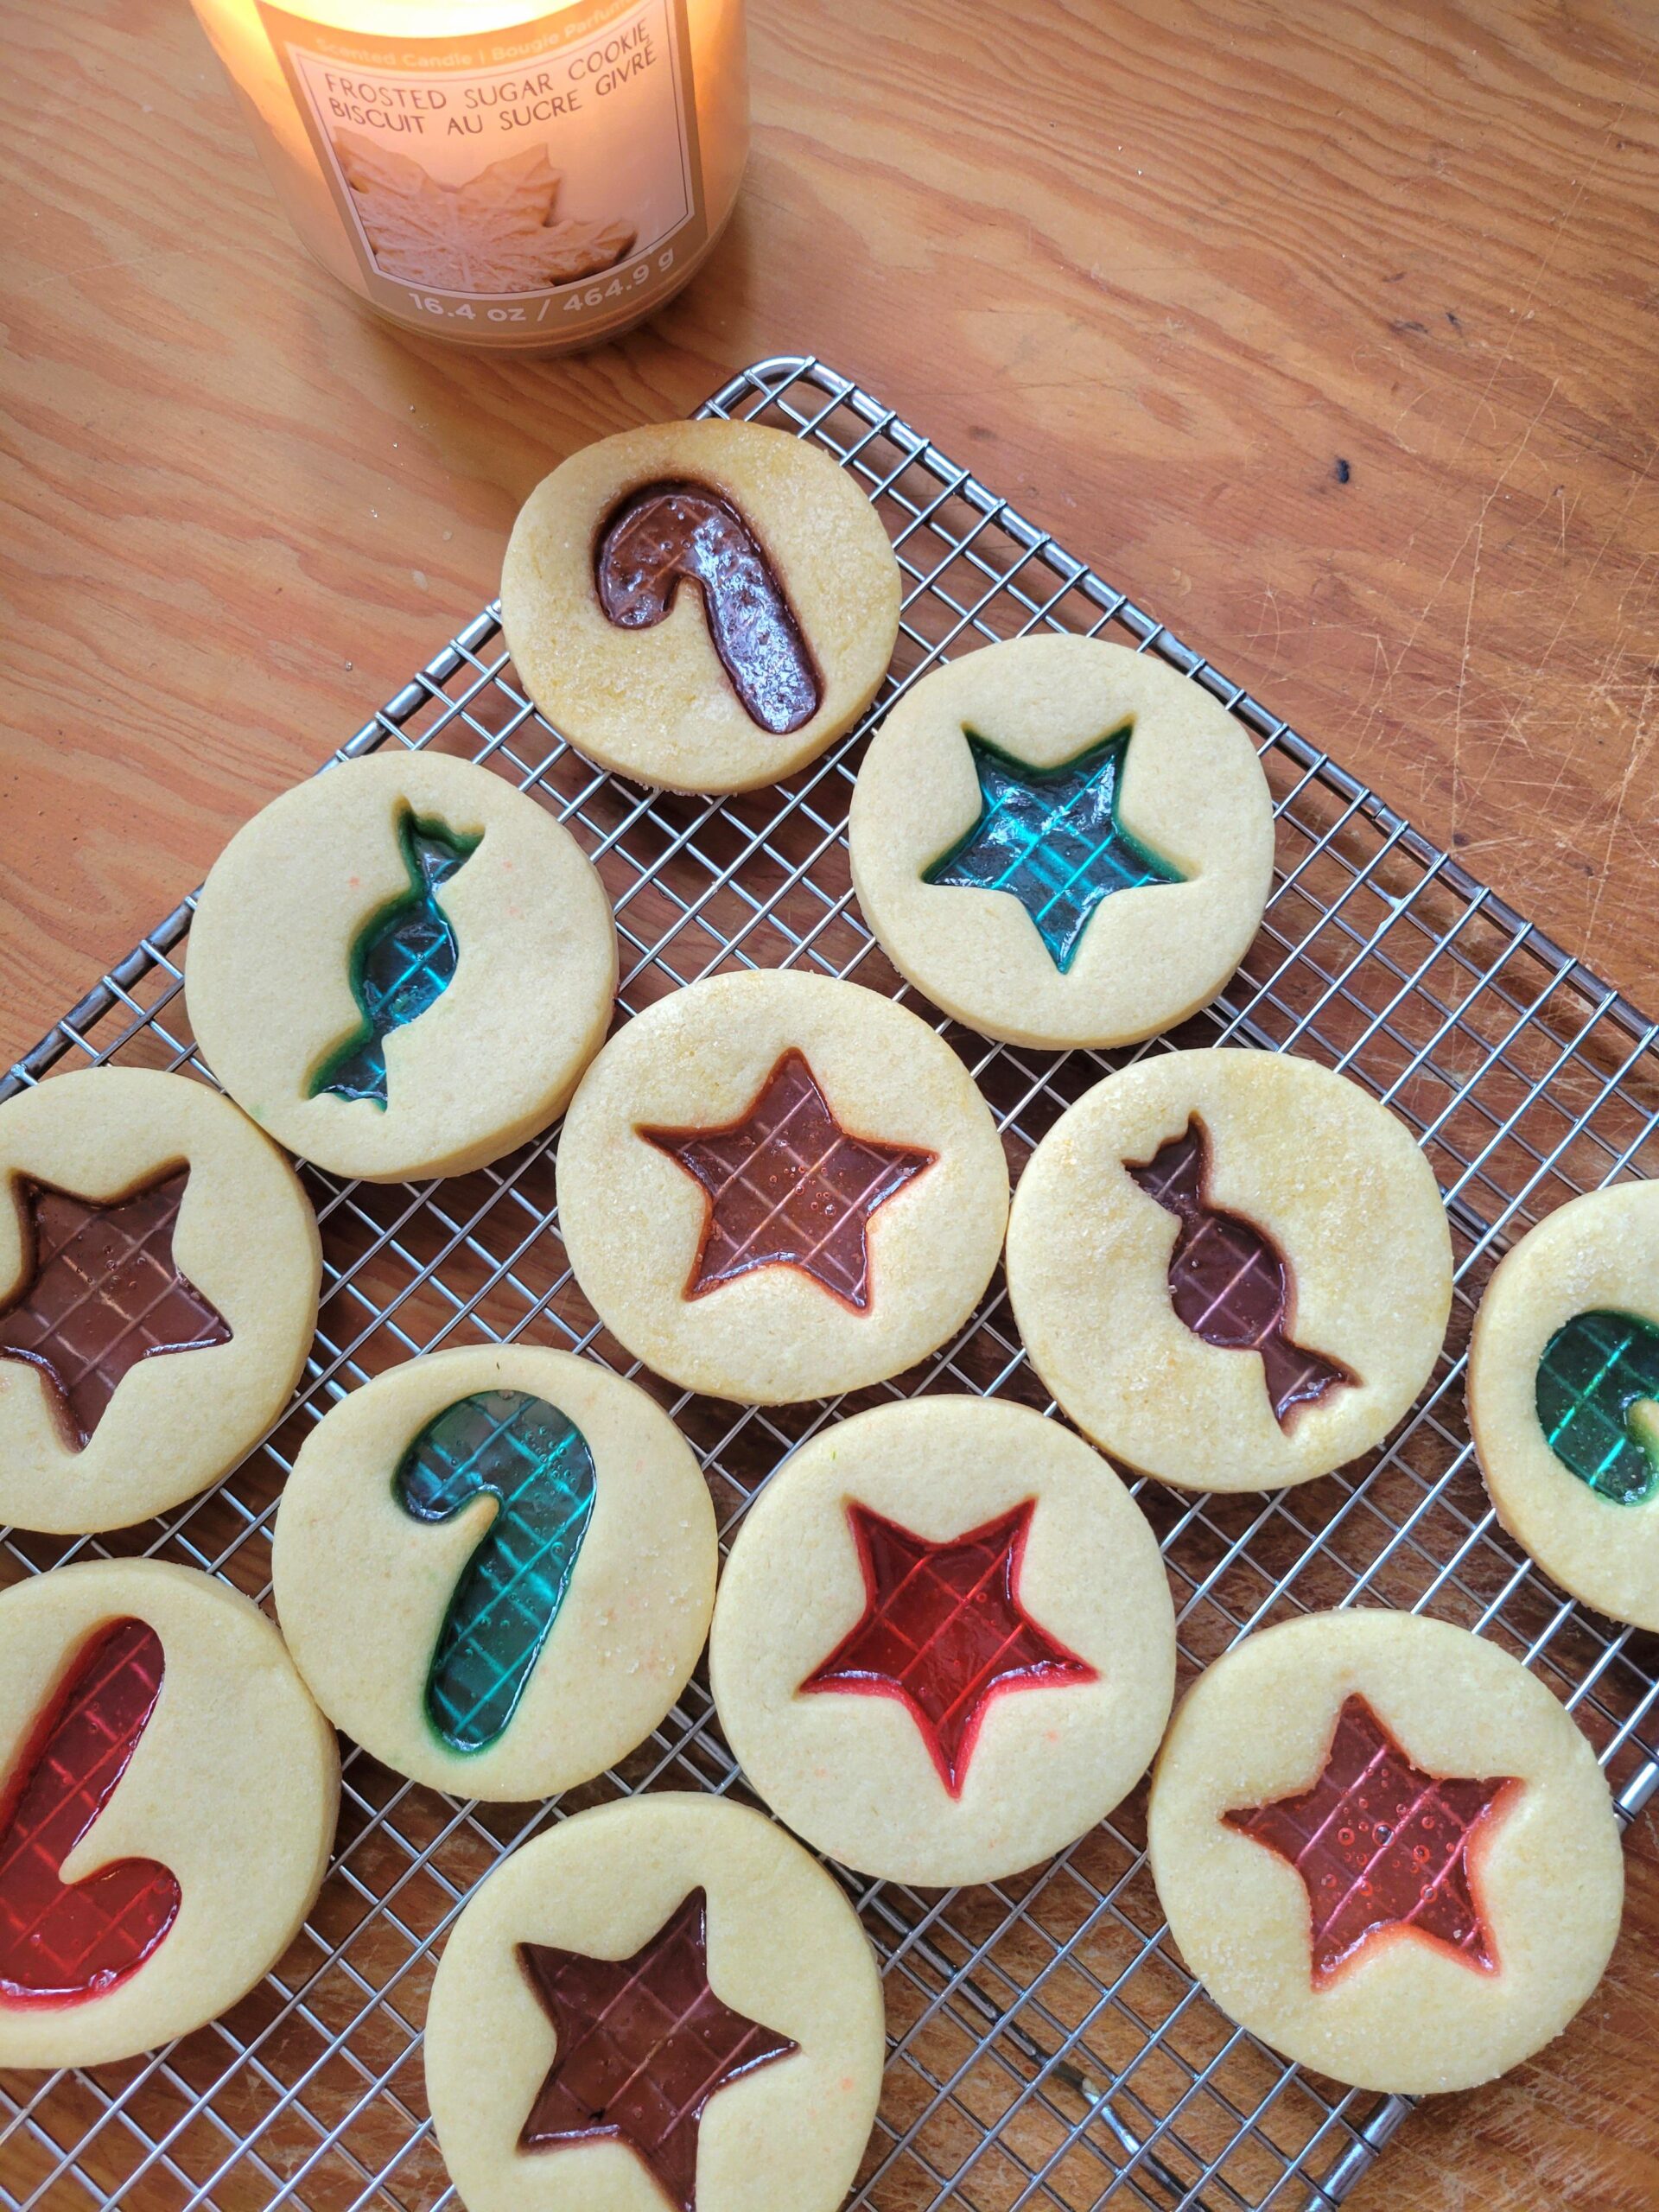
The foundation of this treat is a rich, buttery sugar cookie dough that holds its shape perfectly in the oven. The real magic, however, lies in the center. By cutting a small window out of the raw dough and filling it with crushed hard candies, the oven does the rest of the work. As the cookie bakes, the candy melts and spreads, creating a gorgeous, translucent, candy-glass center that catches the light beautifully.
Whether you are hosting a festive holiday party, participating in a neighborhood cookie exchange, or looking for a fun weekend baking project, this recipe always delivers an undeniable wow factor. You can even poke a small hole in the top of the dough before baking to thread a ribbon through, turning these edible masterpieces into gorgeous ornaments for your tree.
Why You’ll Love This Recipe
-
Stunning Visual Appeal: The glowing, colorful candy centers make these cookies look like professional bakery creations.
-
Simple Ingredients: You only need seven basic ingredients, most of which are likely already sitting in your pantry.
-
Incredibly Fun to Make: Crushing the candies and filling the cookie windows is a fantastic, hands-on step that makes baking these a joy.
-
Perfectly Crisp Texture: The buttery cookie base bakes up slightly crisp, providing a wonderful textural contrast to the hard candy center.
-
Endlessly Customizable: You can use any cookie cutter shapes and any hard candy colors to match different holidays or party themes.
Ingredients
-
Unsalted Butter: Three-quarters of a cup, softened to room temperature. This provides a rich flavor and ensures the dough is tender.
-
Granulated Sugar: Three-quarters of a cup to lightly sweeten the cookie base and help the edges turn pale golden.
-
Egg: One large egg acts as the binding agent, holding the dough together so it doesn’t crumble when cut.
-
Vanilla Extract: One teaspoon of pure vanilla extract enhances the buttery flavor of the dough.
-
All-Purpose Flour: Two and a quarter cups create the structural foundation. Measure by spooning and leveling so the dough isn’t too dry.
-
Salt: Just a quarter teaspoon to balance the sweetness of the sugar and the candy.
-
Hard Candies: One cup of hard translucent candies, like Jolly Ranchers or Life Savers, separated into red and green colors.
Step-by-Step Instructions
Step 1: Cream the Butter and Sugar
In a large mixing bowl, combine the softened unsalted butter and the granulated sugar. Beat them together using an electric mixer until the mixture is incredibly light, pale, and fluffy. Beat in the egg and the vanilla extract until everything is seamlessly incorporated.
Step 2: Form and Chill the Dough
Gradually mix the all-purpose flour and salt into the wet ingredients. Mix just until a smooth, cohesive dough forms. Turn the dough out onto a clean surface and divide it evenly into two flat discs. Wrap each disc tightly in plastic wrap and chill in the refrigerator for exactly 1 hour. Chilling is mandatory to prevent the cookies from spreading in the oven.
Step 3: Crush the Hard Candies
While the dough is chilling, unwrap your hard candies and separate them by color into heavy-duty zip-top plastic bags. Squeeze the air out, seal the bags tightly, and use a rolling pin or a heavy mallet to carefully crush the candies into small, pebble-sized pieces.
Step 4: Prepare the Baking Station
Preheat your oven to 350°F (175°C). Line two large, flat baking sheets with parchment paper or silicone baking mats. This step is absolutely crucial; if you place the candy directly on a bare metal pan, it will fuse to the pan and ruin the cookies.
Step 5: Roll and Cut the Main Shapes
Take one disc of chilled dough and place it on a lightly floured surface. Roll the dough out to an even 1/4-inch thickness. Use a large star, circle, or bell-shaped cookie cutter to stamp out your main cookies. Carefully transfer these shapes directly to your prepared baking sheets, leaving a little space between each one.
Step 6: Create the Window
Take a smaller cookie cutter (about 1 inch in size) and press it directly into the center of each large cookie on the baking sheet. Carefully remove the inner dough piece to create a hollow window. You can gather all these inner scraps, re-roll them, and cut out more cookies.
Step 7: Fill With Candy
Carefully spoon your crushed red and green hard candies into the hollow center of each cookie. You want to fill the space generously so the candy touches the inner edges of the dough, but be careful not to pile it higher than the dough itself, or it will bubble over the sides during baking.
Step 8: Bake to Perfection
Place the baking sheets into the preheated oven and bake for 9 to 11 minutes. Keep a close eye on them. The cookies are done when the dough is pale golden and the candy in the center has completely melted, bubbled, and leveled out into a smooth layer of “glass.”
Step 9: Cool Completely on the Pan
Remove the baking sheets from the oven. Do not attempt to move the cookies while they are hot! The melted candy is essentially boiling sugar and needs time to harden. Let the cookies cool completely on the baking sheets until the candy centers are firm and solid to the touch. Once hardened, they will peel cleanly off the parchment paper.
Expert Cooking Tips
-
Use silicone baking mats: While parchment paper works well, silicone baking mats are the absolute best tool for these cookies. They guarantee a perfectly smooth, non-stick surface for the melted candy glass.
-
Do not overfill the centers: If you heap the crushed candy too high, it will boil over the edges of the dough and ruin the clean shape of the window. Keep the candy level with the dough.
-
Crush the candy uniformly: Try to crush the candy into small, even pieces rather than a fine powder. Powder will melt too quickly and can burn, while large chunks may not melt completely before the cookie dough overbakes.
-
Keep the dough cold: If your dough starts to feel warm or sticky while you are cutting the shapes, pop it back into the refrigerator for 10 minutes. Cold dough holds its sharp, distinct shape in the oven.
-
Sort colors carefully: Keep your crushed candy colors completely separate. Mixing red and green candy pieces in the same window will result in a muddy, brownish color when melted.
Variations to Try
-
Stained Glass Ornaments: Before baking, use a plastic drinking straw to punch a small hole at the top of the dough shape. Once baked and cooled, thread a festive ribbon through the hole to hang them on a Christmas tree.
-
Almond Flavored Dough: Swap half of the vanilla extract for a half teaspoon of pure almond extract to give the cookie base a sophisticated, bakery-style flavor profile.
-
Citrus Zest: Add one tablespoon of freshly grated lemon or orange zest to the butter and sugar mixture during the creaming stage for a bright, vibrant background flavor.
What to Serve With Stained Glass Window Cookies
Because these cookies have a solid, crisp texture and a hard candy center, they are not meant to be dunked. Instead, serve them on a beautiful holiday dessert platter alongside a steaming mug of hot cocoa, spiced apple cider, or a robust cup of dark roast coffee. The warm beverages perfectly balance the sweet, fruity crunch of the candy centers.
Storage & Reheating
Refrigerator
Store completely cooled cookies in an airtight container at room temperature or in the refrigerator for up to one week. You must place sheets of wax paper or parchment paper between each layer of cookies. If the candy centers touch each other, they will stick together and break when pulled apart.
Freezer
Freezing the baked cookies is not recommended, as the moisture in the freezer will cause the candy centers to become cloudy, sticky, and eventually dissolve. However, you can freeze the unbaked, uncut cookie dough tightly wrapped in plastic for up to 3 months. Thaw overnight in the fridge before rolling.
Reheating
Do not attempt to reheat or microwave these cookies. Heat will immediately cause the hard candy centers to melt, bubble, and burn. These cookies are meant to be enjoyed crisp and at room temperature.
Frequently Asked Questions
Why did my candy bubble over the edges?
This happens if you overfill the center cutout. As the hard candy melts in the hot oven, it expands and bubbles. Make sure you only fill the cutout until the candy is flush with the top of the raw dough, never mounding it higher.
Can I use gummy candies or chocolate instead?
No, gummy candies and chocolate will not work for the stained glass effect. Chocolate will melt and burn, and gummy candies will scorch and turn into a sticky, unappealing mess. You must use translucent hard candies like Jolly Ranchers or Life Savers.
Why are my cookie edges spreading and losing their shape?
Cookie dough that spreads in the oven is almost always due to the butter being too warm. It is imperative that you chill the dough discs for a full hour before rolling, and bake the cookies while the dough is still cold.
How do I easily remove the cookies from the pan?
Patience is the only requirement here. You absolutely must wait until the cookies are 100% cool to the touch. Once the sugar center hardens back into “glass,” the cookies will slide effortlessly off of parchment paper or a silicone baking mat.
Can I make the cookie dough ahead of time?
Yes! You can prepare the cookie dough, wrap it tightly in plastic wrap, and store it in the refrigerator for up to 3 days before you plan to roll, cut, and bake them.
Final Thoughts
Baking these stunning stained glass window cookies is a magical experience from start to finish. Watching the opaque, crushed candy transform into brilliant, glowing sugar glass right inside your oven never gets old. They bring a beautiful pop of color and a whimsical touch to any dessert table, proving that you don’t need professional pastry skills to create something truly spectacular. Gather your cookie cutters, pick out your favorite candy colors, and enjoy creating these edible works of art!
Stunning Stained Glass Window Cookies
Beautiful, buttery sugar cookies featuring a gorgeous, translucent center made from melted hard candies. The perfect show-stopping treat for any holiday cookie tray!
Ingredients
- 3/4 cup Unsalted butter softened
- 3/4 cup Granulated sugar
- 1 large Egg
- 1 tsp Vanilla extract
- 2 1/4 cups All-purpose flour
- 1/4 tsp Salt
- 1 cup Hard candies like Jolly Ranchers or Life Savers in red and green colors
Instructions
- In a large bowl, cream the softened butter and granulated sugar with an electric mixer until light and fluffy. Beat in the egg and vanilla extract.
- Gradually mix in the all-purpose flour and salt until a smooth dough forms.
- Divide the dough into two equal discs, wrap tightly in plastic wrap, and chill in the refrigerator for 1 hour.
- Separate the hard candies by color. Place them into separate heavy-duty plastic bags, seal tightly, and crush them with a rolling pin into small pieces.
- Preheat your oven to 350°F (175°C) and line your baking sheets with parchment paper or silicone baking mats.
- Roll out the chilled dough on a lightly floured surface to a 1/4-inch thickness. Use a large cookie cutter to cut out the main shapes. Transfer them to the prepared baking sheets.
- Use a smaller cookie cutter (about 1-inch wide) to cut a window out of the center of each cookie. Remove the inner dough pieces.
- Carefully spoon the crushed hard candy into the hollow center of each cookie, filling it just to the edges of the dough without overfilling.
- Bake for 9-11 minutes, or until the cookie edges are pale golden and the candy has completely melted and leveled out.
- Let the cookies cool completely on the baking sheet until the candy is entirely hardened before moving them.
Notes
Do not place the cookies on a bare metal pan; the candy will permanently stick. Parchment or silicone mats are required.
Keep the candy colors separated to prevent muddy colors when they melt together.
Do not move the warm cookies or the melted sugar center will wrinkle and crack.