Soft and Chewy Red Velvet White Chocolate Chip Cookies
The Ultimate Holiday Dessert Table Showstopper
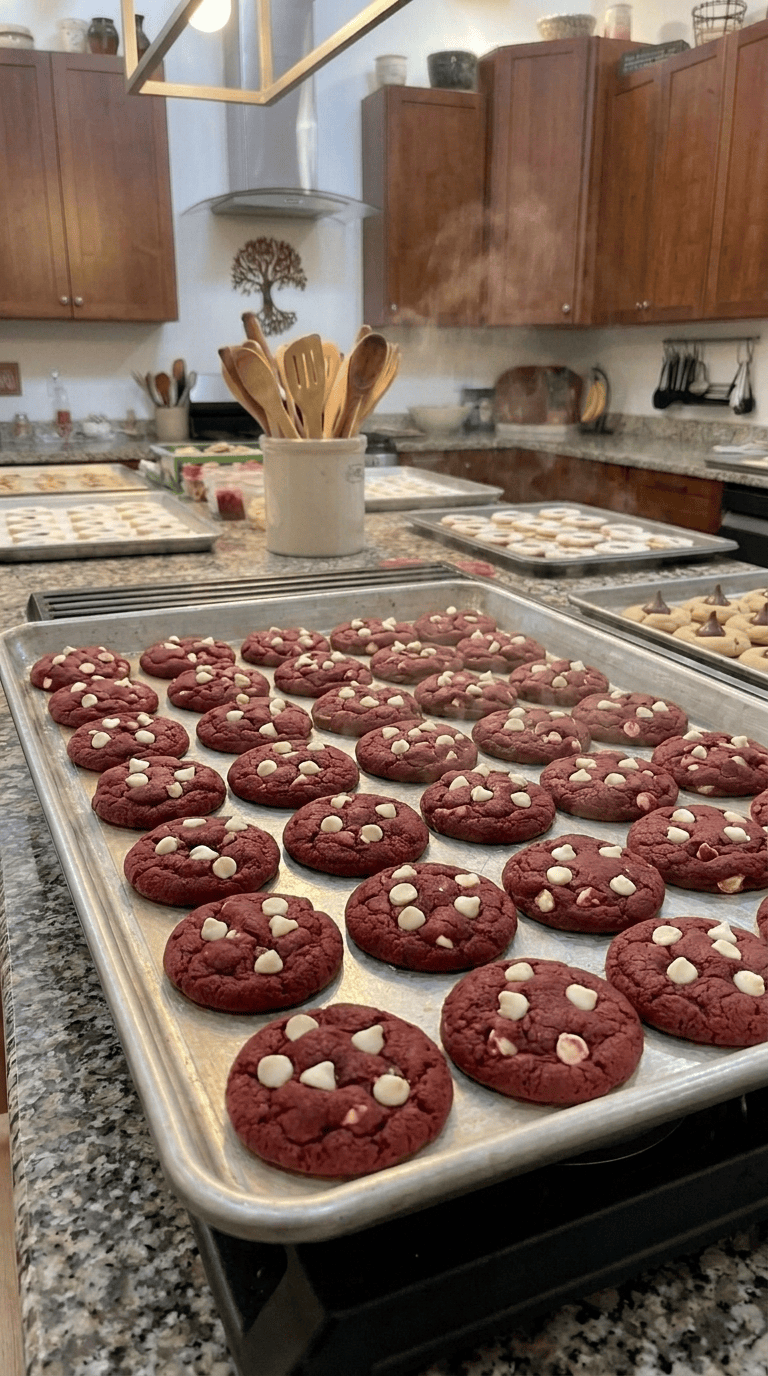
When the holiday baking season arrives, everyone is looking for that one special recipe that will instantly catch the eye and stand out on a crowded dessert table. These striking red velvet white chocolate chip cookies are exactly what you need. With their brilliant, vibrant crimson color and contrasting creamy white chocolate morsels, they practically scream festive cheer.
While they are undeniably gorgeous to look at, the true magic of these cookies lies in their incredible texture and flavor. Traditional red velvet is known for its unique, subtle cocoa flavor intertwined with rich vanilla and a hint of tanginess. This recipe captures that iconic cake flavor and transforms it into a thick, chewy, and impossibly soft cookie.
The secret to their decadent, melt-in-your-mouth texture is a perfect balance of brown sugar for moisture and just enough unsweetened cocoa powder to deliver a deep, complex flavor without turning them into standard chocolate cookies. Whether you are assembling Christmas cookie boxes for neighbors, hosting a holiday party, or even looking ahead to Valentine’s Day, this foolproof recipe guarantees bakery-quality results that will have everyone asking for your secret.
Why You’ll Love This Recipe
- Stunning visual appeal: The bright red dough combined with stark white chocolate chips creates a striking color contrast that looks beautifully festive.
- Incredibly soft texture: A combination of brown sugar and a touch of milk ensures these stay soft, chewy, and moist for days.
- Authentic red velvet flavor: They perfectly mimic that classic cake profile, offering a subtle hint of cocoa balanced with rich vanilla.
- Simple pantry ingredients: You do not need any fancy cake mixes for this from-scratch recipe—just standard baking staples and a bottle of food coloring.
- Perfect for gifting: Because they stay fresh and soft at room temperature, they are ideal for shipping in holiday care packages or arranging in gift tins.
Ingredients
- All-purpose flour: Gives the cookies their structure. Be sure to spoon and level it to avoid a dense dough.
- Unsweetened cocoa powder: A staple for any red velvet recipe. It provides that signature mild chocolate flavor.
- Baking soda: The leavening agent that helps the cookies rise slightly so they are soft, not flat.
- Salt: Balances the sweetness and enhances the cocoa notes.
- Unsalted butter: Needs to be softened to room temperature so it easily creams with the sugars.
- Light brown sugar: Packed tightly. This adds incredible chewiness and moisture to the baked cookies.
- Granulated sugar: Provides the crisp outer edges while sweetening the dough.
- Large egg: Binds everything together and provides richness.
- Milk: Just a tablespoon adds the necessary hydration to keep the dough smooth and tender.
- Vanilla extract: Essential for creating that classic, comforting red velvet flavor profile.
- Red food coloring: Liquid food coloring works perfectly here. Optional: You can use a smaller amount of red gel food coloring for an even more intense hue.
- White chocolate chips: Their creamy, sweet flavor pairs flawlessly with the slight cocoa bite of the cookie dough.
Step-by-Step Instructions
Step 1: Whisk the Dry Ingredients
Start by grabbing a medium mixing bowl. Add your all-purpose flour, unsweetened cocoa powder, baking soda, and salt. Use a whisk to blend everything together thoroughly. Whisking helps break up any stubborn clumps in the cocoa powder, ensuring a smooth dough later on. Set this bowl aside.
Step 2: Cream the Butter and Sugars
In a large mixing bowl (or the bowl of a stand mixer), combine the softened unsalted butter, packed light brown sugar, and granulated sugar. Beat them together on medium speed for about two to three minutes. You want the mixture to look very smooth, creamy, and visibly lighter in texture.
Step 3: Add Wet Ingredients and Color
Once the butter and sugars are perfectly creamed, beat in the large egg, milk, and vanilla extract until fully incorporated. Next, pour in the red food coloring. Blend the mixture on a low speed until the color is completely distributed. The batter should look like a bright, vibrant, and glossy red paste.
Step 4: Combine Wet and Dry Mixtures
Turn your mixer to its lowest setting. Gradually add the dry flour and cocoa mixture into the bright red wet ingredients. Mix just until the dry streaks of flour disappear into the dough. It is very important not to overmix at this stage, as overworking the dough will lead to tough cookies rather than soft, chewy ones.
Step 5: Fold in the Chips and Chill
Switch to a rubber spatula and gently fold in the white chocolate chips, ensuring they are evenly distributed throughout the red dough. Cover the bowl tightly with plastic wrap and place it in the refrigerator. Let the dough chill for a minimum of 1 hour. Chilling allows the flour to hydrate and the butter to firm up, which prevents the cookies from spreading flat in the oven.
Step 6: Bake to Perfection
When you are ready to bake, preheat your oven to 350°F (175°C) and line two baking sheets with parchment paper. Scoop out portions of the chilled dough (about 1.5 tablespoons each) and roll them into balls. Place them on the prepared baking sheets, leaving a couple of inches between each one. Bake for 10 to 12 minutes.
Expert Cooking Tips
- Spoon and level the flour: Never scoop directly from the flour bag with your measuring cup, or you will pack too much flour into the dough. Spoon it lightly into the cup and level it off with a knife.
- Do not skip the chill time: Because this dough uses softened butter and milk, it is quite soft. Chilling it for at least a full hour ensures your cookies bake up thick and chewy instead of thin and crispy.
- Underbake slightly: For the softest texture, pull the baking sheets out of the oven when the edges are set but the centers still look a little gooey and underbaked. They will finish cooking as they sit on the hot pan.
- Press extra chips on top: To make them look like they came from a bakery, reserve a small handful of white chocolate chips. Gently press three or four chips onto the top of each dough ball right before they go into the oven.
- Use gel coloring for a deeper red: If you want a truly striking, intense crimson color without adding extra liquid, swap the 2 teaspoons of liquid coloring for about 1/2 to 1 teaspoon of high-quality red gel food coloring.
Variations to Try
- Cream Cheese Drizzle: Skip the white chocolate chips inside the dough. Once the cookies are baked and cooled, drizzle them generously with a homemade cream cheese glaze.
- Dark Chocolate Red Velvet: Swap the white chocolate chips for dark chocolate chunks for a much richer, more intense chocolate experience.
- Red Velvet Sandwiches: Bake the cookies slightly smaller. Once cooled, pipe a thick layer of vanilla buttercream or cream cheese frosting between two cookies to make decadent whoopie pies.
- Macadamia Nut: Add half a cup of roughly chopped, toasted macadamia nuts along with the white chocolate chips for a delicious, buttery crunch.
What to Serve With Red Velvet White Chocolate Chip Cookies
These rich, sweet cookies deserve a great beverage pairing. Enjoy them alongside:
- A cold, refreshing glass of whole milk.
- A steaming mug of white hot chocolate to match the baking chips.
- Your favorite dark roast coffee or a hot espresso.
- A scoop of vanilla bean ice cream for a festive dessert sundae.
Storage & Reheating
Refrigerator
These cookies do not need to be refrigerated, but you can store them in an airtight container in the fridge if you prefer them cold. They will last up to a week when refrigerated. Let them sit at room temperature for 10 minutes before eating for the best texture.
Freezer
Freezing is highly recommended! Place the baked, fully cooled cookies in a freezer-safe zip-top bag and freeze for up to 3 months. You can also freeze the raw, pre-scooped dough balls; simply bake them straight from frozen, adding an extra 1-2 minutes to the total baking time.
Reheating
To revive that fresh-from-the-oven, gooey texture, place a single baked cookie on a microwave-safe plate and heat it for 8 to 10 seconds. The white chocolate chips will become perfectly melty again.
Frequently Asked Questions
Why did my red velvet cookies turn out brown?
If your cookies look more brown than red, you likely overbaked them. The edges will brown quickly in the oven, masking the red color. Pull them out right at the 10 to 12-minute mark. Also, ensure you use the exact amount of cocoa powder listed; adding too much cocoa will overpower the red dye.
Can I skip the chilling step if I’m in a hurry?
It is not recommended. If you bake this dough immediately after mixing, the warm butter will cause the cookies to spread rapidly in the oven, resulting in very thin, flat cookies that lack that chewy, thick center.
What is the difference between liquid and gel food coloring here?
Liquid coloring is standard and easily accessible, working perfectly for this recipe. Gel food coloring is highly concentrated, meaning you need much less of it to achieve a bold color, and it will not add excess liquid to your dough. Both will yield great results.
Can I use cream cheese chips instead of white chocolate?
Absolutely! If you can find cream cheese-flavored baking chips in your local grocery store, they make an incredible substitute that leans even harder into the traditional red velvet cake flavor profile.
Why is there vinegar in some red velvet recipes but not this one?
Traditional red velvet cake uses buttermilk and vinegar to react with baking soda for a fluffy rise. Because we want a dense, chewy cookie rather than a light, fluffy cake, this recipe omits the heavy acids and relies simply on standard cookie leavening.
Final Thoughts
Baking a batch of these soft and chewy red velvet white chocolate chip cookies is the perfect way to kick off your holiday festivities. They offer everything you want in a seasonal treat: an eye-catching appearance, a nostalgic flavor profile, and an incredibly satisfying, melt-in-your-mouth texture. Plus, they are so simple to throw together that they easily fit into even the busiest baking schedules. Whip up a batch this weekend, and watch how fast they disappear from your kitchen counter!

Red Velvet White Chocolate Chip Cookies
Striking, festive, and incredibly soft! These chewy red velvet cookies are loaded with sweet white chocolate chips and perfectly capture that classic cake flavor.
Ingredients
- 1 1/2 cups All-purpose flour
- 1/4 cup Unsweetened cocoa powder
- 1 tsp Baking soda
- 1/4 tsp Salt
- 1/2 cup Unsalted butter softened to room temperature
- 1/2 cup Light brown sugar packed
- 1/2 cup Granulated sugar
- 1 large Egg room temperature
- 1 tbsp Milk
- 1 tsp Vanilla extract
- 2 tsp Red food coloring liquid, or 1 tsp gel coloring
- 1 cup White chocolate chips
Instructions
- In a medium mixing bowl, whisk together the all-purpose flour, unsweetened cocoa powder, baking soda, and salt until well combined and no cocoa lumps remain. Set aside.
- In a large mixing bowl, use an electric mixer to cream the softened butter, packed brown sugar, and granulated sugar on medium speed until smooth and creamy (about 2 minutes).
- Beat in the egg, milk, vanilla extract, and red food coloring until the mixture is vibrant red and completely uniform.
- Turn the mixer to low speed and gradually add the dry flour mixture to the wet ingredients. Mix just until the dry streaks of flour disappear. Do not overmix.
- Use a rubber spatula to gently fold in the white chocolate chips.
- Cover the bowl tightly with plastic wrap and chill the dough in the refrigerator for at least 1 hour.
- When ready to bake, preheat the oven to 350°F (175°C) and line two baking sheets with parchment paper.
- Scoop the chilled dough into 1.5 tablespoon-sized balls. Place them on the prepared baking sheets, leaving a few inches of space between each one.
- Bake for 10-12 minutes. The cookies will look slightly underbaked and soft in the very center.
- Allow the cookies to cool on the hot baking sheets for 5 minutes before carefully transferring them to a wire rack to cool completely.
Notes
Measuring Flour: Always spoon and level your flour to avoid packing too much into the dough, which causes dry cookies. Chilling is Key: Don't skip the 1-hour chill time. The cold dough is essential for creating thick, chewy cookies that do not spread flat in the oven. Presentation Tip: Press 3 or 4 extra white chocolate chips into the tops of the raw dough balls right before baking for a picture-perfect, bakery-style look. Storage: Store cooled cookies in an airtight container at room temperature for up to 5 days, or freeze for up to 3 months.