Classic Old-Fashioned Spritz Butter Cookies
The Nostalgic Magic of the Holiday Cookie Press
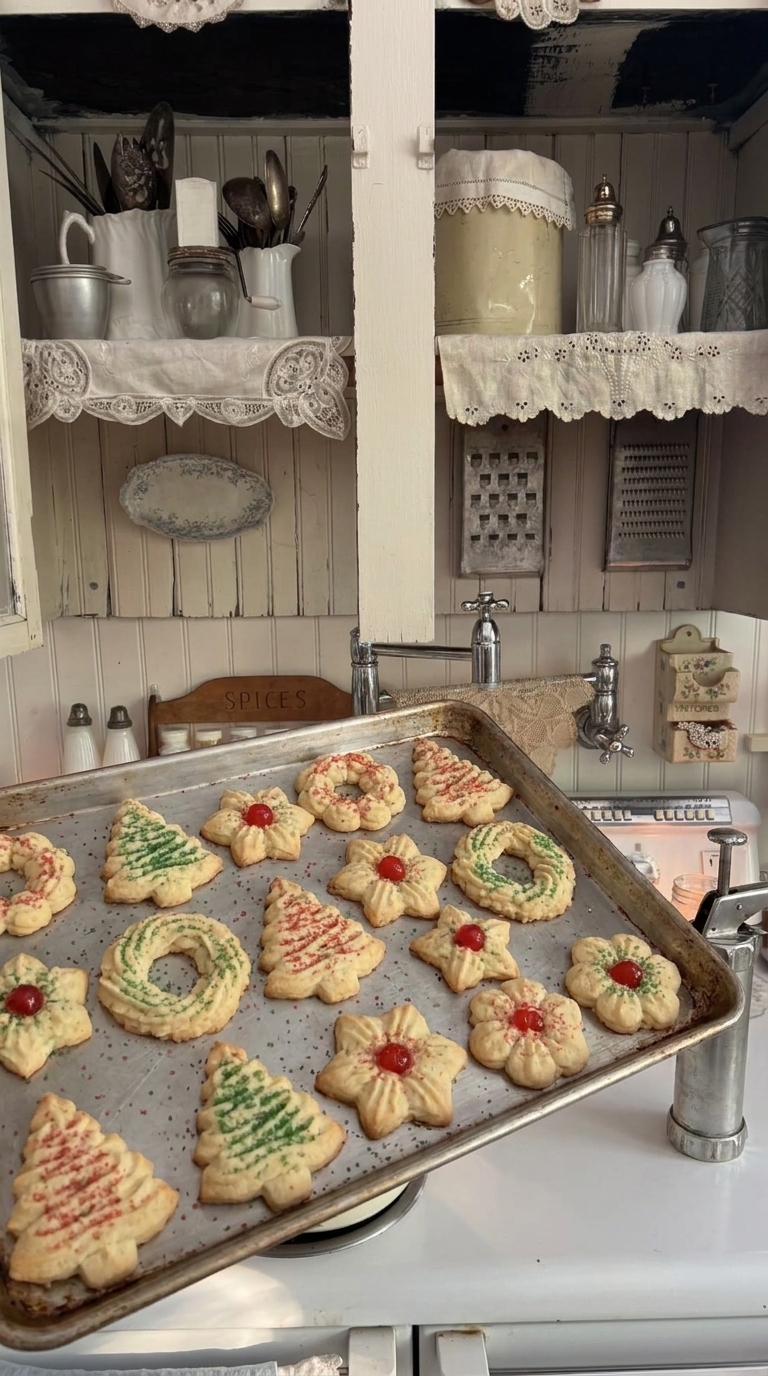
When the holiday season approaches, baking traditions take center stage in the kitchen. Among the towering gingerbread houses and carefully frosted sugar cookies, there is a special kind of magic reserved exclusively for the classic cookie press. Pulling out that trusted metal cylinder and stamping out dozens of delicate little Christmas trees, wreaths, and flowers is a cherished seasonal ritual for so many families.
These old-fashioned spritz cookies deliver everything you could possibly want in a holiday treat. They boast an incredibly rich, buttery flavor profile that simply melts in your mouth. Texturally, they are an absolute masterpiece—perfectly tender and soft in the direct center, with a beautifully delicate, slightly crisp bite around the golden edges. A subtle hint of almond extract elevates the dough, giving it that unmistakable, authentic bakery-style taste that instantly transports you back to childhood cookie trays.
Beyond their incredible flavor, these cookies are remarkably efficient to make. Because the dough is stamped directly onto the pan rather than rolled out and individually cut, you can easily produce a massive batch in a fraction of the time. Whether you are assembling elegant holiday gift tins for your neighbors, participating in a festive cookie exchange, or just want to fill your kitchen with the aroma of warm butter and vanilla, this timeless recipe is guaranteed to be the highlight of your baking season.
Why You’ll Love This Recipe
-
Exceptional Yield: A single batch produces roughly 60 bite-sized cookies, making it the ultimate recipe for feeding a massive holiday crowd or filling up gift tins.
-
No Chilling Required: Unlike cut-out sugar cookies, this dough is designed to be pressed and baked immediately. You do not have to wait hours for the dough to chill in the refrigerator!
-
Beautifully Defined Shapes: The precise ratio of butter to flour ensures these cookies hold their intricate pressed shapes in the hot oven without melting into flat puddles.
-
Pantry-Friendly Ingredients: You only need basic baking staples to pull these together. No unusual or expensive ingredients required.
-
Fun for the Family: Stamping the dough out onto the pans and sprinkling them with vibrant red and green sugar is a wonderful, hands-on activity to share with kids.
Ingredients
-
Unsalted Butter: One cup (two sticks or 226 grams), softened to room temperature. This is the foundation of your cookie. It must be soft enough to pipe through the press easily, but not melted.
-
Granulated Sugar: Three-quarters of a cup (150 grams) provides the perfect amount of sweetness while keeping the edges slightly crisp.
-
Egg: One large egg, brought to room temperature. The egg acts as a binder, holding the buttery dough together so the cookies do not crumble.
-
Vanilla Extract: One full teaspoon of high-quality pure vanilla extract for that classic, warm background flavor.
-
Almond Extract: A half teaspoon is completely optional, but highly recommended! It provides that distinct, nostalgic flavor associated with traditional bakery spritz cookies.
-
All-Purpose Flour: Two and a half cups (313 grams). Measure this carefully using the spoon-and-level method so your dough does not become too stiff for the press.
-
Salt: Just a quarter teaspoon to beautifully balance and enhance the sweetness of the sugar.
-
Decorations: Festive red and green sanding sugar, traditional holiday sprinkles, or even halved candied cherries for finishing the unbaked dough.
Step-by-Step Instructions
Step 1: Prepare the Oven and Pans
Begin by preheating your oven to 350°F (175°C). Grab your heavy-duty, light-colored metal baking sheets. It is absolutely critical that these baking sheets are completely clean, ungreased, and bare. Do not use parchment paper or silicone baking mats. The spritz dough must physically grip the bare metal in order to successfully detach from the cookie press.
Step 2: Cream the Butter and Sugar
In the large bowl of a stand mixer, or using a handheld electric mixer, combine the softened unsalted butter and the granulated sugar. Beat them together on medium-high speed for about two full minutes. The mixture should become noticeably lighter in color, smooth, and incredibly creamy. Do not rush this step, as creaming incorporates necessary air into the dough.
Step 3: Mix the Wet Ingredients
Turn your mixer down to low speed. Add the room-temperature egg, the vanilla extract, and the almond extract (if you are using it). Beat the mixture just until the egg is seamlessly incorporated and the batter looks uniform. Use a rubber spatula to scrape down the sides and bottom of your mixing bowl.
Step 4: Incorporate the Dry Ingredients
In a separate medium bowl, briefly whisk together the all-purpose flour and the salt to ensure the salt is evenly distributed. With your mixer running on the lowest possible speed, gradually add the dry flour mixture into the wet butter mixture. Mix only until a soft, cohesive dough forms and the last streaks of white flour disappear. Overmixing will develop the gluten and result in tough cookies.
Step 5: Load the Cookie Press
Select your favorite festive disc—such as a Christmas tree, a holiday wreath, a star, or a flower—and secure it to the bottom of your cookie press. Carefully scoop the soft cookie dough into the barrel of the press, packing it down gently to remove any large air pockets. Assemble the press according to the manufacturer’s specific instructions.
Step 6: Press the Cookies
Hold the filled cookie press completely upright and flat against the cool, bare metal of your baking sheet. Squeeze the trigger to push the dough out, then lift the press straight up in a swift motion. The dough will grip the ungreased pan and leave behind a perfectly shaped cookie. Repeat this process, leaving about one inch of space between each cookie, as they will puff slightly in the oven.
Step 7: Decorate the Dough
Before the baking sheets go into the oven, lightly sprinkle the raw, shaped cookies with your festive red and green colored sanding sugar, nonpareils, or traditional sprinkles. Gently placing a small candied cherry half in the center of the wreaths or stars is another classic, beautiful option.
Step 8: Bake to Perfection
Place the baking sheet on the center rack of your preheated oven. Bake for 7 to 9 minutes. Keep a very close eye on them during the final minute! Spritz cookies are delicate; they are done when the centers are set and the very bottom edges are just barely beginning to turn a pale golden color. Avoid overbaking, or they will dry out.
Step 9: Cool and Serve
Remove the baking sheet from the oven. Allow the delicate cookies to rest directly on the hot metal pan for exactly two minutes. This brief resting period helps them firm up enough to be moved. After two minutes, use a thin metal spatula to carefully transfer them to a wire cooling rack to cool completely before storing.
Expert Cooking Tips
-
Butter temperature is everything: Your butter must be softened to room temperature, meaning it yields slightly when pressed with a finger. If it is too cold, the dough will be impossible to squeeze through the press. If it is melted or greasy, the cookies will spread into puddles in the oven.
-
Use bare, cool metal pans: Spritz dough relies on adhering to the baking sheet to pull away from the press mechanism. Parchment paper and non-stick sprays prevent this grip. Furthermore, never press dough onto a warm baking sheet! If reusing a pan for a second batch, run it under cold water and dry it completely first.
-
Measure flour correctly: Packing flour into your measuring cup will result in a dry, crumbly dough that will absolutely break your cookie press. Always spoon the flour into the cup and level it off with the flat edge of a knife.
-
Do not chill the dough: Unlike most holiday cookies, this dough is meant to be utilized immediately while the butter is soft. Chilling it will make it too hard to push through the intricate metal discs.
-
Fixing mistakes is easy: If a cookie comes out of the press looking mangled or missing a petal, simply scrape the raw dough off the pan, toss it right back into your mixing bowl, and press it again!
Variations to Try
-
Chocolate Spritz: Swap out a quarter cup of the all-purpose flour and replace it with a quarter cup of high-quality unsweetened cocoa powder for a rich, fudgy alternative.
-
Citrus Zest: Add one tablespoon of freshly grated orange or lemon zest to the butter and sugar during the creaming stage for a bright, vibrant background flavor.
-
Chocolate Dipped: Bake the cookies plain without sprinkles. Once completely cool, dip half of each cookie into melted dark chocolate or white chocolate, then add your festive sprinkles to the wet chocolate.
What to Serve With Old-Fashioned Spritz Cookies
These dainty, buttery cookies are the ultimate addition to any dessert grazing board. Serve them arranged beautifully on a vintage holiday tray alongside rich chocolate fudge, peppermint bark, and classic snickerdoodles. Because they are lightly sweet and subtly flavored, they pair spectacularly with a strong, hot cup of black tea, a steaming mug of spiced apple cider, or a rich mug of hot chocolate.
Storage & Reheating
Room Temperature
Once the cookies are completely cooled to room temperature, pack them carefully into an airtight container or a holiday cookie tin. Because they are a dry, butter-based cookie, they will stay perfectly fresh and crisp on the counter for up to 1 full week.
Freezer
Spritz cookies freeze incredibly well! Place the fully baked and cooled cookies in a heavy-duty, freezer-safe container. To protect the delicate shapes and the sugar decorations, separate each layer of cookies with a sheet of wax paper or parchment paper. They will keep in the freezer for up to 2 months. Thaw them at room temperature for an hour before eating.
Make Ahead Dough
If you want to split up the work, you can prepare the dough in advance. Store the freshly mixed dough in an airtight container in the refrigerator for up to 2 days. When you are ready to bake, you must let the dough sit out at room temperature until it becomes completely soft and pressable again before loading your cookie press.
Frequently Asked Questions
Why won’t my spritz cookie dough stick to the baking sheet?
The most common culprit is a baking sheet that is either too warm, greased with butter or spray, or lined with parchment paper or a silicone mat. You must press the dough onto a perfectly clean, cool, ungreased, bare metal sheet for it to stick properly.
Why is my dough too stiff for the cookie press?
Stiff dough is usually caused by butter that was entirely too cold when mixed, or by accidentally adding too much flour. If your dough has been refrigerated, let it sit on the counter to soften. Always measure your flour using the spoon-and-level technique to prevent packing.
Why are my spritz cookies spreading in the oven?
If your cookies are losing their sharp, defined shapes in the oven, your butter was likely entirely too warm or melted when you creamed the sugar, or you pressed the dough onto a hot baking sheet. Ensure your butter is only slightly softened and your pans are cool to the touch.
Can I make these without a cookie press?
While a cookie press is required to create the iconic, intricate shapes (like trees and tight wreaths), you can still bake this recipe without one! Simply scoop the soft dough into a sturdy canvas piping bag fitted with a very large open star tip, and pipe small rosettes directly onto the ungreased baking sheets.
Can I use salted butter instead of unsalted?
Yes, absolutely. If you only have salted butter on hand, you can use the exact same measurement (one cup). However, be sure to completely omit the additional 1/4 teaspoon of salt called for in the dry ingredients so the cookies do not become overly salty.
Final Thoughts
There is a profound sense of comfort in revisiting the recipes that defined our childhood holidays. The satisfying click of the cookie press and the sight of a metal pan filling up with perfect little buttery shapes is a tradition entirely worth preserving. These old-fashioned spritz butter cookies deliver a bakery-worthy texture and a flavor that is simply timeless. Gather your favorite colored sugars, warm up your oven, and enjoy filling your home with the sweetest memories of the season!
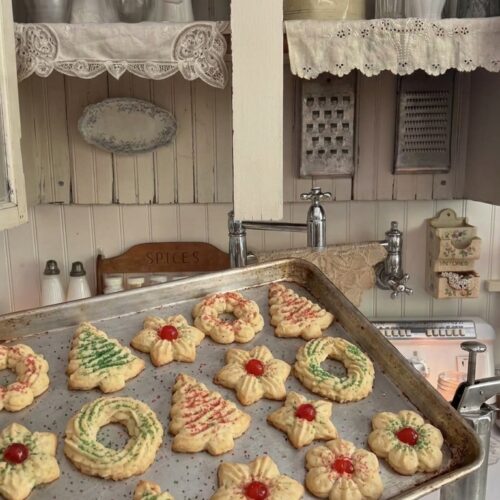
Classic Old-Fashioned Spritz Butter Cookies
The ultimate nostalgic holiday treat! These classic spritz butter cookies are incredibly rich, tender in the center, and feature slightly crisp, golden edges. Perfect for Christmas cookie tins!
Ingredients
- 1 cup 226 g Unsalted butter, softened
- 3/4 cup 150 g Granulated sugar
- 1 large Egg room temperature
- 1 tsp Vanilla extract
- 1/2 tsp Almond extract optional, but recommended
- 2 1/2 cups 313 g All-purpose flour
- 1/4 tsp Salt
- Red and green colored sugar for decorating
- Christmas sprinkles optional
Instructions
- Preheat your oven to 350°F (175°C). Ensure you have clean, bare, ungreased metal baking sheets ready. Do not use parchment paper.
- In a large mixing bowl, beat the softened butter and granulated sugar together on medium-high speed for about 2 minutes until light, smooth, and creamy.
- Add the room-temperature egg, vanilla extract, and almond extract (if using). Beat on low speed just until seamlessly combined.
- In a separate bowl, whisk together the all-purpose flour and the salt.
- Gradually add the dry flour mixture to the wet butter mixture, mixing on low speed strictly until a soft dough forms. Do not overmix.
- Fit your cookie press with your desired decorative disc (such as a tree, wreath, or star). Fill the barrel with dough according to the manufacturer's instructions.
- Hold the press completely flat against the cool, bare metal baking sheet. Press the dough out, leaving about 1 inch of space between each cookie.
- Lightly sprinkle the unbaked dough with red or green colored sugar and festive sprinkles.
- Bake on the center rack for 7-9 minutes, just until the cookies are set and the bottom edges begin to turn a very pale golden color.
- Let the baked cookies rest on the hot pan for exactly 2 minutes before using a thin spatula to carefully transfer them to a wire rack to cool completely.
Notes
Do not chill the dough before using the press, or it will be too stiff to pipe.
The baking sheets MUST be cool and bare. If reusing a pan for a second batch, rinse it in cold water and dry it completely first.
If a cookie comes out messy, simply scrape the raw dough off the pan, throw it back in the bowl, and press it again.